
Verify remote candidates before they join your team
Screen remote hires for fake identities, criminal records, and deepfakes.
Making your workspace safe is a responsibility worth prioritizing, especially when it comes to operations performed digitally. Remote roles can be granted access to critical information and infrastructure of the company, making the question of trust and security real, not just hypothetical. The hiring verification flow keeps the process fast for legitimate candidates while closing the door on:
- Fake or synthetic identities used to pass as a real candidate
- Individuals flagged on sanctions, criminal, or watchlist databases and other high-risk parties, applying for remote roles
- Forged or manipulated identity documents
The Sumsub's Workforce verification solution addresses trust needs through its integrated suite of tools:
- Identity Verification. Confirm the person's identity by checking their documents and biometric data.
- Background check powered by AML Screening. Make sure that the candidate is not flagged on sanctions, criminal, or watchlist databases.
- Workflow Builder. Combine the verification products and review capabilities in a code-free flow.
Configure hiring flow
Set up a verification flow to catch unreliable candidates before extending an offer.
Step 1. Create verification levels
To verify remote candidates, you will need to add two separate verification levels with dedicated checks:
- Identity verification level for performing the initial check that confirms the candidate and their documents are real and authentic.
- AML Screening level (background check) for screening approved hires against sanctions, criminal, and watchlist databases, including government officials and close associates.
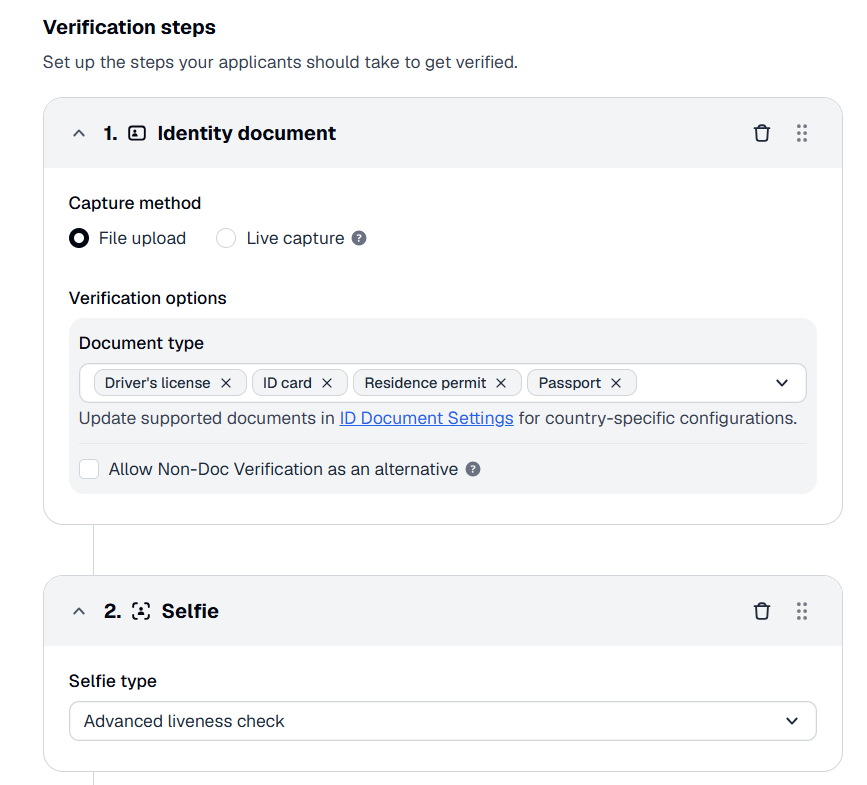
Set up the identity verification level:
- Create the verification level that includes both the Identity document and Selfie verification steps.
- In the Identity document step, set any suitable document types.
- In the Selfie step, select the Advanced liveness check option.
- Configure the rest of the level settings as required.
Set up the AML Screening verification level:
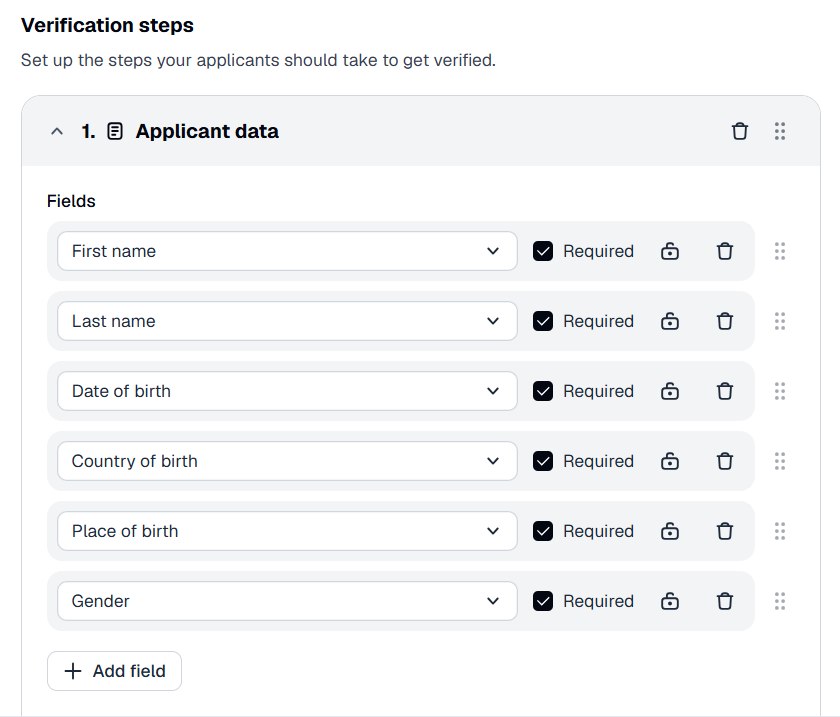
- Create another verification level with the Applicant data, Identity document, and Selfie verification steps.
- In the Applicant data step, add fields to conduct a search for the candidate against sanctions lists. For example, their full name along with the date and country of birth.
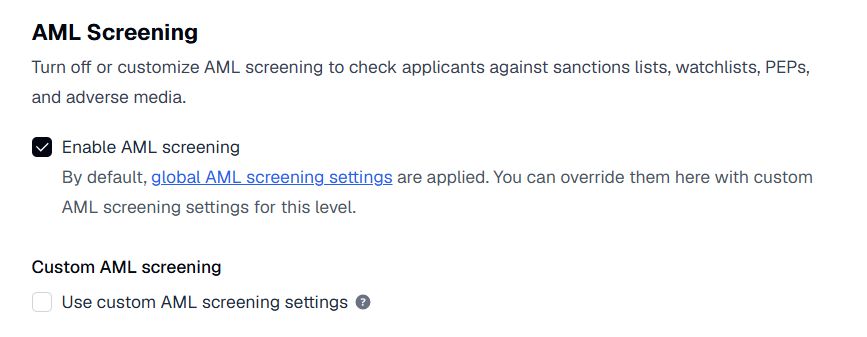
- Configure AML Screening for this level:
- In the verification level, go to the Configurations tab.
- Navigate to AML Screening.
- Check the Enable AML screening box to turn on the check. The general AML Screening settings in Global settings will be applied.
- Check the Custom AML screening box to override the general settings for this verification level and adjust configuration below as required.
NoteTo save and synchronize verification progress, the AML verification level must include the Identity document and Selfie steps as well. Applicants who have already completed these steps will only be asked to complete the new Applicant data step for AML screening.
Step 2. Add initial node to verify candidates
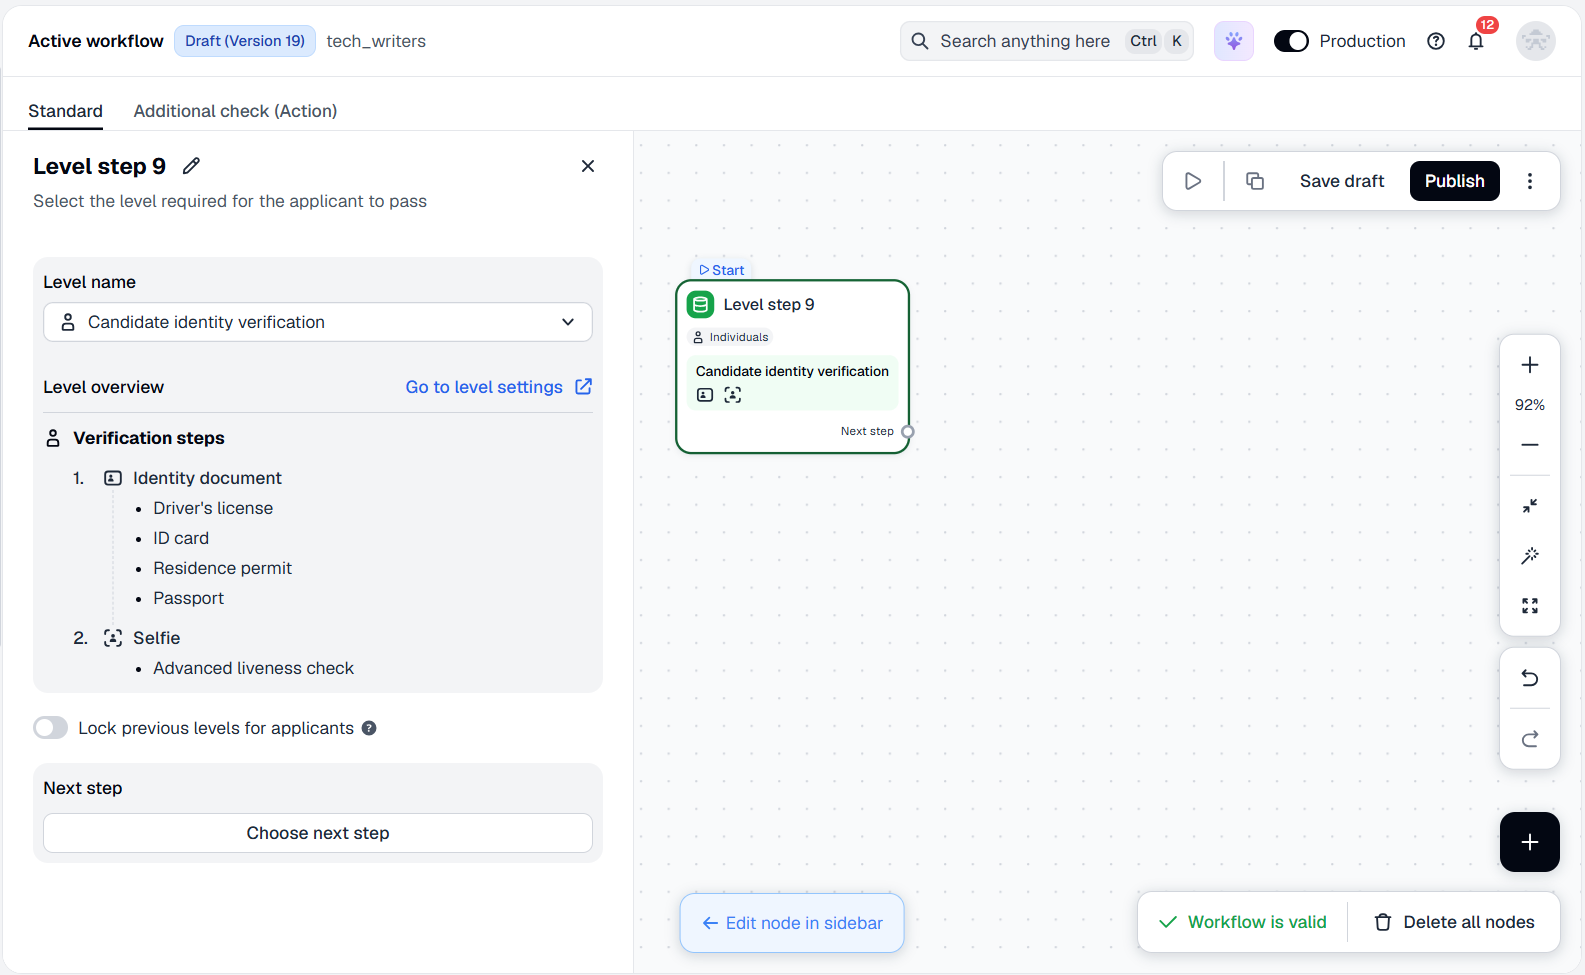
Go to Workflow Builder to place the level node, which launches the verification flow. To add the Level step node:
- In the Dashboard, go to Workflow builder and select Active workflow.
- Navigate to the Standard tab and go to the Draft view.
- Add a Level step to the canvas and attach the initial verification level by selecting it from the list.
Step 3. Set up rejection sequence for unreliable hires
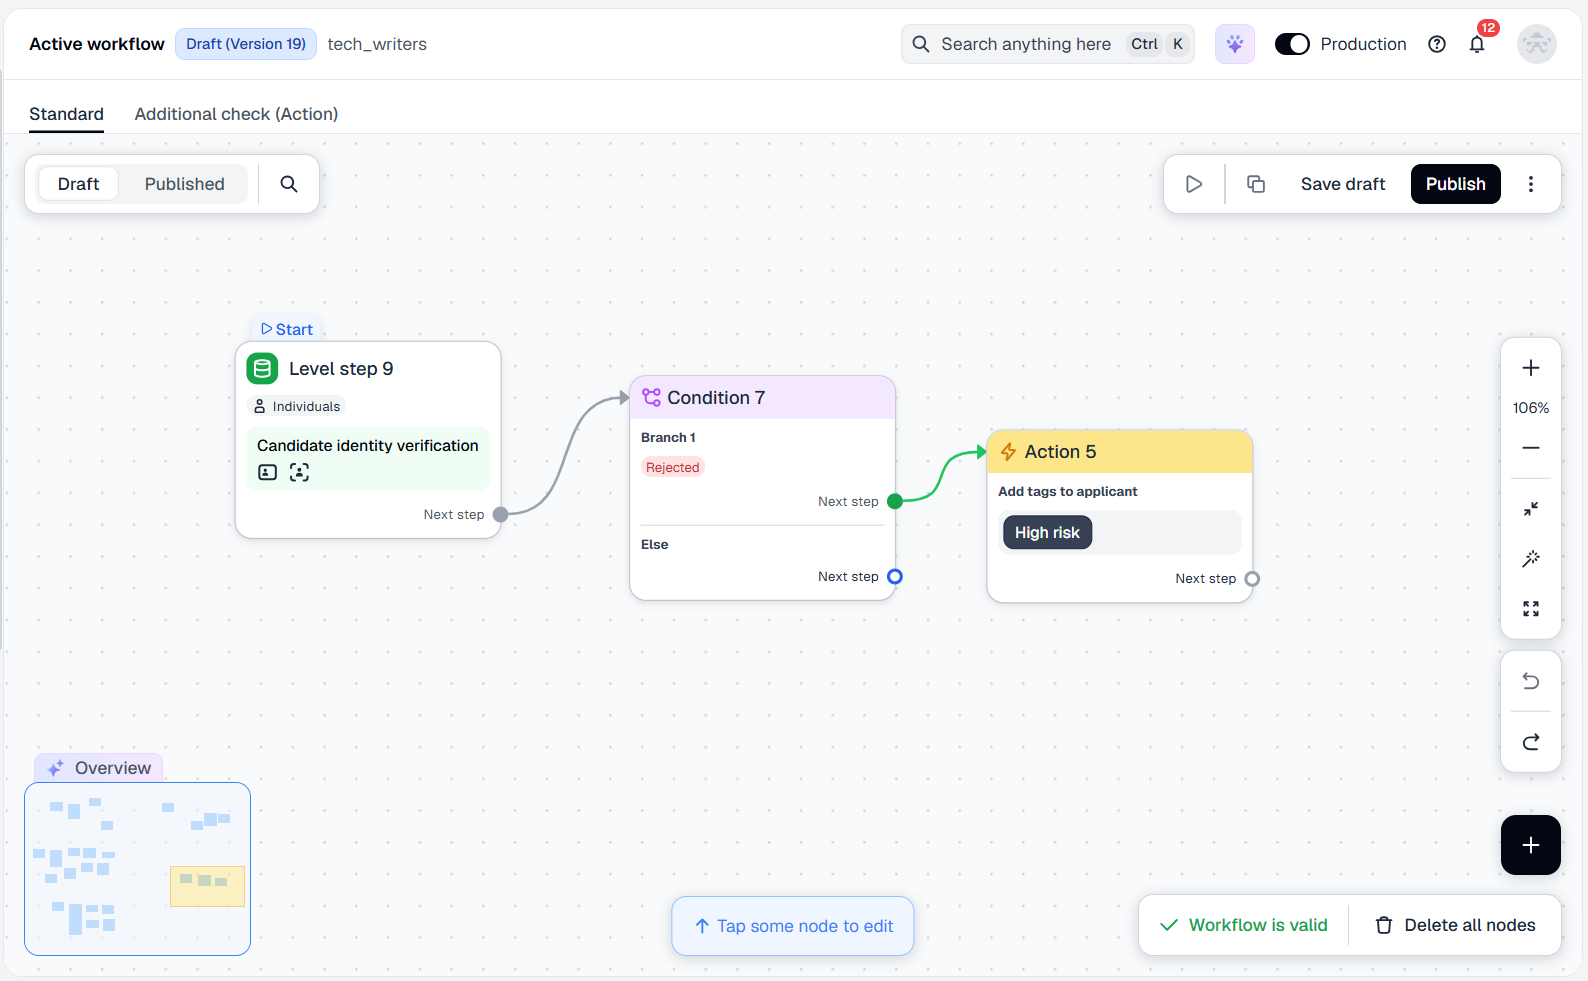
Configure the flow so applicants with fake identity and documents are rejected and assigned the corresponding tags. Set up the Condition and Action nodes:
- Click on the initial node created earlier and select Condition as the next step.
- Within the branch, select the Review decision option: rejected.
- Click Choose next step and select Action.
- Select the type of action: Manage tags.
- Select the Add tags checkbox.
- From the drop-down list below, choose the required tags to assign.
Step 4. Assign approved candidates to AML check
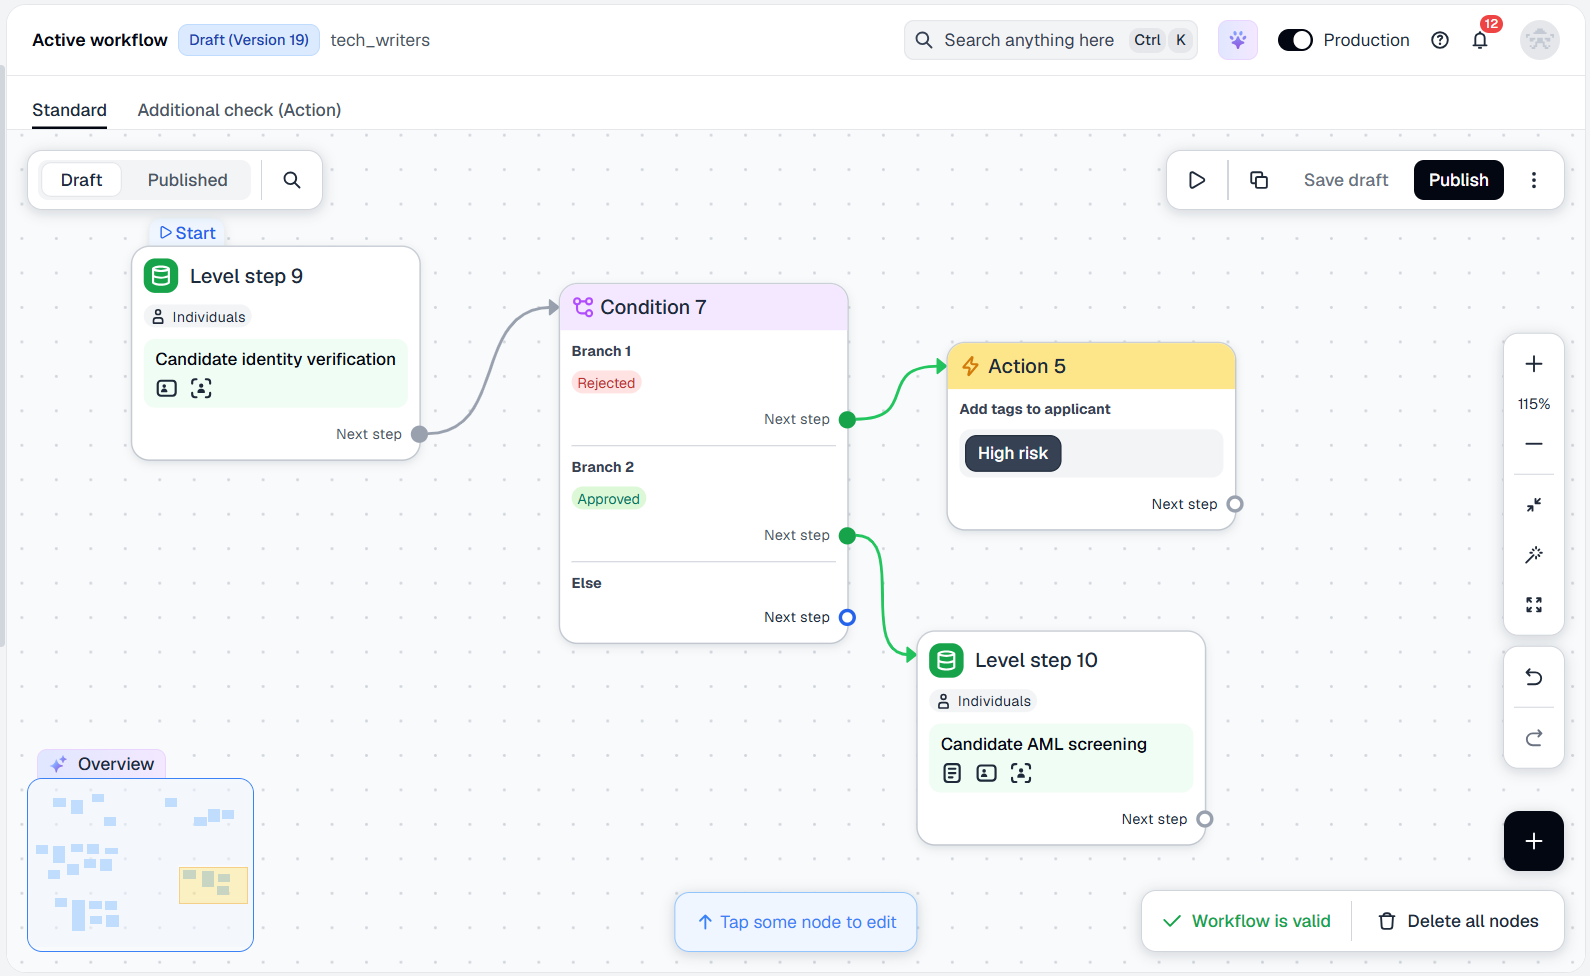
Add nodes to route approved applicants to an AML check. Configure the conditions and place the AML Screening verification level:
- Go back to the added Condition node and click Add new branch.
- Within the branch, select the Review decision option: approved.
- Click Choose next step and add a Level step node.
- Within the added Level step node, select the AML Screening verification level.
Step 5. Escalate corner cases to manual review
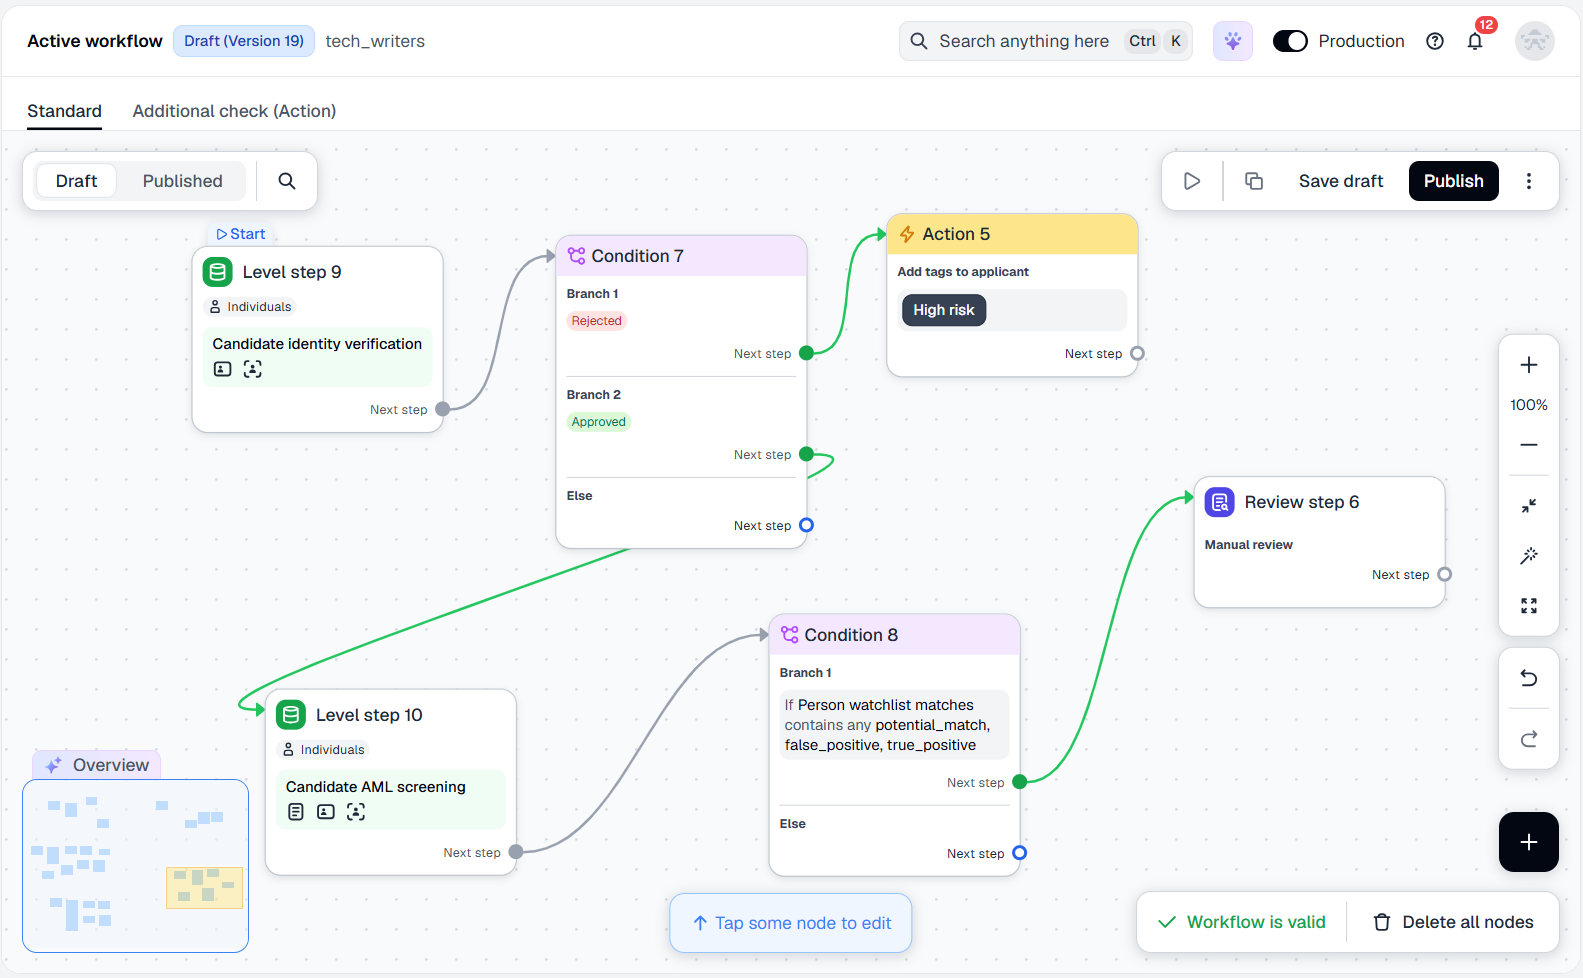
Send applicants to manual review if they get the unsatisfactory AML check results. Configure the manual review path:
- Within the Level step node with the AML Screening verification level, select Condition as the next step.
- Select the If logical operator.
- From the Field drop-down list, select the
checks.personWatchlist.matchStatusesparameter. - Set the logical condition to contains any and specify the required match statuses in Value. For example,
potential_match,false_positive, andtrue_positive. - Add the next step within the current condition branch: Review step.
- Adjust the Review step settings: set the type to Manual review.
Step 6. Start using flow
Once the flow is created and configured, you can save the draft, perform test verification, and publish the flow to run the checks:
- Save the draft and experiment with your flow — create copies and conduct tests.
- Publish the flow to go live once the flow configuration is tested.
Step 7. Receive verification results
Get verification results via the webhooks or view them in applicant profiles.
With this flow, reliable candidates go through smoothly, while unreliable hires get a closer look or a rejection. If you need more employee or candidate verification solutions to explore and implement in your verification journey, contact our team for a thorough discussion.
Updated 20 days ago