Enable PoA through Geolocation
Configure PoA through Geolocation for quicker verification.
To enable PoA through Geolocation:
- In the Dashboard, open Applicant Levels and go to Individuals.
- Select an existing verification level that contains the Proof of Address step or create a new one.
- In the level settings, navigate to the Steps tab and scroll down to Verification steps.
- Click Add new step and select Proof of address.
- Choose a proof of address preset.
- Select the Activate geolocation for automatic device tracking via GPS checkbox.
- Set up the fields that your applicants will manually fill out during verification.
Configure PoA through Geolocation without documents
PoA through Geolocation has an alternative option with more strict configurations that allow applicants to pass address verification only by sharing their location.
You can use the results received during this check to build a multifaceted verification flow that covers each individual case. For example, you may set more strict requirements for the applicants who do not share their location, and establish different steps for other applicants, depending on their country.
Use cases
You may need to implement PoA through Geolocation without documents in your verification in the following cases:
- You do not want to allow applicants from certain countries to upload PoA documents altogether, while applicants from other countries will be required to upload specific PoA documents.
- You request different types of PoA documents (including their accessibility), depending on the applicant country.
How PoA through Geolocation without documents works
The following steps describe the verification process where proof of address is provided only by sharing geolocation:
- On the Geo as PoA step, the applicant is suggested to share their location.
- If there are no suspicious indicators detected (for example, using a VPN), we recognize the applicant's address. They correct it if the accuracy is insufficient and receive an approval or rejection message.
- If the applicant is unable to share their location, use a VPN, or we notice other suspicious activity related to their IP address, the I can’t share my location button becomes available after the second attempt to share their address information.
- After skipping the step, there are two possible options for the development:
- The applicant moves to the next verification step.
- The verification is completed, and we begin processing their results.
- Applicants who have not provided their geolocation within the PoA step receive the Resubmission request status accompanied by the GPS as POA skipped reason.
NoteThe Geo as PoA step is available only in the WebSDK 2.0.
Set up PoA through Geolocation without documents via Workflow Builder
ImportantAll verification processes that include geoposition-based PoA steps without documents must be configured via Workflow Builder because, in case of skipping the step, the Resubmission request status remains, and verification cannot be completed. To avoid such cases, the applicant must be assigned alternative verification steps that will determine their final status.
Step 1. Adjust proof of address verification settings
Enable the geoposition-based address confirmation in the verification level settings.
The following configuration does not allow applicants to upload documents within the PoA step; they can only share their geolocation:
- In the Dashboard, open Applicant Levels and go to Individuals.
- Select an existing level that contains the Proof of Address step or create a new one.
- In the level settings, navigate to the Steps tab and scroll down to Verification steps.
- Click Add new step and select Proof of address.
- Choose a proof of address preset.
- Select the Activate geolocation for automatic device tracking via GPS checkbox.
- Select the Don’t allow document upload as an alternative to geolocation information checkbox.
- Set up the fields that your applicants will manually fill out during verification.
Step 2. Go to Workflow Builder and add Level step node
Start building a verification flow by adding the initial node to the Workflow Builder canvas:
- In the Dashboard, go to Workflow builder and add a level step to the canvas.
- From the Level name drop-down list, select the configured verification level.
Step 3. Set up flow development
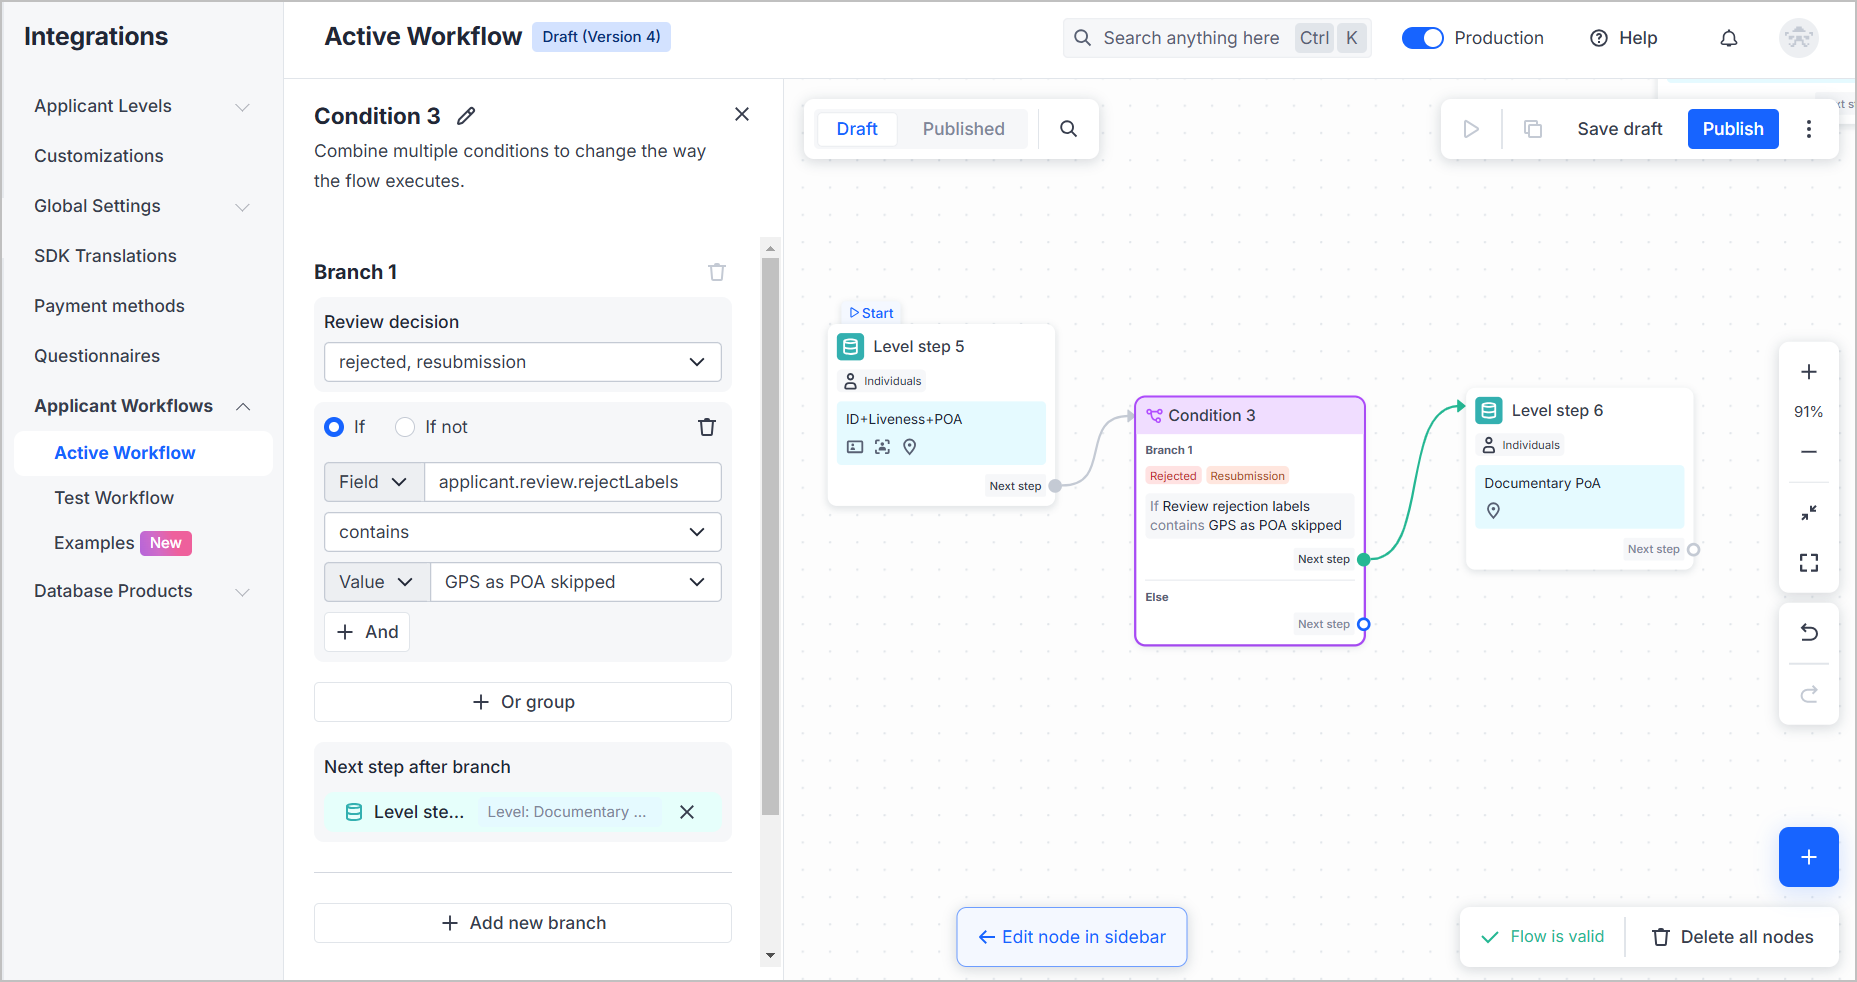
Add a Condition node that considers the results of the check and assigns different verification steps in each case.
For example, you need a verification flow that forces applicants who skip the Geo as PoA step to pass a more strict address verification by providing specific proof of address documents:
- Click on the initial node created earlier and in the Next step section, select Choose next step -> Condition.
- Configure the condition branch:
- From the Review decision drop-down list, select rejected and resubmission.
- Select the
Iflogical operator. - From the Field drop-down list, select the
applicant.review.rejectLabelsparameter. - Set the contains logical condition.
- From the Value list, select the GPS as PoA skipped risk label.
- Within the created condition branch, click Choose next step and select another verification level that requires uploading proof of address documents.
Step 4. Start using the flow
Once the flow is created and configured, you can save the draft, perform test verification, and publish the flow to run the checks:
- Save the draft and experiment with your flow — create copies and conduct tests.
- Publish the flow to go live once the flow configuration is tested.
Step 5. Receive verification results
Get verification results via the webhooks or using applicant profiles.