Transaction Monitoring Quick Start Guide
Get started with Sumsub Transaction Monitoring to ensure effective fraud prevention and secure financial activity.
Transaction Monitoring is a compliance tool designed to help businesses detect and prevent fraudulent activity during transactions while ensuring compliance with AML regulations. Integrating Transaction Monitoring into current workflows and customizing monitoring rules may require navigating a range of technical, regulatory, and operational factors.
This Quick Start Guide helps you smoothly incorporate the Sumsub Transaction Monitoring into your workflow. It outlines the step-by-step process for setting up a testing environment, configuring rules, and conducting transactions.
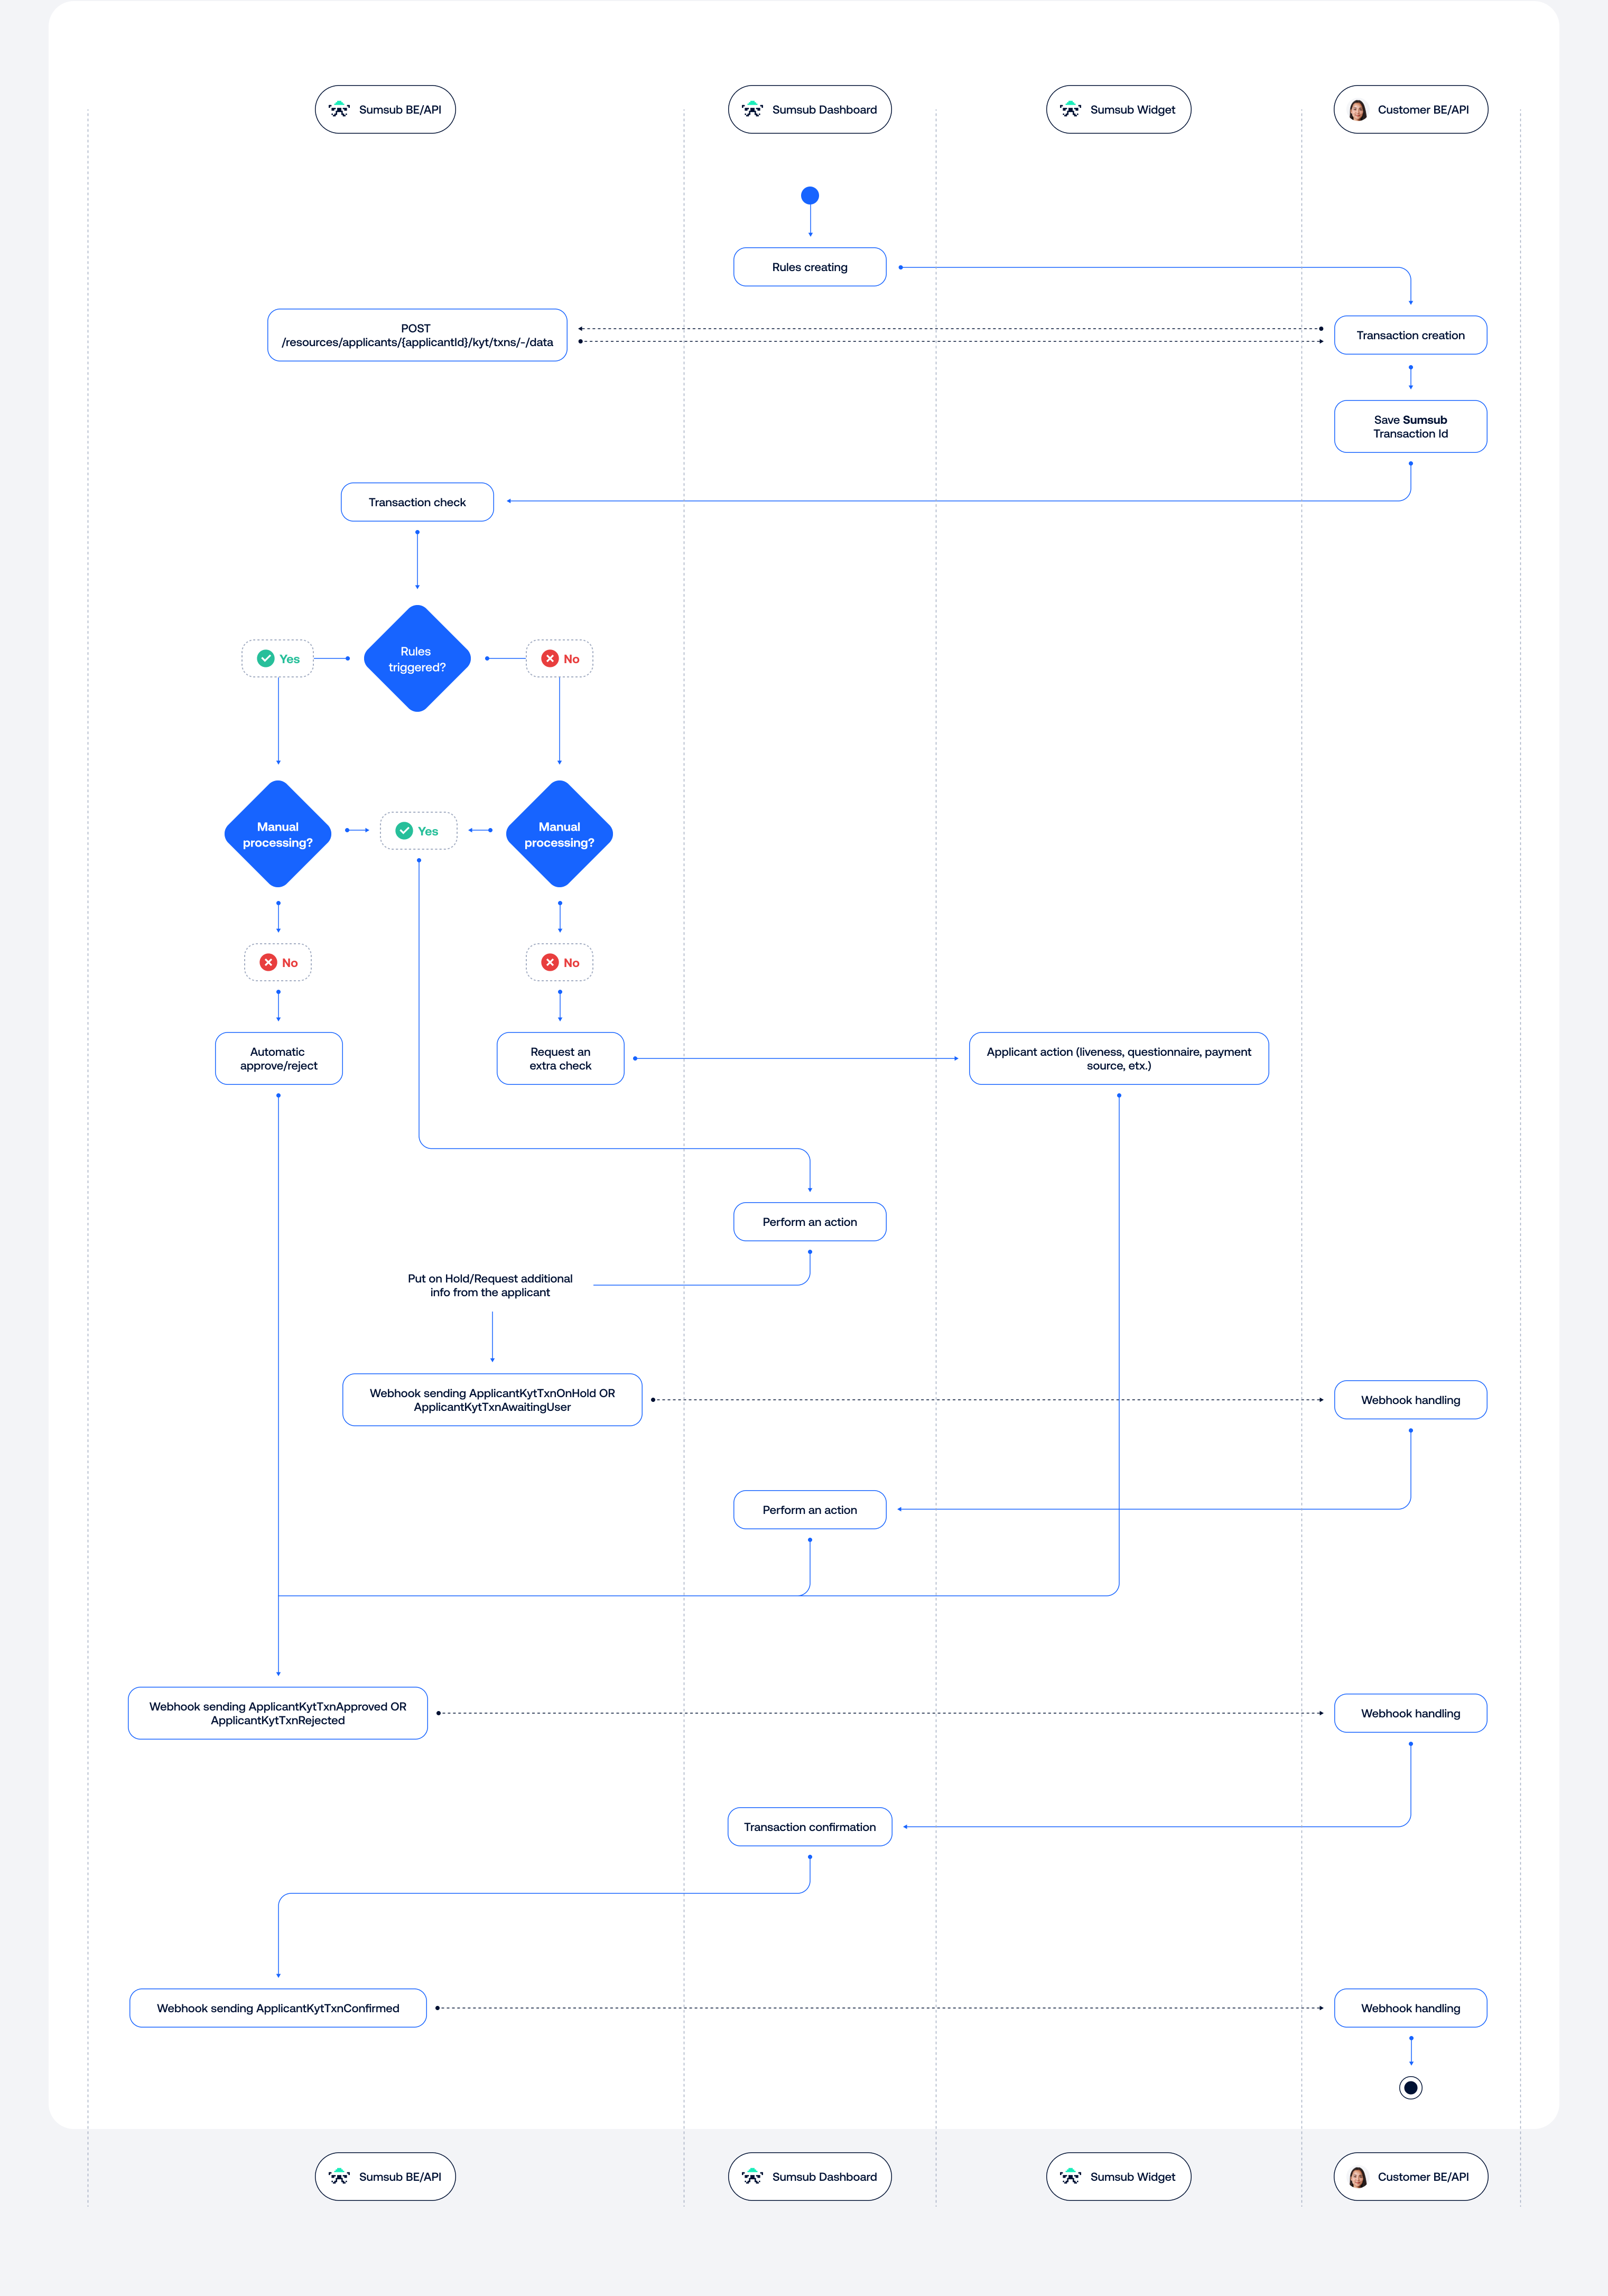
Transaction Monitoring integration flow
The following diagram provides a visual representation of the default integration flow.
Step 1: Enable Transaction Monitoring
To start using the Sumsub Transaction Monitoring solution, you need to request access to Sandbox and/or Production via your account manager. After that, you must:
- Create an app token to sign your API calls.
- Configure team access by setting permissions and roles for your team members.
Sandbox mode (pre-live testing)
You can use the Sumsub Sandbox environment to explore Transaction Monitoring before going live.
Switch to Sandbox mode to safely:
- Import and simulate dummy transaction data.
- Build and test rule logic using pre-scoring and monitoring rules. If needed, you will be able to use the same setup on the production.
- Experiment with webhooks.
- Validate custom rule triggers.
- Generate app tokens. When doing it in the Sandbox mode, use prefix
sbx:.
NoteFor more information on how to test Transaction Monitoring in Sandbox mode, refer to this article.
You can switch between Sandbox and Production mode directly from the Dashboard using the toggle located in the upper-right corner.
Once you are ready, switch to Production mode to process real transaction data.
Step 2: Configure rules
Install pre-scoring rule bundles from the Rules Library first. They are required for many monitoring rules to function correctly.
Recommended bundles include:
In addition, you can create custom rules tailored to your business needs:
- Start with custom rules in Test mode, which allows you to evaluate the impact of rules on your transactions without altering the transaction status or risk score.
- Then you can activate them in the Dashboard.
Step 3: Submit transactions via API
To proceed with transactions, use the correct app token created in Step 1. Then use this API method to submit transactions.
Request example:
curl -X POST \
  'https://api.sumsub.com/resources/applicants/67a0ec0b9aa0951851d627ef/kyt/txns/-/data' \
  -H 'Content-Type: application/x-ndjson' \
  -d $'{
	"txnId": "b4xdq4qjh5qpo06r8cpunc",
	"type": "travelRule",
	"applicant": {
	  "type": "individual",
	  "nameType": "birthName",
	  "dob": "1992-05-08",
	  "placeOfBirth": "Paris, France",
	  "address": {
		"country": "FRA",
		"town": "Paris",
		"postCode": "75001",
		"street": "Rue de Rivoli",
		"subStreet": "1"
	  },
	  "idDoc": {
		"number": "1234567",
		"country": "FRA",
		"idDocType": "PASSPORT",
		"registrationAuthority": "Ille-de-France 01"
	  },
	  "residenceCountry": "FRA",
	  "paymentMethod": {
		"type": "account",
		"accountId": "1A1zP1eP5QGefi2DMPTfTL5SLmv7DivfNa"
	  },
	  "institutionInfo": {},
	  "firstName": "",
	  "lastName": ""
	},
	"counterparty": {
	  "externalUserId": "rwopmrnkuaob6d9ettn8",
	  "firstName": "Jack",
	  "lastName": "Posek",
	  "nameType": "birthName",
	  "type": "individual",
	  "dob": "1991-04-07",
	  "placeOfBirth": "Berlin, Germany",
	  "address": {
		"country": "DEU",
		"town": "Berlin",
		"postCode": "10115",
		"street": "Chauseestr.",
		"subStreet": "60"
	  },
	  "idDoc": {
		"number": "65434543",
		"country": "DEU",
		"idDocType": "PASSPORT",
		"registrationAuthority": "BerlinMitte"
	  },
	  "residenceCountry": "DEU",
	  "paymentMethod": {
		"type": "",
		"accountId": "bcаfdhgj86pxvf5nk45353xecdrw6nrx3zzy9xl7q",
		"memo": "3213"
	  },
	  "institutionInfo": {
		"internalId": "645a5a60294c3b043c84594f"
	  }
	},
	"info": {
	  "direction": "out",
	  "amount": 0.01,
	  "currencyCode": "BTC",
	  "type": ""
	},
	"props": {
	  "customProperty": "Custom value that can be used in rules"
	},
	"txnDate": "2025-01-30 11:41:55+0000"
  }'
Review what data you are capturing internally. Ensure alignment on the fields you will send via API and match them against Sumsub expected fields listed here.
Capture Device Intelligence data
To detect fraud better, capture Device Intelligence data using this API method.
This step is optional, however, enabling Device Intelligence allows you to uncover risky patterns and filter out suspicious behavior early in the process.
Step 4: Integrate webhooks
Configure your system to receive webhooks. They indicate the status of the transaction after checking it against the installed rules. You might receive one of the following webhooks:
NoteTo receive webhooks to your backend, you have to configure it in the Dashboard. For more instructions, see this article.
Manual review
Optionally, you can review transactions in the Dashboard by navigating to Case management, where you can:
- Investigate flagged transactions
- Override automated results
- View audit trails & risk scores
Useful resources
See the following articles to learn more about the Transaction Monitoring solution:
Updated about 2 months ago