Get started with Business Verification
Verify businesses efficiently.
To get started with business verification:
- Set up a business verification level.
- Create an applicant for company verification using one of the following methods:
- Use Verification links (no integration required).
- Set up the WebSDK integration.
- Use the Sumsub REST API integration.
- Create a new applicant profile manually via the Dashboard.
- Perform the following checks:
Note
- During KYB checks, all languages are supported. Country availability depends on the selected Corporate Registry Sources pack at the contract stage. If you need to make changes, please contact your Customer Success Manager. For more details, refer to this article.
- Support for Business Verification is not available in the MobileSDK.
Set up business verification level
A business verification level regulates the process of collecting information about your applicants. A business verification level structure is similar to the individual verification level structure, with some exceptions specifically related to verifying organizations.
In the Dashboard, go to the Companies page and select Create level to configure a new level for business verification.
NoteThe ID document settings tab is not used when configuring a business verification level.
Step 1. Set up general settings
On the Steps tab, you can configure general level settings, as well as add and customize all the steps required for your particular business verification scenario.
To configure settings in the General section:
- In the Level name field, provide a name for the level. Mind that once you save the level, you will not be able to change its name.
- [Optionally] Click Add description to enter additional information for level identification.
- Select the Enable WebSDK 2.0 for this level toggle if you want to utilize all the capabilities of our latest UI. WebSDK 2.0 is the default for all new clients. For more information on WebSDK 2.0, see this article.
- From the KYB Type drop-down list, choose one of the following level types:
- Full KYB — verifies the company registry, performs AML screenings, and includes manual review of applicants and submitted documents.
- Registry and AML Check — inspects the company registry and performs AML screenings. The applicant is declined if registry data is missing, the company has an inactive status, or AML matches are found.
- AML Check — performs AML screenings only. The applicant is declined if AML matches are found.
- [Not available for AML Check KYB type] In the Company search & pre-fill section, use a toggle to enable a company search and data pre-fill from corporate registry databases. When enabled, you can select pre-filled fields in the Company Data and Associated parties steps. Switch the toggle off if your regulations restrict data exposure.
- From the SDK translations drop-down list, select the preferred SDK translation if you have previously created a custom one. If not, you can always choose the Default translation. To modify a translation, click Edit. To learn more about configuring SDK translations, refer to this article.
- In the Customization section, select a visual customization from the WebSDK drop-down list. To modify the customization, click Edit. For more information about customizing the appearance of your SDK, see this article.
Step 2. Configure verification steps
The business verification steps may include the following: Company Data, Associated parties, Company documents, Questionnaire , Email verification, and Phone verification.
To add a new step to your verification flow, click Add new step and select a step from the pop-up menu:
- Set up the Company Data step by defining the company data to be collected and verified. This information is pre-populated from Government Corporate registries if the Pre-fill from data source checkbox is selected; otherwise, it can be entered manually by applicants. By default, three fields are already included in this step: Country, Company name, and Registration number.
- In the Select field drop-down list, choose all necessary fields that should be collected as company data.
- Click Add field to create a new field, and set the Required checkbox to make it mandatory if needed.
- In the Company documents step, identify which documents should be provided for business verification.
- Click Add group to add one or more document groups for confirming various legal details about the company, such as Legal presence, Company details, Ownership structure, or Representatives authorization. You can add as many groups as you need. Additionally, select the Other 1, Other 2, and Other 3 document groups if you have more aspects to verify. Group names can be edited on the Default translation page.
- Within the added group, use the drop-down list to select the documents to be provided. Applicants will be able to upload one document from the selected options.
- Set the Required checkbox to make the group mandatory if needed.
- Configure Associated parties to get information on the associated individuals and companies:
- Click Add beneficiary to add a beneficiary type. By default, when you add this step, the system creates the UBOs beneficiary type, but you can remove it using the trash bin icon and add the required types. The following roles are available to add:
- Associated party roles verified by Sumsub (Expert-assisted KYB): UBOs, Shareholders, Representatives, Directors, Secretaries, Founders, Legal advisors, Authorized signatories, Trustees, Beneficiaries, Settlors, and Protectors.
- Associated party roles for internal use (not verified by Sumsub): Company officers and Investors.
- From the Select level drop-down list, choose the KYC verification level that an individual must complete during verification. Click Edit if you want to make changes to the chosen verification level. Make sure the Enabled checkbox is selected to apply KYC verification to associated parties. If unchecked, only specified fields are collected, without running a verification process.
- Specify data that should be collected, such as first name, last name, date of birth, and so on. This information is pre-populated from Government Corporate registries if the Pre-fill from data source checkbox is selected; otherwise, it can be entered manually by applicants. Click Add field to configure as many fields as you need. You can also create a custom field by clicking the Add custom field button for beneficiary verification.
- For some roles you can enable a toggle in the Individual or Company section to specify whether you are collecting data from an individual or a company. You can enable both toggles if needed.
- Select the Allow to skip checkbox in case they cannot be identified (for example, public share companies, complex trust structures, and so on). You can do it for any role.
- Click Add beneficiary to add a beneficiary type. By default, when you add this step, the system creates the UBOs beneficiary type, but you can remove it using the trash bin icon and add the required types. The following roles are available to add:
NoteMind that the options to skip UBOs and shareholders are mutually exclusive. If both are selected, you will still be required to provide at least one ownership type when completing the company profile.
- Add the Questionnaire step to collect additional data within your business verification process. Choose the required questionnaire type in the Questionnaire drop-down list if you have set it up in advance. If not, refer to this article to create your custom set of questions. Click Edit to add or remove questions in the existing questionnaire.
- Configure the Phone verification and Email verification steps to confirm the reliability of the contact information. This step does not require any settings. For more information, see this article.
- Include the Payment method step to verify payment methods for companies and select the required types: Bank cards or Bank accounts.
You can manage both verification steps and the fields within those steps in any of the following ways:
- Use the trash bin icon to remove a step or field from the created verification flow.
- Reorder steps or fields by clicking and holding the six dots icon.
NoteWhen attaching an applicant level to a beneficiary who is an individual, mind the conditions outlined below:
- The Applicant Data fields at the applicant level should include at least those defined in the Associated parties step to enable data reuse and pre-fill within the Individuals verification process.
- If you do not define fields in the beneficiary settings, the attached applicant level should still include the following fields in the Applicant Data step — First name, Last name, Email, and Phone number.
Step 3: Adjust level configurations
On the Configurations tab, set up the additional level settings:
Location settings
Adjust the location-related settings for your business verification level:
- In the Country restriction for verification steps section, choose whether you want to accept applicants from all countries, or define countries that should be supported or restricted. For example, use the Accept applicants from selected counties drop-down list to add the relevant countries. If you define the list of accepted countries, the company will be rejected if its country of registration is not on the list. If no countries are explicitly accepted, you can add them in the Rejected from selected countries list — in this case, companies registered in those countries will be rejected, and all others will be allowed.
- Set up the location requirements in the IP settings section. Just as in the previous step, specify which IP addresses should be accepted and which should be rejected.
- In the USA resident settings, select the Reject USA residents if they confirm US residency in SDK checkbox to identify whether you want to reject the USA as a company registration country.
- Configure the VPN detection settings. Check the related box to pause verification if VPN is turned on.
Business Verification
Establish level-based rules for companies. In the Owners roles identification thresholds section, set thresholds to identify UBOs and Shareholders:
- In the UBOs field, specify the ownership percentage threshold to identify UBOs (Ultimate Beneficial Owners). Individuals whose ownership meets or exceeds the specified threshold will be classified as UBOs. The UBO verification level will be applied accordingly.
- In the Shareholders field, specify the ownership percentage threshold to identify shareholders. Individuals whose ownership exceeds the specified threshold but is below the UBO threshold will be classified as shareholders and will be required to complete the shareholder verification level. Entities having below the shareholder threshold percentage will be ignored.
Fraud prevention
Configure the use of email, phone, IP, geo, and device data to detect fraud at the very beginning:
- In the Device intelligence section, check the Enable device fingerprinting during onboarding box to collect signals from applicants’ devices for suspicious activity detection.
- Set the Applicant insights checkboxes to understand the applicant’s risk profile better:
- Email insights— to enable advanced email risk assessment.
- Phone insights— to enable advanced phone risk assessment.
- IP insights — to enable advanced IP checks.
- Identity enrichment — to enable in-depth insights based on the applicant’s email and phone number.
- AI suspicious name check — to enable AI checks of applicant names to detect suspicious patterns. If the applicant's name meets certain AI criteria, the applicant profile receives any of the following risk labels: Famous person, Strange name.
AML Screening
In the AML Screening section, decide whether you need AML checks and configure the screening criteria:
- Check the Enable AML screening box to conduct AML checks.
- In the Custom AML screening section, define if you want to adjust custom AML settings for this level. By default, global AML screening settings are applied.
- From the Choose the provider you’d like to use for AML screening drop-down list, select a provider for your custom AML screening settings.
- In the Search configuration section, select the type of search and adjust its settings:
- If you select the Search by warning types option, use the checkboxes to select the categories you want to include in the screening, such as Sanctions, Warnings, Fitness & Probity, and Politically Exposed Persons (PEPs).
- From the Adverse Media General dropdown list, select the types of adverse media to be considered.
When proceeding with the Use custom search profile option, enter a profile identifier. Set the configuration as described in this article.
- Configure Name matching criteria — select how strictly names should be matched during AML screening at this level.
- From the Choose whether to enable auto-screening for AML drop-down list, select whether the auto-screening should be enabled, disabled, or set to default. If enabled, you can select the Delegate manual review tasks for ongoing monitoring box to send all approved applicants found in AML lists to your compliance officers for manual review.
Advanced settings
Use Advanced settings to manage notifications, environment, and data processing preferences:
- From the Source key drop-down list, select a source key if you have previously configured one. If not, refer to this article to learn how to create a source key. This drop-down list is available only if at least one source key exists in your environment.
- In the Email notifications section, choose the verification statuses to notify your applicants about using the Select options drop-down list. You can select multiple options, including all if needed:
- Send when applicant is approved.
- Send when applicant requires resubmission.
- Send when applicant is rejected.
- In the Applicant scoring section, enable the checkbox to calculate the risk score of your applicants.
- Set Visibility configuration — check the Level should only be available on production environment checkbox to make the level available only in Production mode.
- In Review settings, enable the Disable automatic checks checkbox to prevent automatic verification. Mind that this option stops all automatic checks, including AML screening/monitoring and Company check against Corporate Registries. You will have to enable checks manually using the Request check button on the applicant page.
- Check the Skip consent screen box to let applicants proceed without accepting the terms and conditions in the Web and Mobile SDKs. This option is only available for the Questionnaire and/or Applicant Data steps in user verification, and for the Company Data, Questionnaire, and/or Associated Parties steps in business verification. If your verification level includes other steps, this option will not appear, and the consent screen will be shown.
- In the Data processing agreement section, choose how to present your agreement to applicants:
- Default — Displays the standard system agreement without any additional consent link or text.
- Link — Allows you to display a custom link for data processing on the agreement screen in the WebSDK.
- Text — Lets you add custom text for data processing to display directly on the agreement screen in the WebSDK.
Configure global business verification settings
Adjust additional business verification settings to control common KYB solution logic and behavior.
Status synchronization
- Check the main Synchronize company status with associated parties box to enable Status synchronization.
- Adjust Reject settings:
- Select the Reject company if any associated party is rejected option to automatically decline a company profile, if at least one related applicant fails verification. If disabled, the company remains in the Awaiting user status until all associated parties are processed.
- Enable the Progress only after all associated parties are verified box to allow a final company decision only after all associated parties have completed verification. Combined with the previous setting, this enables a more balanced decision-making process, but may slow down verification.
- Configure Additional roles:
- Check the Include additional roles in verification status box to include non-mandatory roles in the company verification level. These roles may be optional ones or added after the main company verification process is completed.
General settings
Set up general configurations:
- Select the Don’t link previously verified applicants with identical primary data as Associated parties checkbox to disable automatic matching with existing verified beneficiaries and associated parties. When enabled, the system will not attempt to link applicants based on matching primary data, like phone number or email address for Individuals and company registration number for Companies.
NoteIf you enable this option, make sure to allow duplicates on your source keys. Otherwise, a new applicant with the same data will be blocked.
- Use the Account for additional and skipped roles checkbox to include all provided associated parties in the company structure, even if they are marked as optional within the level settings. When enabled, the verification status of any manually added or skipped roles will impact the overall company verification result.
- From the Default level for intermediate companies in ownership structure dropdown list, select a level that will be automatically assigned when intermediate beneficial companies are created in the ownership structure.
- From the Associated parties verification link expiry dropdown list, set the expiration time for verification links sent to associated parties. The available options range from 5 minutes to 1 month. This setting applies only to applicants created via the Associated parties step and does not affect global verification link settings.
- Save changes.
Collect and verify company and beneficiaries information
To conduct the automated corporate registry check:
- Create a business verification level with the Company name, Registration number, and Country fields to provide.
- Submit the Company name, Registration number, and Country details by one of the following methods:
- Create an applicant profile in the Dashboard or with this API method.
- Generate a verification link and send it to the applicant for collecting data in the WebSDK.
- Conduct verification:
- When adding the data via the Dashboard or API, go to the created applicant profile and click Request check.
- When collecting details via the WebSDK, the Corporate AML screening is performed automatically.
- Review verification results.
Review results
To check the verification results:
- Go to the Companies page and open the necessary applicant profile.
- Go to the Corporate registry check section.
The report may contain the following information:
Data provided by applicant
The following is a list with details provided by an applicant:
- Company name
- Registration number
- Company Type
- Country
- Incorporated on
- Legal address
- Tax ID and other fields (Location of registration, Postal address, Applicant position, and so on)
Data extracted from corporate registry
The table below outlines the details that can be extracted from a corporate registry:
Type of results | Provided information for Advanced corporate registry pack | Provided information for Global + Ownership insights |
|---|---|---|
Company information |
|
|
Company officers | - |
|
Persons With Significant Control | - |
|
Alternatively, use this API method to review the results. You can also obtain the verification status results and applicant data.
Additionally, there will be a Company Structure informational block designed in accordance with the data found on the company.
Review Expert-assisted KYB results
If you perform the Expert-assisted KYB checks, after the automated corporate registry check, there will also be information in the Company Data section of the applicant profile. The data within the section is split into two tables—Extracted Company Data and Provided Company Data.
The Extracted Company Data table shows the information received from registries and attached documents. This may include the following:
- Company name
- Registration number
- Country and Location of registration
- Date of incorporation
- Tax/VAT number
- Legal address
The details in Provided Company Data are the information manually specified by the applicant in the fields. There will only be data from the fields that you set up in the business verification level.
To review the results:
- In the Dashboard, go to the Companies page and open the necessary applicant profile.
- Go to the Verification tab and select the Company Data section on the left side. You will be navigated to the collapsible blocks containing all required information.
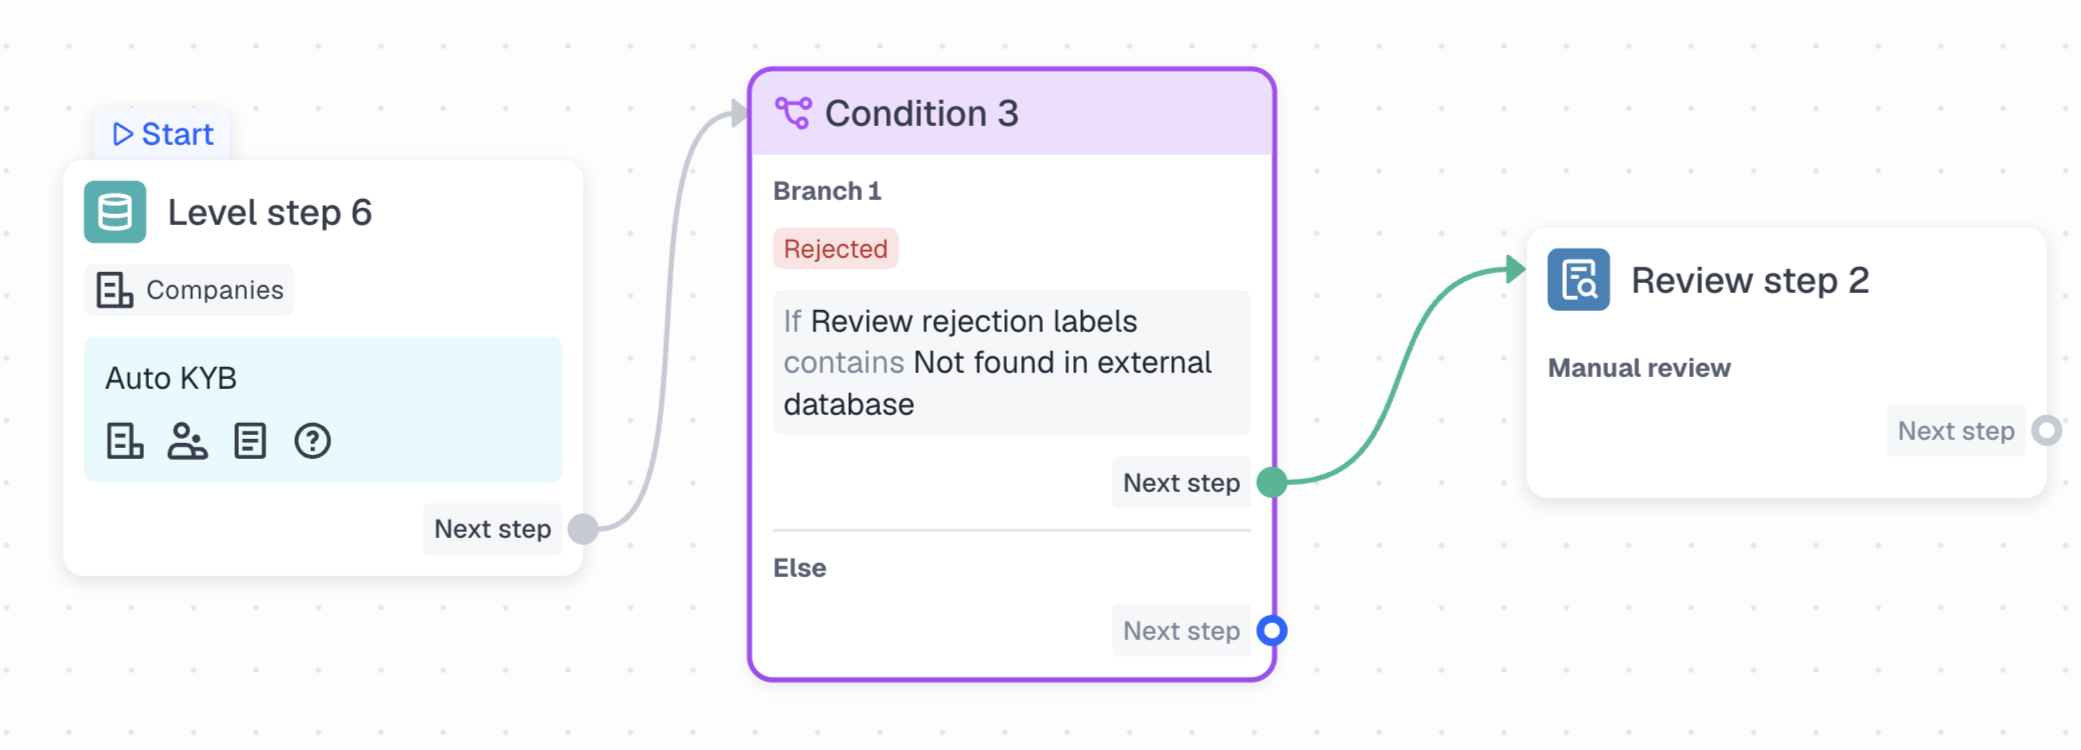
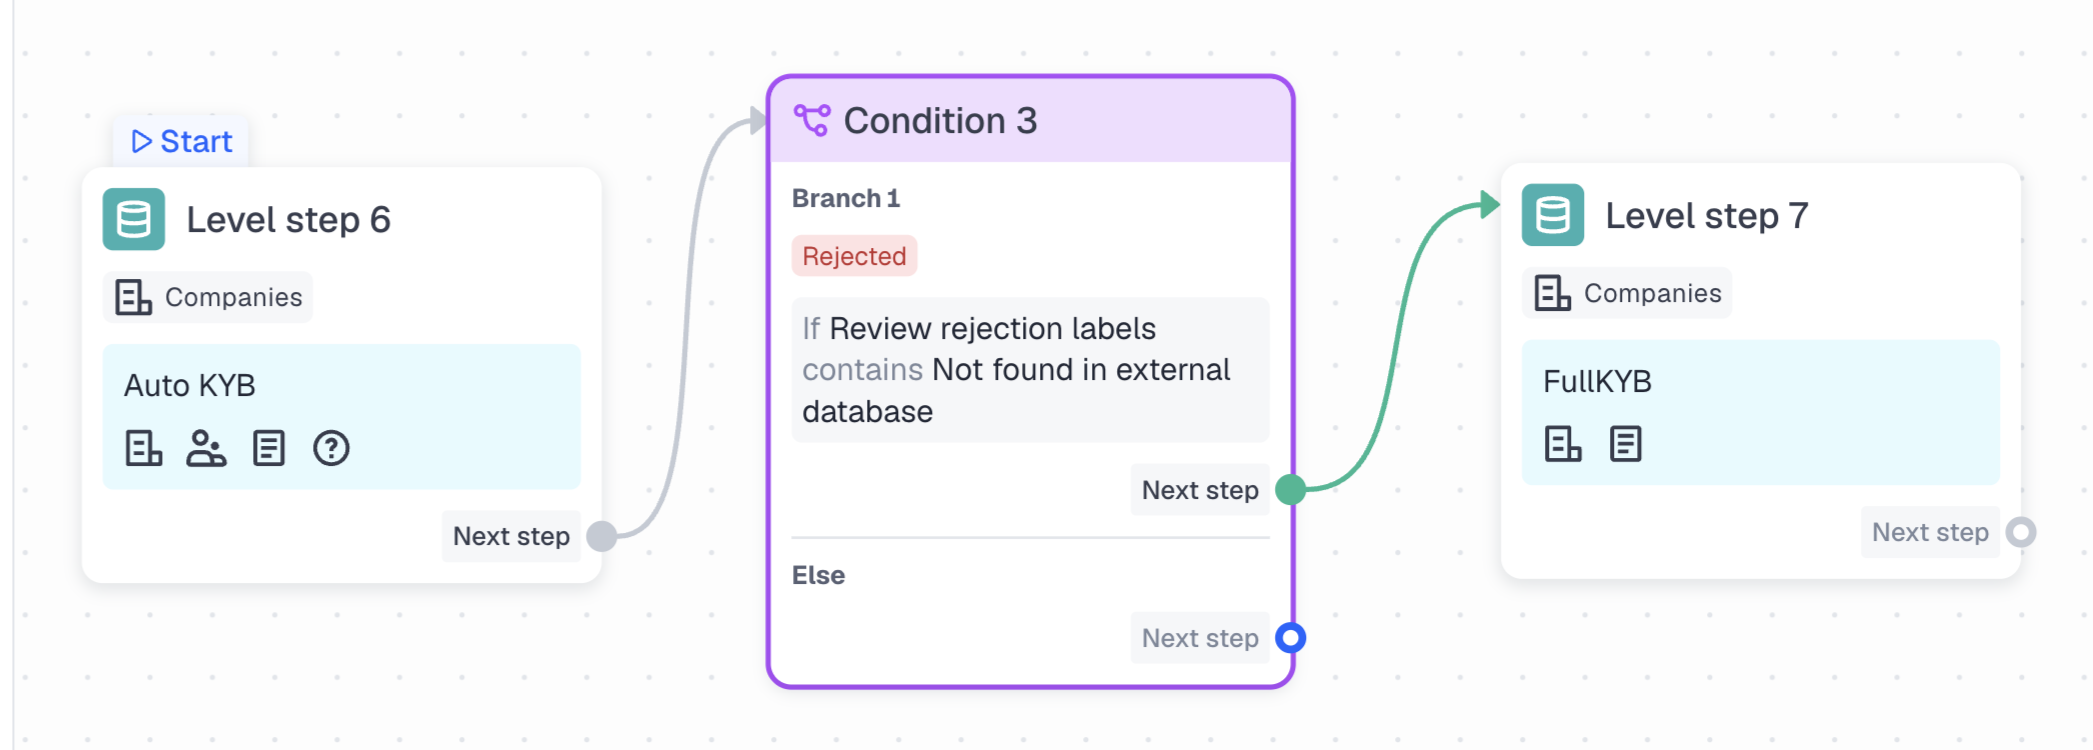
Set up fallback scenario for Automated corporate registry check
If no information is found on the company, the profile will be declined with the Not found in external database tag.
You can set up delegation rules for such cases in Workflow Builder. For example, you can configure the following scenarios:
- Delegating rejected applicants for manual review with the Requires actions status, which can be handled via Case management.
- Sending rejected applicants for Expert-assisted KYB verification.
Perform Company tax check
The Company tax check will be completed along with the Automated Corporate Registry Check if some tax information is not available through corporate registries.
Review results
To check the verification results:
- Go to the Companies page and open the necessary applicant profile.
- Go to the Company tax check section.
This section displays whether tax data has been confirmed using color indicators:
GREEN— verification is successful, as the provided information is correct for the company.RED— verification has failed due to a mismatch or other issues.
Alternatively, you can use the Get company tax check results API method to get the verification results.
NoteThe Company tax check does not affect the approval or rejection of an applicant profile. If you want to manage applicants based on this parameter, use Workflow Builder to create a suitable verification flow.
Enable automated reading of company documents
To add an Automated Company Document Reading (ACDR) feature to your business verification flow:
- Create a business verification level and configure the Company documents step to collect and process essential data from uploaded corporate documents.
- Add the ACDR option to the created level:
- Expert-assisted KYB — ACDR is included by default in all Full KYB levels free of charge.
- Automated KYB — You can enable ACDR for Automated KYB levels by contacting your Customer Success Manager.
- Upload required documents by one of the following methods:
- Create an applicant profile in the Dashboard or with this API method.
- Generate a verification link and send it to the applicant for collecting data in the WebSDK.
- Conduct verification:
- When adding the data via the Dashboard or API, go to the created applicant profile and click Request check.
- When collecting details via the WebSDK, the Automated Company Document Reading is performed automatically.
- Review verification results.
Review results
To check the verification results:
- Go to the Companies page and open the necessary applicant profile.
- Below the Add documents section, observe the recognized and extracted data fields from the uploaded documents. These fields are also appended to the Extracted Company Data.
NoteData extracted from documents is considered less reliable than the outputs from the Corporate Registry Check. In case of conflicting values, the latter will take precedence.
- Expand the Checks and Regulations section to view the cross-validation results.
- Go to the Risk labels section to see which company risk label was assigned during the verification.
Alternatively, use the Sumsub API to obtain the verification status results and applicant data.
Establish company structure, approve ownership and verify identity
To configure ownership and management structure check:
- Create a business verification level to collect information about the company and its beneficial owners, request documents confirming the entity's legal existence, and perform user verification of the UBOs, shareholders, and representatives.
- Generate verification links.
- Review the verification results.
Review results
The check results are shown in the company profile and indicated in the company report. Both contain the company structure, company details, and beneficiaries details.
To review the verification results:
- Go to the Companies page and open the necessary applicant profile.
- Select Company report, or navigate to the Company Structure and Control and Ownership structure sections.
The company report is available for downloading in PDF, including the results of the Intermediate Shareholders Check.
Alternatively, use the Sumsub API to obtain the verification status results and applicant data.
Perform screening for legal entities
To run a corporate AML screening check:
- Create a business verification level with the following required fields: Company name, Country.
- Provide the company name by one of the following methods:
- Create an applicant profile in the Dashboard or with this API method.
- Generate a verification link and send it to the applicant for collecting data in the WebSDK.
- Conduct verification:
- When adding the company name via the Dashboard or API, go to the created applicant profile and click Request check.
- When collecting details via the WebSDK, the Corporate AML screening is performed automatically.
- Review verification results.
Review results
To check the verification results:
- Go to the Companies page and open the necessary applicant profile.
- Go to the Watchlists section and click View report . The report contains the profile data, search settings, and the list of sources where matches have been found.
If matches have been found, a final decision can be made by the Sumsub legal officer or delegated to your team. The report is available for downloading in PDF.
Alternatively, use the Sumsub API to obtain the verification status results and applicant data.
Updated 8 days ago