Sumsub ID Connect
Streamline privacy-preserving identity verification using Sumsub ID Connect.
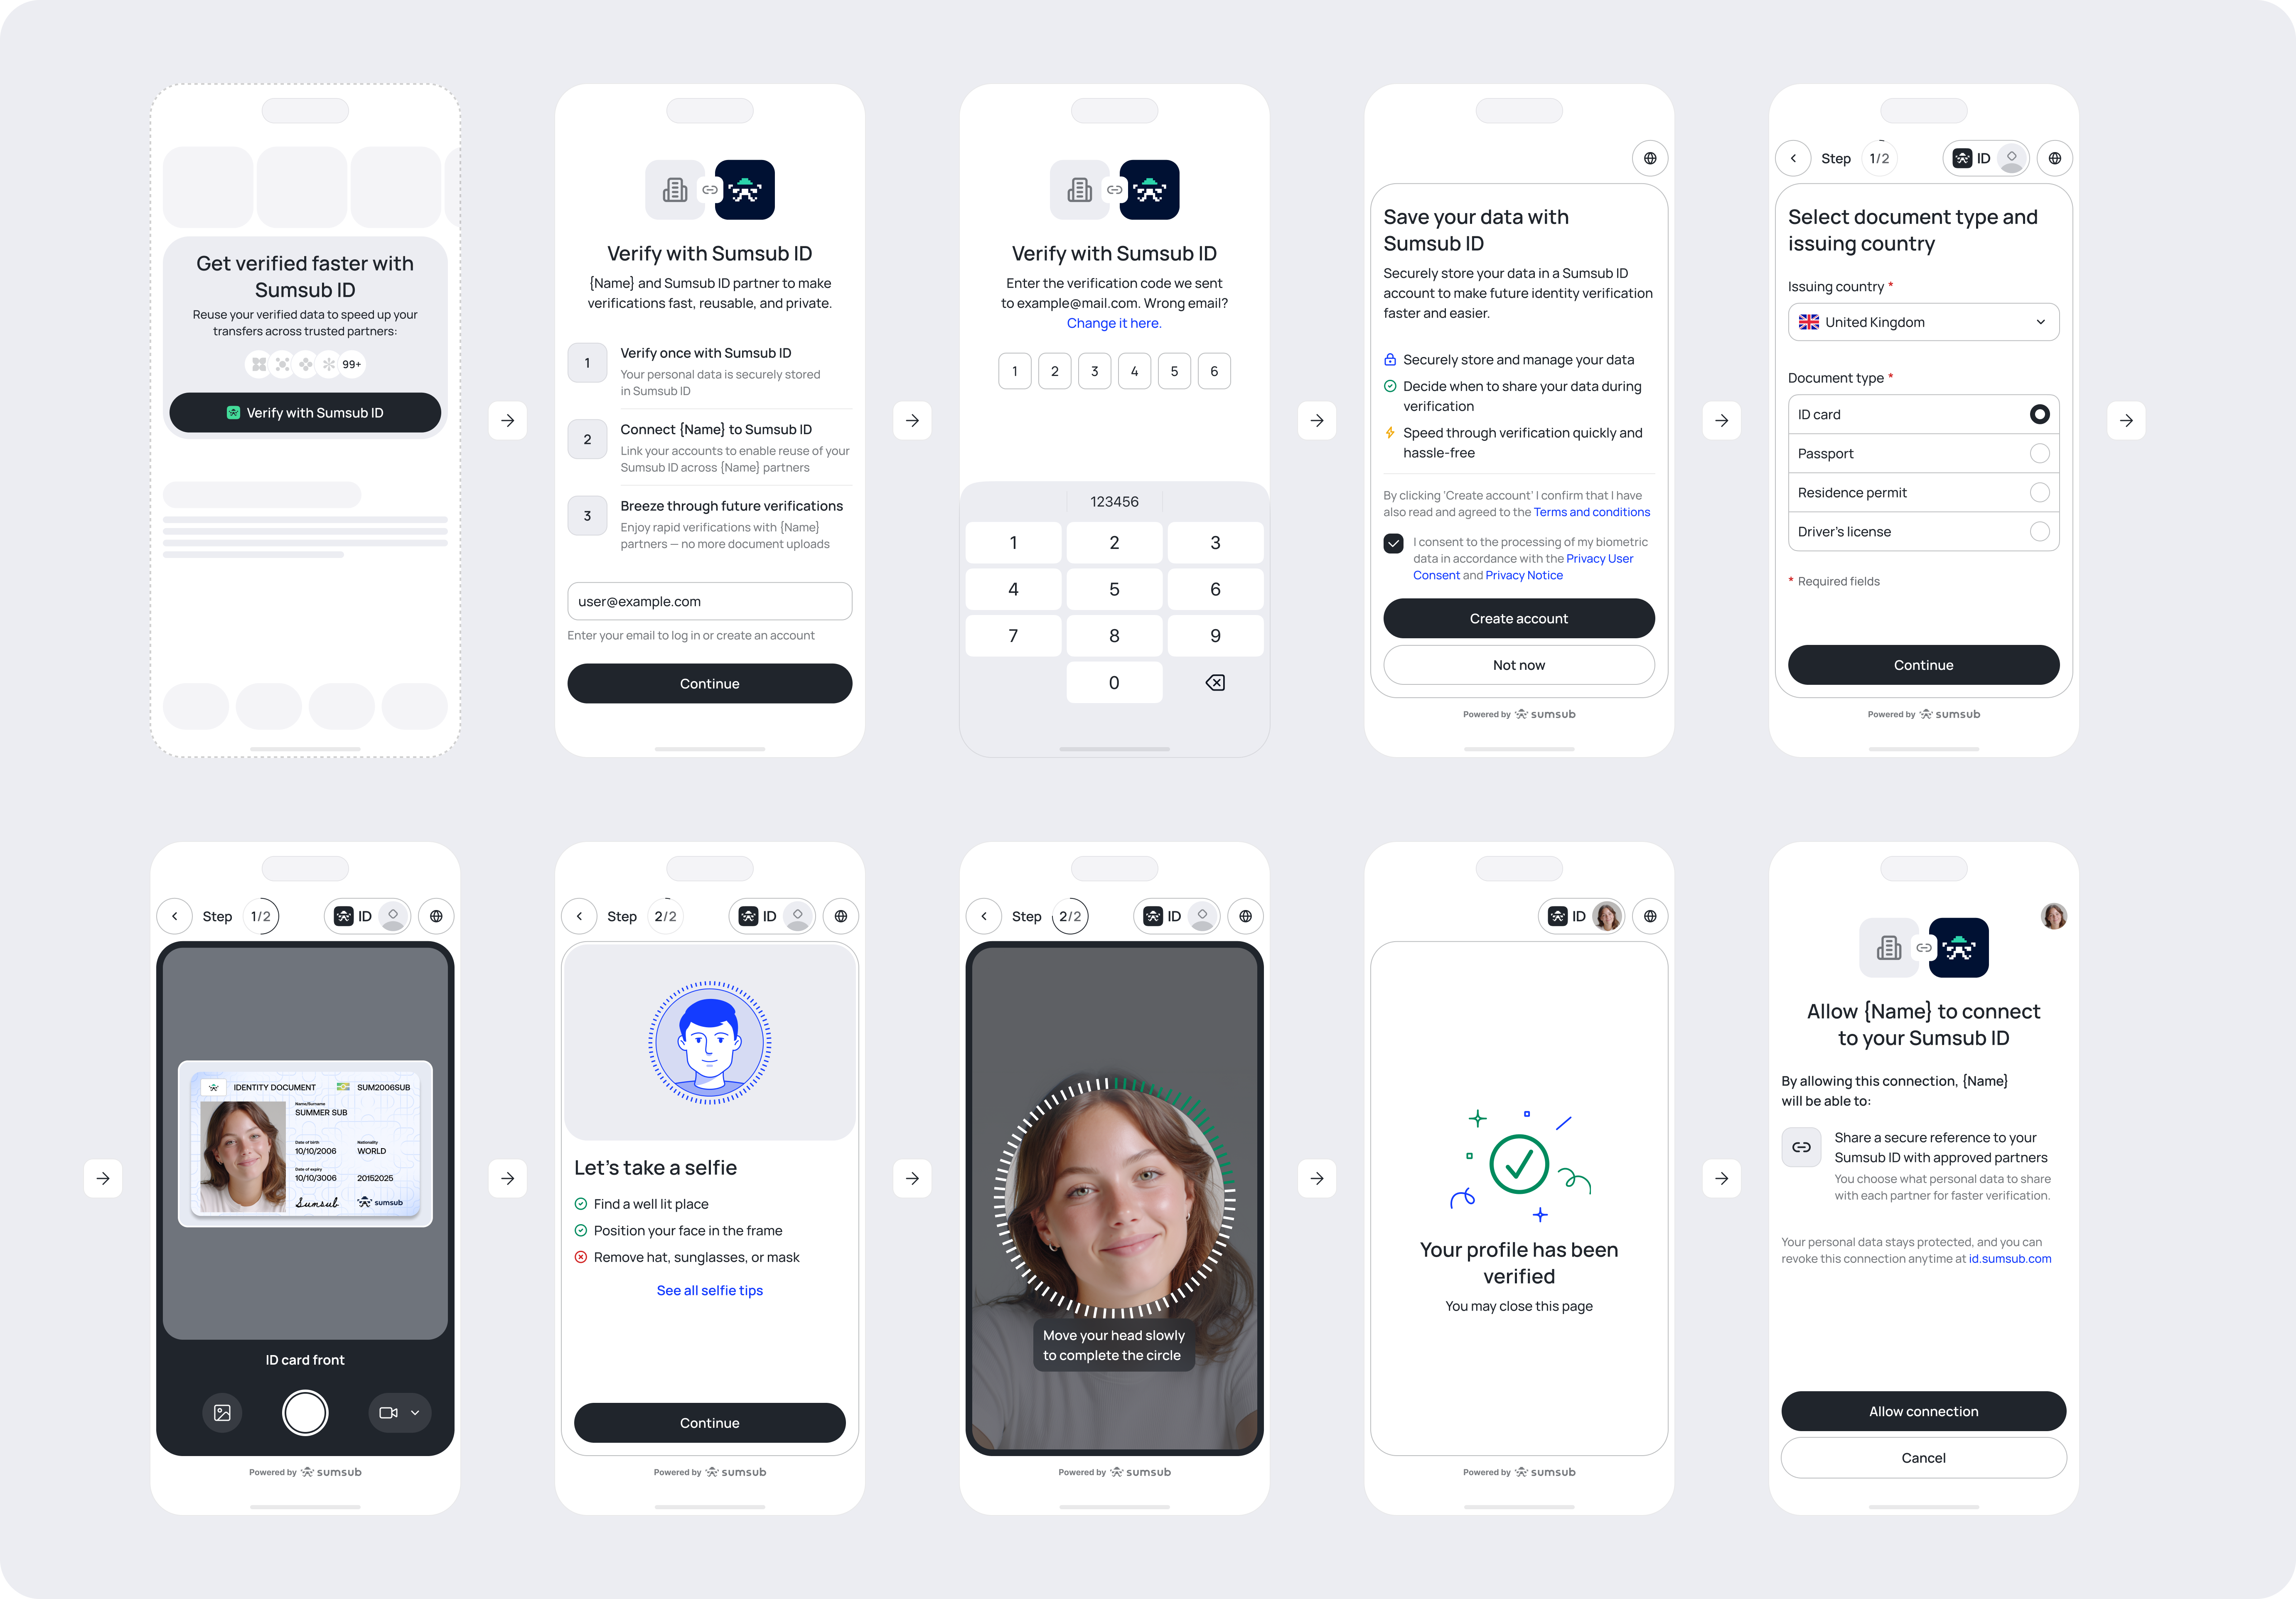
Sumsub ID Connect allows businesses to access verified claims, such as age, name, and nationality, from a network of pre-verified identities, while reducing verification costs and ensuring the absolute privacy of the end-user.
Integration with Sumsub ID Connect requires minimal effort and avoids any collection or storage of users’ highly sensitive biometric or source document data by the business. The users store their verification data in a personal Sumsub ID account they are fully in control of, and then give permission to reveal the requested verified identity claims.
How Sumsub ID Connect works
Sumsub ID Connect uses a JavaScript library that follows OIDC (Open ID Connect) standards. With this library, you can add a Verify with Sumsub ID button to any platform, which triggers a Sumsub ID hosted user flow.
During setup, you define OIDC scopes that specify which verified claims (for example, age, name, nationality) your service needs. You can adjust these scopes and other options in the Sumsub dashboard.
When a user clicks Verify with Sumsub ID, your application redirects them to the Sumsub ID Connect flow. The flow checks whether the user already has a Sumsub ID account and whether that account contains enough verified data to satisfy the requested scopes. If necessary, the user completes any missing verification steps. Sumsub hosts and maintains all verification screens, so you do not need to implement or operate these flows yourself.
After the user finishes the flow, the integrating business will receive verified claims as per OIDC protocol standards. This response includes a cryptographically signed JWT (JSON Web Token) that contains the user’s identity claims and can be validated to confirm the token's authenticity and integrity.
If you include the offline_access scope, Sumsub creates an ongoing connection between the user’s Sumsub ID and your service. This connection allows your service to request verified claims again in the future for any scopes the user has already approved, without asking the user to repeat the full flow. The user creates this connection once and can revoke it at any time from their Sumsub ID account.
Existing Sumsub ID account
If Sumsub ID already exists and contains requested verified data:
- Authentication. User provides and confirms their email address.
- Authorisation. User gives permission to reveal certain verified claims to the integrating business.
Non-existing Sumsub ID account
If Sumsub ID does not exist:
- Authentication. User provides and confirms their email address.
- Sumsub ID account creation. User will be prompted to create a Sumsub ID account.
- Verification. Sumsub runs the checks needed to provide the requested data. These checks depend on the scopes you ask for and the steps already completed by the applicant.
- Authorisation. User gives permission to reveal certain verified claims to integrating business.
OIDC integration
Sumsub ID supports OpenID Connect (OIDC), which allows you to authenticate verified users using Sumsub ID.
Implementation details
- Issuer:
https://id.sumsub.com/ - Configuration URL:
https://id.sumsub.com/.well-known/openid-configuration
The OpenID Connect discovery protocol allows you to automatically configure OIDC integrations using the metadata provided at the configuration URL.
Configuration metadata
The configuration contains metadata describing:
- Authorization and token endpoints.
- Userinfo endpoint.
- Supported scopes, response types, and grant types.
- Public keys for ID token validation.
Supported scopes
The following table describes the supported scope values—permissions that grant access to specific actions within Sumsub ID Connect—used in the following request.
| Scope | Description |
|---|---|
openid | Returns the ID token (id_token). Required by OpenID Connect. |
email | Grants access to the user’s email address. |
name | Grants access to the user’s name information. |
share | Grants permission to generate a Sumsub ID Share token. |
offline_access | Grants permission to obtain a refresh_token. |
Enable OIDC integration
To enable and use OpenID Connect, complete the following steps in the Dashboard:
- Navigate to Reusable Identity → Sumsub ID Connect.
- Generate a secret key and register a redirect URL.
- Save changes.
Verify with Sumsub ID Connect button integration
Use the Sumsub ID Connect JavaScript library to add a Verify with Sumsub ID button and run the authorization flow with OIDC.
The library includes:
- Secure OAuth 2.0 authentication with Sumsub ID and customizable button
- Simple API with TypeScript support
- Responsive behavior across devices
- Automatic handling of the authorization flow (including PKCE – Proof Key for Code Exchange)
You can install the package using npm, yarn, or pnpm:
npm install @sumsub/id-connect
yarn add @sumsub/id-connect
pnpm add @sumsub/id-connect
How JavaScript library works
The library implements the OAuth 2.0 Authorization Code flow with PKCE:
Your frontend initializes the library with your
clientIdand optional security parameters.When the user clicks the button, the library opens a popup where the user authorizes with Sumsub ID.
After a successful authorization, the library calls the
onSuccesscallback with an authorization code.Your backend exchanges this authorization code for Sumsub ID Connect token.
For an OIDC-compliant flow, use the
Use the client secret key that you configured in the Sumsub ID Connectsection in the Sumsub Dashboard.tokenanduserinfoendpoints from the OIDC metadata file:Your backend validates the tokens and uses them to retrieve user details and verified claims according to the scopes you requested.
Attention
- The authorization code expires quickly, so exchange it for tokens as soon as possible.
- Add your domain in the Sumsub ID Connect configuration section.
How to integrate JavaScript library
You can integrate the library in two ways:
- Use the pre-built button.
import { createButton } from '@sumsub/id-connect'; createButton({ clientId: 'your-client-id', permissions: ['share'], container: document.getElementById('button-container'), onSuccess: (response) => console.log('Authorization successful:', response.code), onError: (error) => console.error('Authorization error:', error.message), className: 'custom-button-class', text: 'Verify with Sumsub ID' }); - Use your own button with the modal.
import { openModal } from '@sumsub/id-connect'; document.getElementById('your-custom-button')!.addEventListener('click', () => { openModal({ clientId: 'your-client-id', permissions: ['share'], onSuccess: (response) => console.log('Authorization successful:', response.code), onError: (error) => console.error('Authorization error:', error.message), onLoading: (isLoading) => console.log('Loading state:', isLoading) }); });
UMD build
You can also include the UMD build (JavaScript bundle formatted using the Universal Module Definition pattern) directly in your HTML:
<script src="https://unpkg.com/@sumsub/id-connect/dist/index.umd.js"></script>
<script>
SumsubIdConnect.createButton({
clientId: 'your-client-id',
permissions: ['share'],
container: document.getElementById('button-container'),
onSuccess: (response) => console.log('Authorization successful:', response.code),
onError: (error) => console.error('Authorization error:', error.message)
// The button handles loading state internally
});
</script>
OAuth authorization flow parameters
Here, you can find all parameters you pass to openModal and createButton when you start the OAuth authorization flow with Sumsub ID.
openModal(options)
Call openModal to open a popup window and start the OAuth authorization flow with Sumsub ID.
In the table below, you can find the full list of parameters with its description.
| Name | Type | Description |
|---|---|---|
clientId | String | Sumsub ID client identifier for your application. |
permissions | String | List of requested permissions (scopes), for example: openid, share, offline_access, email, name. |
onSuccess | Function | Callback that receives the authorization response when the user successfully authorizes. |
onError | Function, optional | Callback that receives error details if the authorization flow fails. |
onLoading | Function, optional | Callback that receives a boolean flag indicating whether the popup is currently loading. |
state | String, optional | OAuth state parameter for CSRF protection. Use this to correlate the response with the original request. |
codeChallenge | String, optional | PKCE code challenge value that matches the verifier used on your backend. |
baseUrl | String, optional | Custom base URL of the OAuth server. In most cases you can omit this and rely on the default. |
Function behavior
openModal does not return a value. It opens a popup window, starts the OAuth authorization flow with Sumsub ID, and reports the result through the provided callbacks.
Example:
openModal({
clientId: 'your-client-id',
permissions: ['share'],
onSuccess: (response) => console.log('Authorization successful:', response.code),
onError: (error) => console.error('Authorization error:', error.message),
onLoading: (isLoading) => console.log('Loading state:', isLoading),
state: 'random-state-string', // Optional
codeChallenge: 'code-challenge-string' // Optional
});
createButton(options)
Call createButton to render a button that starts the OAuth authorization flow when the user clicks it.
In the table below, you can find the full list of parameters with its description.
| Name | Type | Description |
|---|---|---|
clientId | String | Sumsub ID client identifier for your application. |
permissions | String | List of requested permissions (scopes), for example: openid, share, offline_access, email, name. |
container | HTMLElement | DOM element that receives the created button. |
onSuccess | Function | Callback that receives the authorization response when the user successfully authorizes. |
onError | Function, optional | Callback that receives error details if the authorization flow fails. |
onLoading | Function, optional | Callback that receives a boolean flag indicating whether the popup is currently loading. |
className | String, optional | CSS class name for customizing button styles. |
text | String, optional | Button label. The default value is connect. |
state | String, optional | OAuth state parameter for CSRF protection. Use this to correlate the response with the original request. |
codeChallenge | String, optional | PKCE code challenge value that matches the verifier used on your backend. |
baseUrl | String, optional | Custom base URL of the OAuth server. In most cases you can omit this and rely on the default. |
Function behavior
createButton does not return a value. It creates a button inside the specified container, wires it to the OAuth authorization flow with Sumsub ID, and reports the result through the provided callbacks
Example:
createButton({
clientId: 'your-client-id',
permissions: ['share'],
scope: 'openid share offline_access',
container: document.getElementById('button-container')!,
onSuccess: (response) => console.log('Authorization successful:', response.code),
onError: (error) => console.error('Authorization error:', error.message),
className: 'custom-button',
text: 'Login with Sumsub ID'
// The button manages loading state internally and can call onLoading if provided
});
Types
AuthorizeResponse describes the object that the library passes to onSuccess after a successful authorization.
Example:
type AuthorizeResponse = {
code?: string; // Authorization code to exchange for tokens on your backend
state?: string; // State value returned from the authorization response
};
How to integrate with Sumsub ID Connect
To integrate with Sumsub ID Connect, you need to:
- Get a client key (client ID) to use Sumsub services.
- Ask Sumsub support to enable Sumsub ID Connect for your client key.
- Exchange the authorization code for a Sumsub ID Connect token on your backend. To get this token, use this API method.
Request example:
curl -X POST https://api.sumsub.com/resources/snsId/api/connect/token \
-H "Content-Type: application/json" \
-d '{
"grant_type": "authorization_code",
"code": "authorization_code_from_frontend",
"codeVerifier": "code_verifier_used_during_authorization"
}'
The following example shows a simplified Sumsub ID Connect button integration:
<!DOCTYPE html>
<html lang="en">
<head>
<title>Sumsub ID Connect Example</title>
<style>
.sumsub-button {
background-color: #4285f4;
color: white;
padding: 10px 20px;
border-radius: 4px;
border: none;
cursor: pointer;
}
.sumsub-button:hover { background-color: #3367d6; }
.sumsub-button:disabled { background-color: #cccccc; }
</style>
</head>
<body>
<div id="button-container"></div>
<script type="module">
import { createButton } from '@sumsub/id-connect';
createButton({
clientId: 'your-client-id',
container: document.getElementById('button-container'),
className: 'sumsub-button',
text: 'Verify with Sumsub ID',
onSuccess: (response) => console.log('Authorization successful:', response),
onError: (error) => console.error('Authorization error:', error.message)
});
</script>
</body>
</html>
Updated 2 days ago