Implement data reconfirmation flow
Reconfirm applicant data at predefined intervals without a full reverification, using an Action workflow and a Transfer step.
Data reconfirmation is a process that allows you to re-check applicant data in order to verify its accuracy and relevance. In Sumsub, we have made it possible to create a convenient verification scenario to do both—meet compliance requirements and maintain conversion while reconfirming data.
The data reconfirmation flow lets you:
- Ask applicants to confirm the data you already hold (name, address, tax residence, TIN, and so on).
- Set up an instant pass for applicants who have no changes in their data.
- Trigger additional verification for specific data that should be updated.
How Data reconfirmation flow works
The reconfirmation scenario is built based on a few Sumsub product solutions working together:
- Applicant data reuse — a reconfirmation action contains pre-filled data so applicants only review it instead of re-entering.
- Periodic verification (if applicable) — a custom rule configuration that is used to request a data re-check at specific time intervals.
- Workflow action configuration — the reconfirmation action setup to add fallback logic transferring applicants to a standard verification level.
- Workflow conditional logic — a condition node to inspect the reconfirmation result and use a Transfer step to reset only the required data.
The reconfirmation flow typically includes the following steps:
- An applicant is asked to reconfirm their data. The reconfirmation is initiated either after a specific period of time or triggered by a custom event.
- The system handles the reconfirmation result:
- If there are no changes — the applicant passes verification with no extra steps.
- If there is data to update — the applicant is routed to the standard verification level to upload and verify the affected data.
Set up data reconfirmation flow
To design the data reconfirmation flow, you need to add verification levels, decide how the flow is triggered, and handle the outcome with a Workflow builder configuration.
Step 1: Configure verification levels
To create a proper reconfirmation scenario, there should be three types of levels involved in the verification process:
Onboarding level
The onboarding verification level is the stage at which your applicant initially provides all required data and documents. You can use a verification level configured earlier or create a new one:
- In the Dashboard, go to Integrations → Verification levels → Individual levels.
- Click Create level and choose Standard.
- Configure the level settings and add all required data and documents.
Reconfirmation action level
The reconfirmation level is an Applicant action level used to verify the relevance and accuracy of applicant data provided during onboarding. Make sure to include the Applicant data step with the fields that require reconfirmation.
Add the reconfirmation action level:
- In the Dashboard, go to Integrations → Verification levels → Individual levels.
- Click Create level and choose Actions.
- Add the Applicant data step and required fields.
- Select the Pre-fill known data checkbox. This allows your applicants to review the data and make changes if necessary, instead of re-entering.
TipAdd only the fields that genuinely need reconfirmation to avoid rejections and protect conversion.
Update level
Add the update level to route applicants to additional verification steps in case of data changes. This update level should only include the verification steps that require data to be re-entered. This way, your applicants will not need to pass full verification again.
Create the update level:
- In the Dashboard, go to Integrations → Verification levels → Individual levels.
- Click Create level and choose Standard.
- Add the required verification steps.
Step 2: Determine reconfirmation flow
Decide how your reconfirmation is initiated and performed by using one of the options or combining them in your flow:
- Scheduled periodic re-check. Use the Periodic verification product to conduct reconfirmation automatically at predefined intervals. For example, schedule a re-check 1 year after a successful verification. The data confirmation request will be fully handled by the system at a specific time, with no manual work required.
- Event-based reconfirmation. Configure the reconfirmation action level in Workflow builder — set conditions that will trigger additional verification if a data update is needed. The conditions might be tied to any event, including periodic action results. Alternatively, you can create the reconfirmation action for a specific applicant directly from your own system.
Step 3: Set up periodic re-check (optional)
Configure periodic verification that reconfirms applicant data at a specific interval on a recurring basis.
Create and adjust a custom rule:
- In the Dashboard, go to Transactions and travel rule.
- Navigate to Rules manager → Installed rules and click Create rule.
- Give the rule a title and an optional description.
- Switch to the Trigger a scheduled event rule behavior.
- Set the rule trigger:
- Select the Time since a level was completed option.
- Specify the number of days after the last successful check and select the verification level (the onboarding level) from the drop-down list.
- Configure the consequent step:
- Under Then, choose the Change level to option and select the created reconfirmation action level.
Step 4: Establish reconfirmation in Workflow builder
With Workflow builder, create an Applicant action-based flow that considers the reconfirmation action results and handles them. The reconfirmation flow should contain the following nodes:
- Initial level step to place the reconfirmation action level.
- Condition node to consider data changes.
- Transfer node to identify the update level and perform a selective data reset.
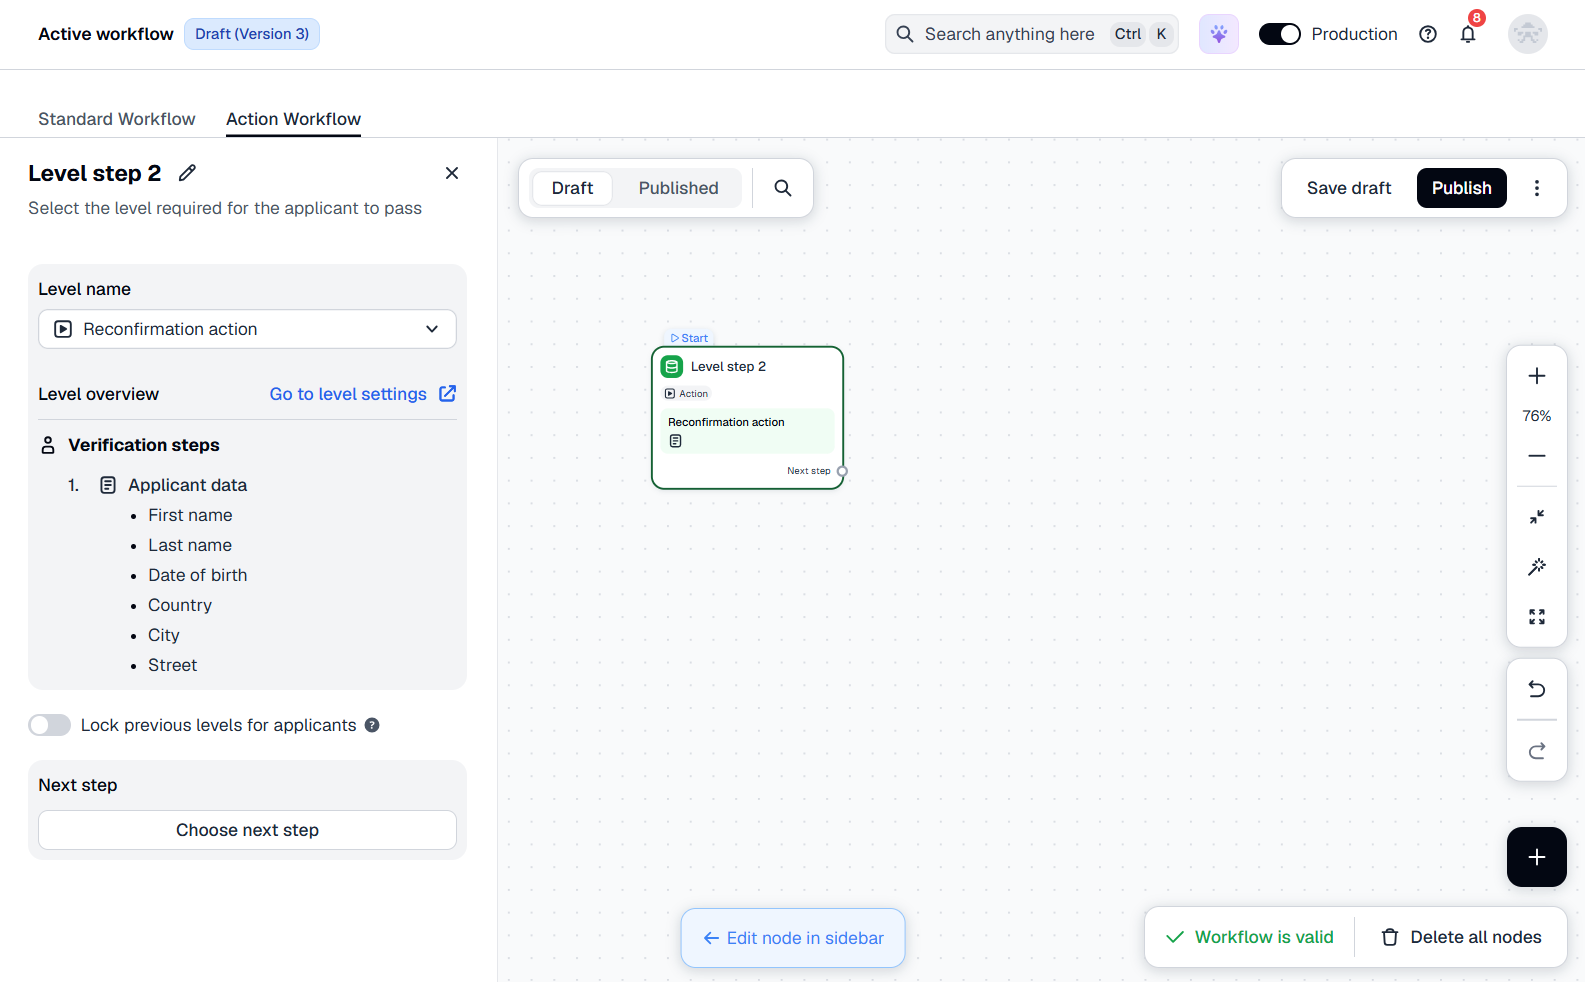
Add reconfirmation level step
Start building the reconfirmation flow in Workflow builder:
- In the Dashboard, go to Integrations → Workflow builder → Active workflow.
- Switch to the Action Workflow tab and select the Draft canvas.
- Click anywhere on the canvas to add an initial node.
- Choose Level step and then select the created reconfirmation action level from the drop-down list.
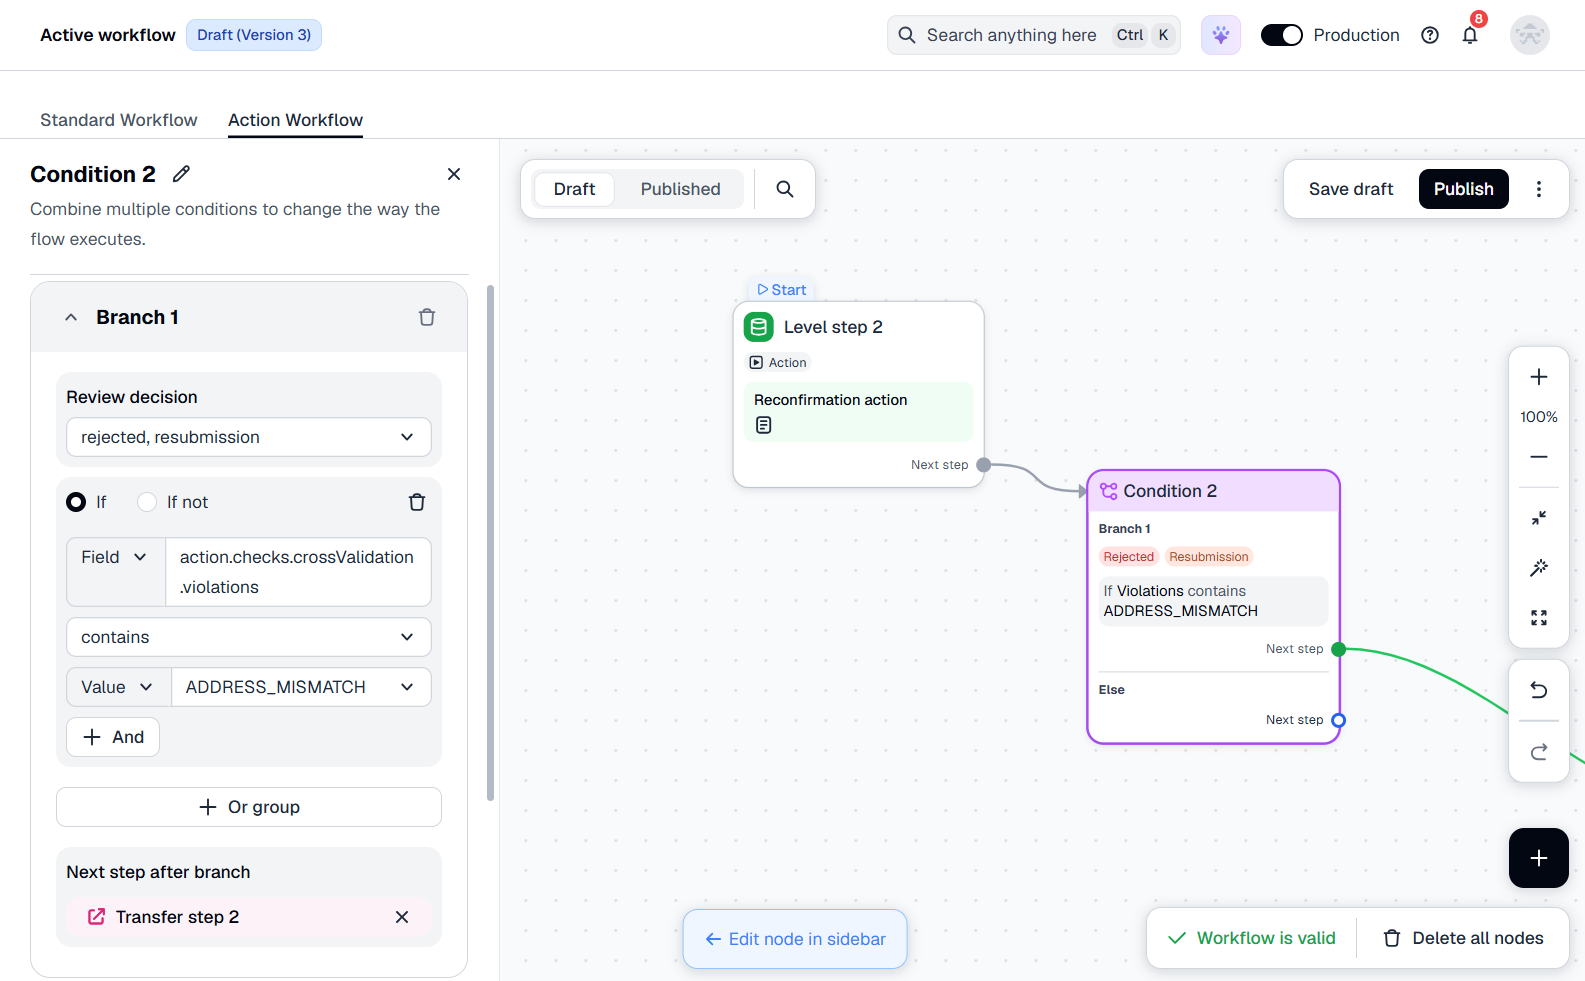
Set up triggers for data update
Configure conditions that must be met to route applicants to additional verification for a data update:
- Click on the initial level node created earlier and select Condition as the next step.
- Configure the condition branch:
- Set Review decision to rejected, resubmission.
- Select the If logical operator.
- From the Field drop-down list, select
action.checks.crossValidation.violations. - Set a logical condition contains and specify the Value (for example,
ADDRESS_MISMATCH)
NoteAn applicant triggers only one condition branch at a time. To handle several mismatch types in a single branch, combine conditions with AND/OR operators instead of duplicating branches. See Conditions logic.
Transfer applicants to update level
Route your applicant to another verification level if a data update is required, using a Transfer node. Unlike a standard level transition, the Transfer node supports a selective data reset—the applicant reconfirms only the data you choose, and all other completed steps stay intact.
Add the Transfer node to each condition branch:
- Within the created Condition branch, select the next after branch — Transfer step.
- Select the verification level (the update level) from the list.
- Identify which steps your applicant needs to pass once transferred to the level.
Note
- The Transfer step should be a terminal point in a workflow used to redirect applicants to a Standard workflow. No additional nodes can be added after it.
- The transfer is one-way. Applicants cannot return to the previous workflow after the transfer.
- Documents submitted for the reset steps become inactive and must be provided again.
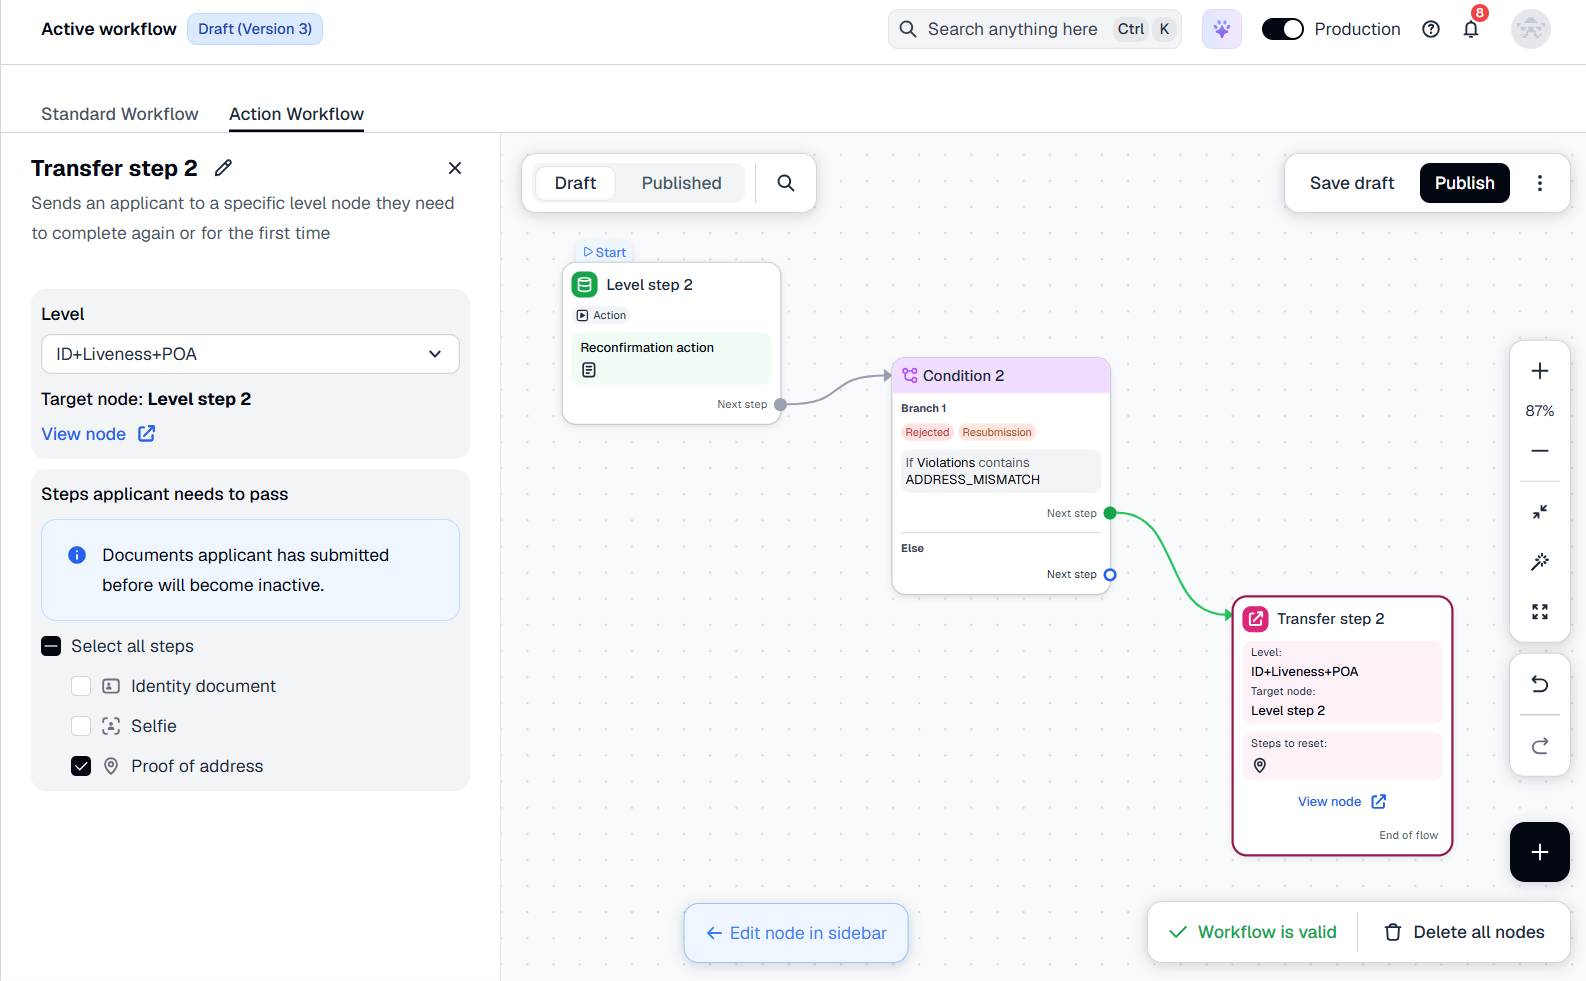
The complete flow example shows a case of handling an address mismatch where applicants will be requested to provide proof of address.
Step 5: Start using flow
Once the flow is created and configured, you can save the draft, perform test verification, and publish the flow to run the checks:
- Save the draft and experiment with your flow — create copies and conduct tests.
- Publish the flow to go live once the flow configuration is tested.
Step 6: Receive verification results
You receive the applicantReviewed webhook with the verification status when the applicant completes the flow or receives a resubmission request. The result can also be reviewed in the applicant profile.
Updated 9 days ago