Reusable KYC Gateway
Connect users to regulated services with reusable KYC data.
Reusable KYC Gateway lets non-regulated businesses help their users reuse identity verification at regulated partner services without collecting or storing the user’s identity documents, biometric data, or verification results.
In a standard Reusable KYC flow, one regulated business shares verification data with another regulated business. In this flow, the reused data exists because the donor runs its own KYC.
Gateway extends this model to non-regulated businesses that do not run KYC themselves. In Gateway, the non-regulated business acts as the integrator, and the source of reused data becomes the user’s own Sumsub ID account.
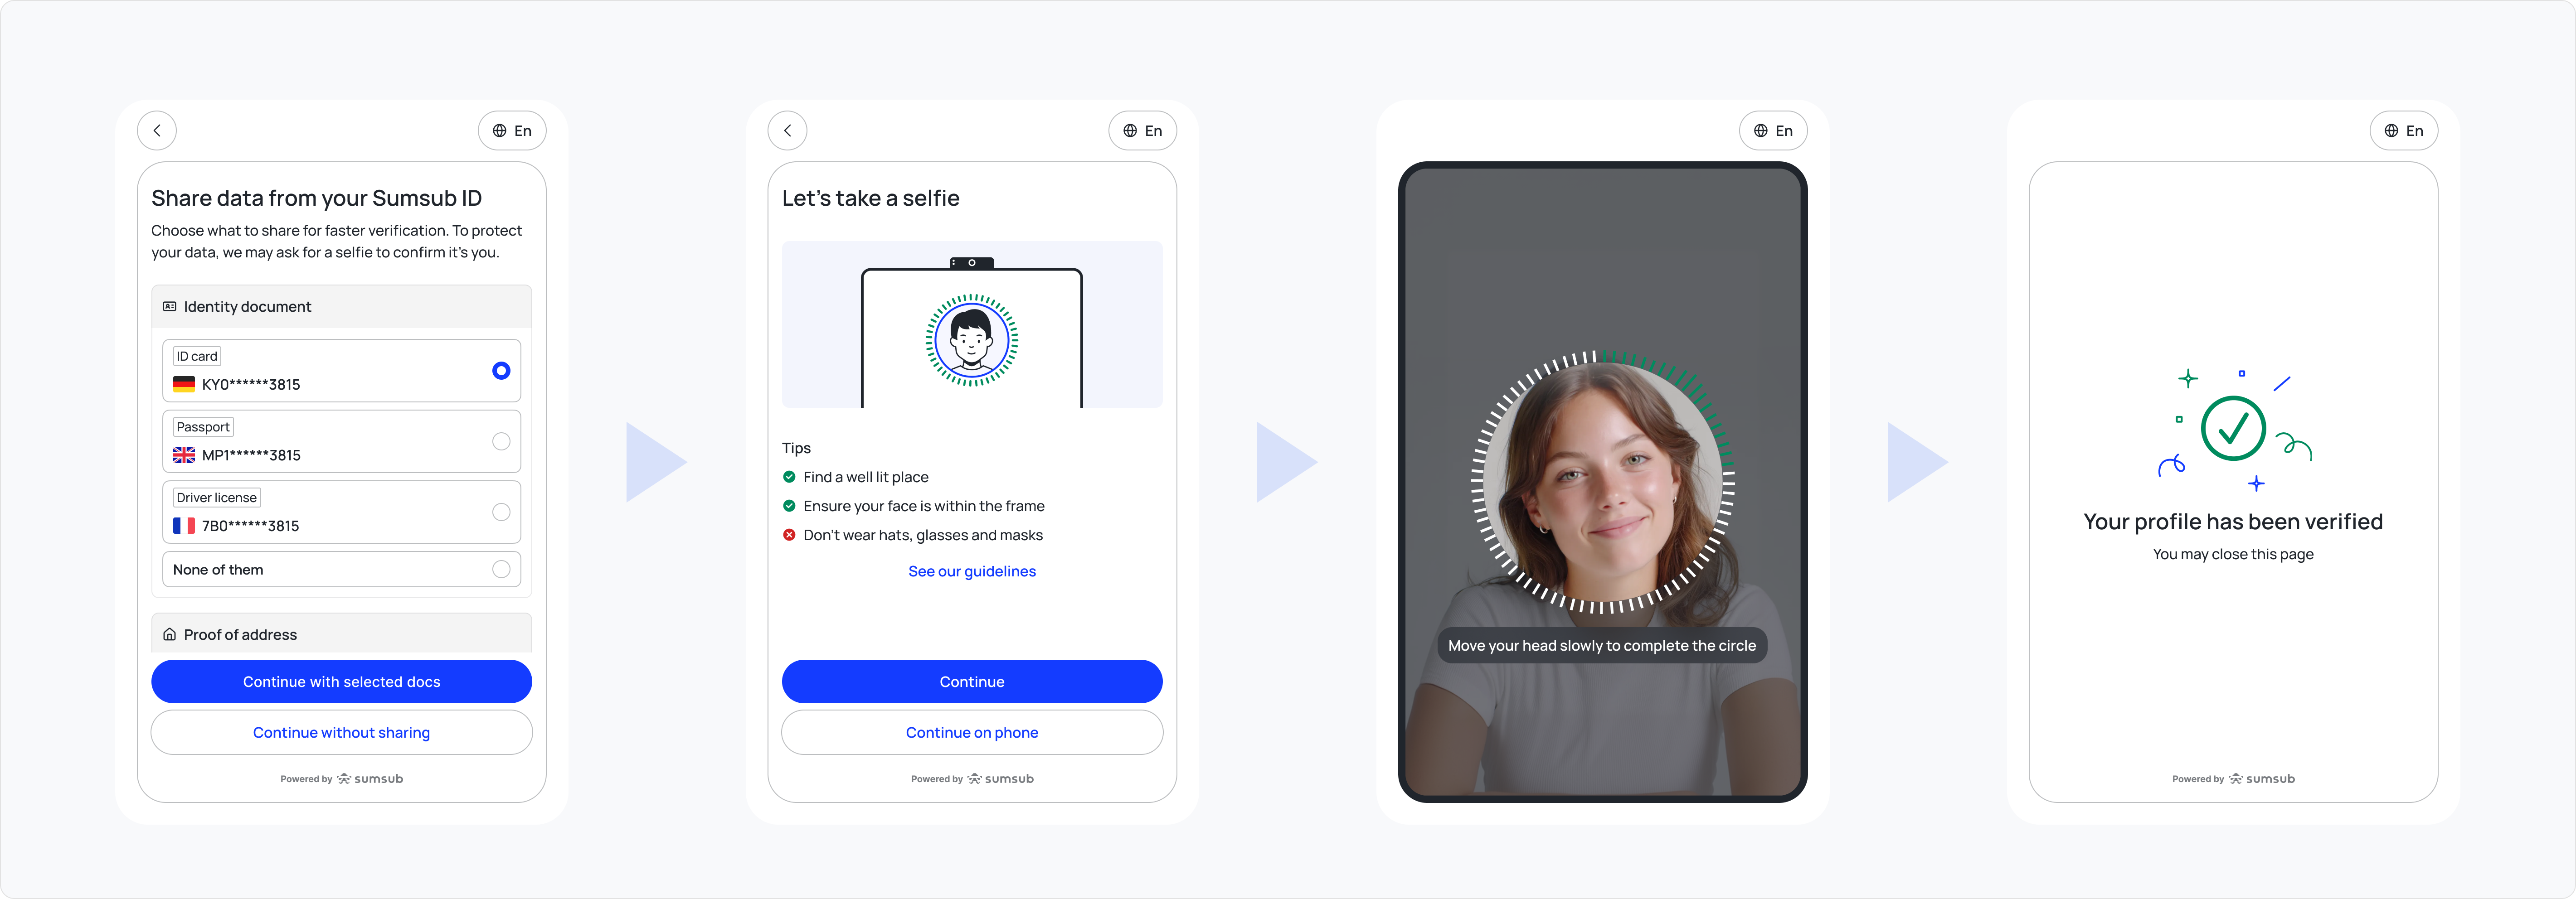
The integrator embeds a Verify with Sumsub ID button in its product — conceptually similar to Sign in with Google. The button opens a Sumsub-hosted flow where the user signs in to or creates their Sumsub ID account, completes identity verification if needed, and authorizes the integrator to generate share tokens on their behalf.
The integrator then passes share tokens to regulated partner services, called recipients, who ingest them through Reusable KYC via API or SDK. Sumsub retrieves matching data from the user’s Sumsub ID account and runs the recipient’s configured Reusable KYC checks. All checks run fresh in the recipient’s Reusable KYC flow, Sumsub does not copy check results from the Sumsub ID account.
Gateway uses Sumsub ID — OIDC as a technical building block for connecting the integrator’s product to the user’s Sumsub ID account. For detailed OIDC setup, supported scopes, and JavaScript library options, see this article.
How Reusable KYC Gateway works
Gateway involves three roles:
- Integrator — a non-regulated business that embeds the Verify with Sumsub ID button in its product. The integrator connects the user’s Sumsub ID account and obtains permission to generate share tokens.
- Recipient — a regulated business that receives verified applicant data through Reusable KYC via API or SDK.
- Source — the user’s Sumsub ID account, which stores verified documents and data. The user controls sharing from this account.
NoteThe integrator is not the source of documents, verification data, or verification results. Sumsub retrieves the reused data from the user’s Sumsub ID account after the user authorizes sharing.
The Gateway flow consists of three main stages:
- Connection. The user connects their Sumsub ID account to the integrator through a Sumsub-hosted flow. During this step, the user authorizes the integrator to generate Sumsub ID share tokens.
If the user already has a verified Sumsub ID account, they can proceed directly to authorization. If they do not have a Sumsub ID account, they create one and complete the required verification checks. - Share token generation. When the user moves from the integrator’s product to a recipient service, the integrator generates a Sumsub ID share token for that specific recipient.
If the user has not yet authorized sharing with this recipient, the integrator redirects the user to a Sumsub-hosted consent screen. - Reusable KYC. The recipient ingests the share token through Reusable KYC via API or SDK. Sumsub checks the user’s authorization, retrieves matching data from the user’s Sumsub ID account, and applies the recipient’s verification level requirements.
NoteGateway reuses verified documents and data from the user’s Sumsub ID account, but the recipient’s checks run in the recipient’s own Reusable KYC flow. Sumsub applies the recipient’s level requirements and check configuration instead of copying existing check results from the Sumsub ID account.
Setup for integrators
Before starting the integration:
- Sign up for Reusable KYC Gateway with Sumsub.
- Receive your integrator client key.
- Make sure the following scopes are enabled for your client key:
openidemailshareoffline_access
- Register your redirect URI in the Dashboard in the OIDC Settings section.
ImportantSumsub enforces scope restrictions server-side. Gateway integrators cannot request additional personal-data scopes by default. Contact Sumsub if your flow requires more scopes.
The integrator receives only the data required to identify the connected Sumsub ID account and generate share tokens.
| Data | Description |
|---|---|
| OIDC subject identifier | An opaque identifier that lets the integrator recognize which Sumsub ID account the user connected. |
| Email address | Returned only if the integrator requests the email scope. |
| Sumsub ID share token | An opaque token that the integrator passes to the recipient. |
| Implicit verification signal | A user only reaches the share-token authorization screen if their Sumsub ID account is verified. Reaching this screen successfully therefore implies that the user has an approved identity verification. |
NoteThe integrator does not receive:
- User identity data, such as name, date of birth, nationality, or document images.
- Biometric data.
- The recipient’s KYC result.
- Check results from the recipient’s verification flow.
Once all the prerequisites are met, complete the following steps to set up Gateway as an integrator.
Step 1: Add recipients
Before generating Sumsub ID share tokens, add the regulated partner services that will receive the reused KYC data as recipients in the Dashboard.
For more instructions on how to add a recipient, refer to this article.
After you add the required recipients, you can generate Sumsub ID share tokens for them using their Sumsub client IDs.
Step 2: Embed Verify with Sumsub ID button
Gateway uses Sumsub ID — OIDC to connect the user’s Sumsub ID account and authorize share-token generation. For more detailed OIDC setup options, see this article.
Use the Sumsub ID Connect JavaScript library to add the Verify with Sumsub ID button to your product.
Install the package:
npm install @sumsub/id-connectAlternatively, use the UMD build:
<script src="https://unpkg.com/@sumsub/id-connect/dist/index.umd.js"></script>Render the button:
import { createButton } from '@sumsub/id-connect';

createButton({
  clientId: 'your-integrator-client-id',
  permissions: ['share'],          // Gateway requires the 'share' scope
  container: document.getElementById('button-container'),
  onSuccess: (response) => {
    // Pass response.code to your backend immediately — codes are short-lived
    sendCodeToBackend(response.code);
  },
  onError: (error) => console.error('Authorization error:', error.message),
  text: 'Verify with Sumsub ID'
});
The share scope lets the user authorize your service to generate Sumsub ID share tokens.
Step 3: Exchange authorization code
After the user completes the Sumsub-hosted flow, your frontend receives an authorization code. Send this code to your backend and exchange it for a Sumsub ID Connect token.
Use the client secret from the OIDC Settings page:
curl -X POST 'https://id.sumsub.com/resources/snsId/api/connect/token' \
  -H 'content-type: application/json' \
  -d '{
    "grant_type": "authorization_code",
    "code": "<authorization_code>",
    "codeVerifier": "<pkce_code_verifier>"
  }'
The response contains the Sumsub ID Connect token (JWT). Store this token securely against your internal user record and use it to generate share tokens.
ImportantExchange the authorization code as soon as you receive it. Authorization codes are short-lived.
Step 4: Generate Sumsub ID share token
When the user proceeds to a recipient partner, generate a Sumsub ID share token for that specific recipient. To do so, use this API method.
Request example:
curl -X POST 'https://api.sumsub.com/resources/accessTokens/sumsubIdShareToken' \
 -H 'content-type: application/json' \
 -d '{
   "sumsubIdConnectToken": "<token_from_step_2>",
   "forClientId": "RecipientClientId",
   "ttlInSecs": "1800"
}'| Parameter | Type | Required | Description |
|---|---|---|---|
sumsubIdConnectToken | String | Yes | Sumsub ID Connect token obtained after the authorization code exchange. |
forClientId | String | Yes | Recipient’s Sumsub client ID. |
ttlInSecs | String or Integer | No | Token time-to-live in seconds. For example, 1800. |
Response example:
{
  "token": "_act-snsId-08c4d85d-d0ae-43d6-81e9-a57d4f8e3768",
  "forClientId": "RecipientClientId",
  "sharingAllowed": true
}| Field | Type | Description |
|---|---|---|
token | String | Generated Sumsub ID share token. Pass this token to the recipient. |
forClientId | String | Recipient’s client ID. |
sharingAllowed | Boolean | Shows whether the user has already authorized sharing with this recipient. If sharingAllowed is true, pass the share token to the recipient.If sharingAllowed is false, collect the user’s consent for this recipient before passing the token. |
NoteTreat Sumsub ID Connect tokens and Sumsub ID share tokens as opaque values. Do not parse, analyze, or rely on their internal structure. Token formats may change without notice. Maximum token length — 1 KB.
Collect consent for recipient
If sharingAllowed is false, the user has not yet authorized sharing with this recipient. Generate a share consent link and redirect the user to the Sumsub-hosted consent screen.
To collect this permission, use this API method to request a share link. Request example:
curl --request POST \
 --url https://api.sumsub.com/resources/snsId/oauth/shareLink \
 --header 'Authorization: Bearer <integrator_token>' \
 --data '{
   "redirectUri": "https://your-app.example/sumsub-share-callback",
   "forClientId": "RecipientClientId",
   "displayMode": "page",
   "state": "<your_custom_state>"
 }'
Sumsub returns a short-lived link. Redirect the user to this link.
After the user accepts or declines sharing, Sumsub redirects them back to the redirectUri and adds a signed JWT in the token query parameter. The JWT contains the sharingAllowed field.
Check sharingAllowed before continuing:
- If
sharingAllowedistrue, pass the share token to the recipient. - If
sharingAllowedisfalse, stop the flow and do not pass the share token.
Sumsub records consent per integrator, recipient, and user combination. Consent for one recipient does not apply to another recipient.
NoteCheck whether the share token generated before consent remains valid after the user grants consent, or whether the integrator must generate a new share token before passing it to the recipient.
Step 5: Pass share token to recipient
Pass the Sumsub ID share token to the recipient when the user moves from your product to the recipient’s flow. Use a secure backend-to-backend transfer where possible.
The recipient then submits the token through Reusable KYC via API.
Request example:
 curl -X POST \
      'https://api.sumsub.com/resources/api/reusableIdentity/reuse?shareToken=_act-jwt-eyJhbGciOiJub25lIn0.eyJqdGkiOiJfYWN0LTE3YjM5YTljLWRhOWUtNGY2MS04Y2ZjLTYwNzViNWM2NDk5MSIsInVybCI6Imh0dHA6Ly9sb2NhbGhvc3Q6ODA5MCJ9.&levelName=liveness-id-poa' \
      -H 'X-App-Token: <your-app-token>' \
      -H 'X-App-Access-Sig: <your-signature>' \
      -H 'X-App-Access-Ts: <unix-timestamp>'
ImportantSumsub ID share tokens are single-use. Generate a new token each time you pass a user to a recipient.
User experience
The user experience depends on whether the user already has a Sumsub ID account.
Existing Sumsub ID account
If a Sumsub ID account already exists and contains the requested verified data:
- Authentication. User provides and confirms their email address.
- Authorisation. User gives permission for integrator to generate share tokens.
Non-existing Sumsub ID account
If a Sumsub ID account does not exist:
- Authentication. User provides and confirms their email address.
- Sumsub ID account creation. User is prompted to create a Sumsub ID account.
- Verification. Sumsub runs the checks needed to provide the requested data. These checks depend on the scopes you ask for and the steps already completed by the applicant.
- Authorisation. User gives permission for integrator to generate share tokens.
When the user proceeds to a recipient for the first time, Sumsub may also show a consent screen for that specific recipient.
After the user authorizes sharing with a recipient, the recipient-side API flow does not require additional user screens.
NoteUsers can revoke the connection from their Sumsub ID account at any time. After revocation, the integrator can no longer generate share tokens for that user unless the user authorizes the connection again.
Setup for recipients
Before receiving data through Gateway:
- Subscribe to Reusable KYC Gateway.
- Make sure Reusable KYC is enabled for your account.
- Add the integrator as a donor in the Dashboard. For more information, refer to this article.
NoteThe Dashboard currently lists integrators under the Donor tab. In Gateway, the integrator does not provide KYC data. Sumsub retrieves the data from the user’s Sumsub ID account.
Reuse data via API
When the integrator passes you a Sumsub ID share token, submit it through the standard Reusable KYC via API method.
Request example:
curl -X POST \
'https://api.sumsub.com/resources/api/reusableIdentity/reuse?shareToken=_act-snsId-08c4d85d-d0ae-43d6-81e9-a57d4f8e3768&levelName=liveness-id-poa'| Parameter | Type | Required | Description |
|---|---|---|---|
shareToken | String | Yes | Sumsub ID share token received from the integrator. |
levelName | String | Yes | Verification level on the recipient side. Sumsub applies reused data against this level. |
After receiving the request, Sumsub:
- Checks that the user authorized sharing with your client ID.
- Retrieves matching data from the user’s Sumsub ID account.
- Runs the standard Reusable KYC via API flow against your level requirements.
- Creates or updates the applicant on your side.
If the reused data satisfies the level requirements and all checks pass, Sumsub approves the applicant.
Reuse data via SDK
Gateway also supports SDK-based reuse. In this flow, the user can choose which documents and data to share from their Sumsub ID account and completes a liveness check.
To start the SDK flow, include the Sumsub ID share token when generating an SDK access token.
Request example:
curl --request POST \
 --url https://api.sumsub.com/resources/accessTokens/sdk \
 --header 'content-type: application/json' \
 --data '{
   "applicantIdentifiers": {
     "email": "[email protected]",
     "phone": "555-1111"
   },
   "ttlInSecs": 600,
   "shareToken": "_act-snsId-08c4d85d-d0ae-43d6-81e9-a57d4f8e3768",
   "userId": "endUserId",
   "levelName": "basic-kyc-level"
 }'
Including the share token triggers the Sumsub ID reuse flow inside the SDK. The user selects which data to share, completes the required liveness check, and submits the data to your verification level.
What recipient receives
As a recipient, you receive:
- An applicant profile that Sumsub creates or updates on your side.
- Documents and data from the user’s Sumsub ID account that match your verification level.
- Check results for the checks configured in your level.
If all required checks pass, Sumsub approves the applicant. The recipient receives a completed KYC result while reducing the number of actions required from the user.
Test Reusable KYC Gateway in Sandbox
You can test the full end-to-end Reusable KYC — Gateway flow in Sandbox before switching to production.
For Gateway testing, use the Sandbox Sumsub ID environment: https://id-sbx.sumsub.com.
This environment is separate from the production Sumsub ID environment.
ImportantAccounts and data created in the Sandbox Sumsub ID environment do not exist in production and do not affect production data.
Sumsub automatically deletes Sandbox Sumsub ID accounts after 15 days.
Before you start, make sure both integrator and recipient have Reusable KYC service enabled and all steps are completed in Sandbox mode.
NoteYou can also test Gateway within the same client key in Sandbox. In this case, the same client key acts as both the integrator and the recipient.
Testing for integrators
Complete the following steps to test Gateway in Sandbox mode as an integrator.
Step 1: Configure OIDC settings in Sandbox
In the Dashboard, perform the following steps:
- Switch to Sandbox mode using the toggle in the upper-right corner.
- Navigate to Dev Space → OIDC Settings.
- Generate a client secret.
- Register the redirect URL that will receive the authorization code after the user completes the Sumsub-hosted flow.
Note
Use the Sandbox Sumsub ID host for Gateway testing. When initializing the Sumsub ID Connect JavaScript library, set the
baseUrlparameter tohttps://id-sbx.sumsub.com.
Example with createButton:
import { createButton } from '@sumsub/id-connect';

createButton({
  clientId: 'your-sandbox-client-id',
  permissions: ['share'],
  container: document.getElementById('button-container'),
  baseUrl: 'https://id-sbx.sumsub.com',
  onSuccess: (response) => {
    // Send response.code to your backend immediately.
    sendCodeToBackend(response.code);
  },
  onError: (error) => console.error('Authorization error:', error.message),
  text: 'Verify with Sumsub ID'
});
You can also use openModal with the same baseUrl value:
import { openModal } from '@sumsub/id-connect';

openModal({
  clientId: 'your-sandbox-client-id',
  permissions: ['share'],
  baseUrl: 'https://id-sbx.sumsub.com',
  onSuccess: (response) => {
    // Send response.code to your backend immediately.
    sendCodeToBackend(response.code);
  },
  onError: (error) => console.error('Authorization error:', error.message)
});
Step 2: Connect to Sandbox Sumsub ID
After the user clicks Verify with Sumsub ID, Sumsub redirects them to the Sandbox Sumsub ID environment.
Depending on whether the user already has a Sandbox Sumsub ID account, they will:
- Sign in to an existing Sandbox Sumsub ID account and authorize the integrator to generate share tokens.
- Create a Sandbox Sumsub ID account, complete the required verification checks, and then authorize the integrator.
AttentionThe production Sumsub ID account cannot be used for Sandbox testing. The user must create or use an account in the Sandbox Sumsub ID environment.
Step 3: Exchange authorization code
After the user completes the Sumsub-hosted flow, your frontend receives an authorization code. Send this code to your backend and exchange it for a Sandbox Sumsub ID Connect token.
Use the Sandbox Sumsub ID host for the token exchange request:
curl -X POST 'https://id-sbx.sumsub.com/resources/snsId/api/connect/token' \
  -H 'Content-Type: application/json' \
  -d '{
    "grant_type": "authorization_code",
    "code": "<authorization_code>",
    "codeVerifier": "<pkce_code_verifier>"
  }'
Use the Sandbox client secret from the OIDC Settings page when authenticating the request.
Step 4: Generate a Sandbox Sumsub ID share token
When the user proceeds to a recipient, generate a Sumsub ID share token for that recipient. For Sandbox testing, sign the request with an app token and secret key created in Sandbox mode.
Response example:
{
  "token": "_act-sbx-snsId-...",
  "forClientId": "recipient-sandbox-client-id",
  "sharingAllowed": true
}
Testing for recipients
Complete the following steps to test Gateway in Sandbox mode as an recipient.
Step 1: Configure recipient level
In the Dashboard, perform the following steps:
-
Switch to Sandbox mode using the toggle in the upper-right corner.
-
Go to Dev Space → Sandbox mode for verification testing.
-
Open an existing verification preset or click Create new verification preset.
-
Configure the preset:
- Enable Automated applicant review.
- Set Face match to Always approve.
- Enable Reusable KYC.
-
Save the preset.
-
Apply the preset to the verification level that you want to use for Gateway testing. To do so:
- Open Integrations and select the level of your interest.
- On the Configurations tab, open Sandbox mode for verification testing and select the preset you configured.
- Save changes.
The recipient must use this Sandbox level name when calling the Reusable KYC via API.
Step 2: Reuse Sandbox share token
After the recipient receives the Sandbox Sumsub ID share token from the integrator, submit it through the standard Reusable KYC via API method.
Use the recipient Sandbox app token when signing the request:
curl -X POST \
  'https://api.sumsub.com/resources/api/reusableIdentity/reuse?shareToken=_act-sbx-snsId-...&levelName=your-sandbox-level-name'
Data privacy (GDPR/UK GDPR)
The Sumsub-hosted connection flow and per-recipient consent screen collect user authorization for data transfer from Sumsub ID to the recipient. Integrators and recipients remain responsible for their own data-protection obligations, including GDPR and UK GDPR obligations where applicable.
Updated 8 days ago