Create questionnaire
Collect information from your applicants for effective verification.
Questionnaires consist of sections. Each section may contain one or more questions (items in API), and allows you to group them into different areas of application, depending on your scenario.
To create a questionnaire:
- In the Dashboard, go to the Questionnaires section and click Create questionnaire.
- In Questionnaire settings, provide a questionnaire name that will be shown at the top-middle when applicants pass the questionnaire and enter an optional description.
-
Select the Show questionnaire name to applicant in SDK steps list checkbox to display the questionnaire name in the SDK steps list instead of the default label.
If you add translations for the questionnaire, applicants see the localized title (based on their language). If a translation is not available for that language, the steps list shows the default label.
AttentionAfter updating a questionnaire name or its translations, the change may take up to 15 minutes to appear in the SDK.
- Check out the generated questionnaire ID and edit it if needed. The ID is used when working with API.
- Select the Allow team members to edit questionnaires checkbox to allow your team members to change questionnaires.
- Navigate to Questionnaire content to set up sections.
NoteTo change questionnaires, your Dashboard account must be granted the Change applicant’s personal data permission.
Set up questionnaire section
In Questionnaire content, you can group your questions into independent sections, each section per set of questions. You can add as many sections as you need, depending on your scenario.
To adjust a question section:
- Provide a section title that you want to be shown to your applicants. For example, you may want to group your questions into several sections in case you want to collect answers from different areas. This means that you can create several sections, each of them having different titles. Additionally, this field supports Markdown for formatting and structuring your text.
- In the Description field, enter an optional section description. This field also supports Markdown.
- In the ID field, review the automatically assigned identification number. You can use this number when specifying conditions or working via API.
-
Check the Show random questions from this section box to set up question randomizer. It lets you select a number of questions that will be randomly picked for the applicant. Random selection happens independently for each applicant. All questions are mandatory and must be completed.
You can configure randomization separately for each content section of a questionnaire, and specify any number of questions any from 1 up to the total number of questions in the section. If you mark a question as Required, we will always show it to the applicant along with the randomly picked questions. In such case, a number of questions must be higher than the number of required questions + one more.
Mind the following- When this setting is enabled, conditions cannot be applied to any questions within that section.
- When editing answers, the editor can edit only the same set of selected questions. New randomization will not occur during editing.
- If the SDK is reloaded or the applicant returns later, they see the same questions.
- Resetting a questionnaire (individually or as part of a full applicant reset) clears previously assigned random questions and assigns a new random set.
This does not apply to questionnaires within Applicant actions. To reassign questions in such cases, create a new action.
- Via the switch button, identify if there will be a condition that defines the way how the data in each section should be displayed and processed. Such a condition might be based on answers to certain questions or whether the questions are answered at all. You can combine conditions by using logical operators, such as
AND (&&)andOR (||). To refer to questions, use theSection idandItem idvariables in the formatsectionid.itemid. - Go to the New Question form to customize question details and add more questions to the section.
- To add another section, scroll down to the end of the page and click Add section.
Add question
Specify question details. You can add as many questions as you need, depending on your scenario.
To specify questions:
- Provide a question title and enter an optional question description.
- In the ID field, review the automatically assigned identification number. You can use this number when specifying conditions or working via API.
- Select the Required checkbox if you want to mark the question as required. This way, your applicants will not be able to skip the question.
- From the Type of Question drop-down list, select a question type.
- Identify the text that will be shown in the placeholder.
- Adjust Advanced settings if you want to extend the default settings.
- Click Add option if you want to define custom values and configure risk scoring. Available only if Type of Question is Checkboxes, Multiple choice, Country (countrySelect or countryMultiSelect), or Dropdown.
Question types
Question types define the way in which to collect the data. For example, if you want to collect some textual information from your applicants, you can select Short answer. If you want to give your applicants the ability to select from different options, you can opt for Checkboxes, Multiple choice, or Dropdown.
Available question types include:
|
Type |
Parameter |
Description |
|---|---|---|
|
Short answer |
|
Simple text field. |
|
Paragraph |
|
Expandable text area. |
|
Checkboxes |
|
Array of options. Creates checkboxes. |
|
Multiple choice |
|
Array of options. Creates radio buttons. |
|
Dropdown |
|
Array of options. Creates a drop-down list. |
|
Phone number |
|
Phone number field. |
|
Country |
|
Drop-down list with available countries. |
|
|
Drop-down list with available countries where several of them can be selected. Mind that |
|
|
File upload |
|
Allows uploading a file as an attachment. |
|
|
Allows uploading several files as an attachment. |
|
|
Date |
|
Date field in format |
|
Date and time |
|
Calendar control that allows you to select date and time. |
|
Consent / Agreement |
|
Single checkbox that allows applicants to accept the consent or agreement. When you select this option, the Text of agreement field becomes available where you can specify the consent or agreement. The field also supports Markdown to help you provide a link to the consent or agreement. |
Settings
Advanced settings let you set auxiliary parameters, such as logical conditions and formats.
These settings are available when Type of Question is set to Short answer, Paragraph, or Multiple file upload.
|
Option |
Description |
|---|---|
|
Condition |
A logical condition that defines the way how the data in each section should be displayed and processed. Such a condition is based on the answers to certain question or whether the question is answered at
all. You can combine conditions by using logical operators, such as |
|
Format |
Depending on which option is selected (Short answer, Paragraph, or Multiple file upload) and while answering the questions, applicants must adhere to the format that you define here. For example, you can force your applicants to provide only numeric answers or answers that fall within the specified range using the Minimum value and Maximum value. These are the possible format options for managing answers:
|
Options
Options let you configure risk scoring. If your question types support options, you can create them manually or by uploading a CSV file.
Regardless of the option creation method, they may include the following columns in this specific order:
| Option | CSV file column | Description |
|---|---|---|
| Title | title | Text description of the field shown to the user. |
| Value | value | Sets the value that you will get via the API after the applicant selects it. |
| Risk score | risk_score | Upon completion of the questionnaire, the system simply sums up the number of points according to the applicant's answers. The way the received points are interpreted is decided independently, depending on your scenario. The risk score feature does not affect verification results. |
AttentionThe risk score column is only supported if you have the Risk Scoring enabled.
CSV import
The successful CSV import works as follows:
- If the uploaded CSV file contains no validation or parsing errors, the system generates a list of options based on the file and adds them to the question.
- All existing options for the question will be replaced.
NoteThe system also supports uploading CSV files with localized option titles. In this case, title columns must follow the next format:
title_<language_code>.To see the full list of supported languages, refer to this article.
Add section separators
Divide long questionnaires by adding section separators between the sections. All the changes you make will be displayed on the preview screens. Use the navigation arrows to switch between the screens and view the changes.
To add a separator:
- Click Add section separator.
- Place the separator as needed using the drag-and-drop.
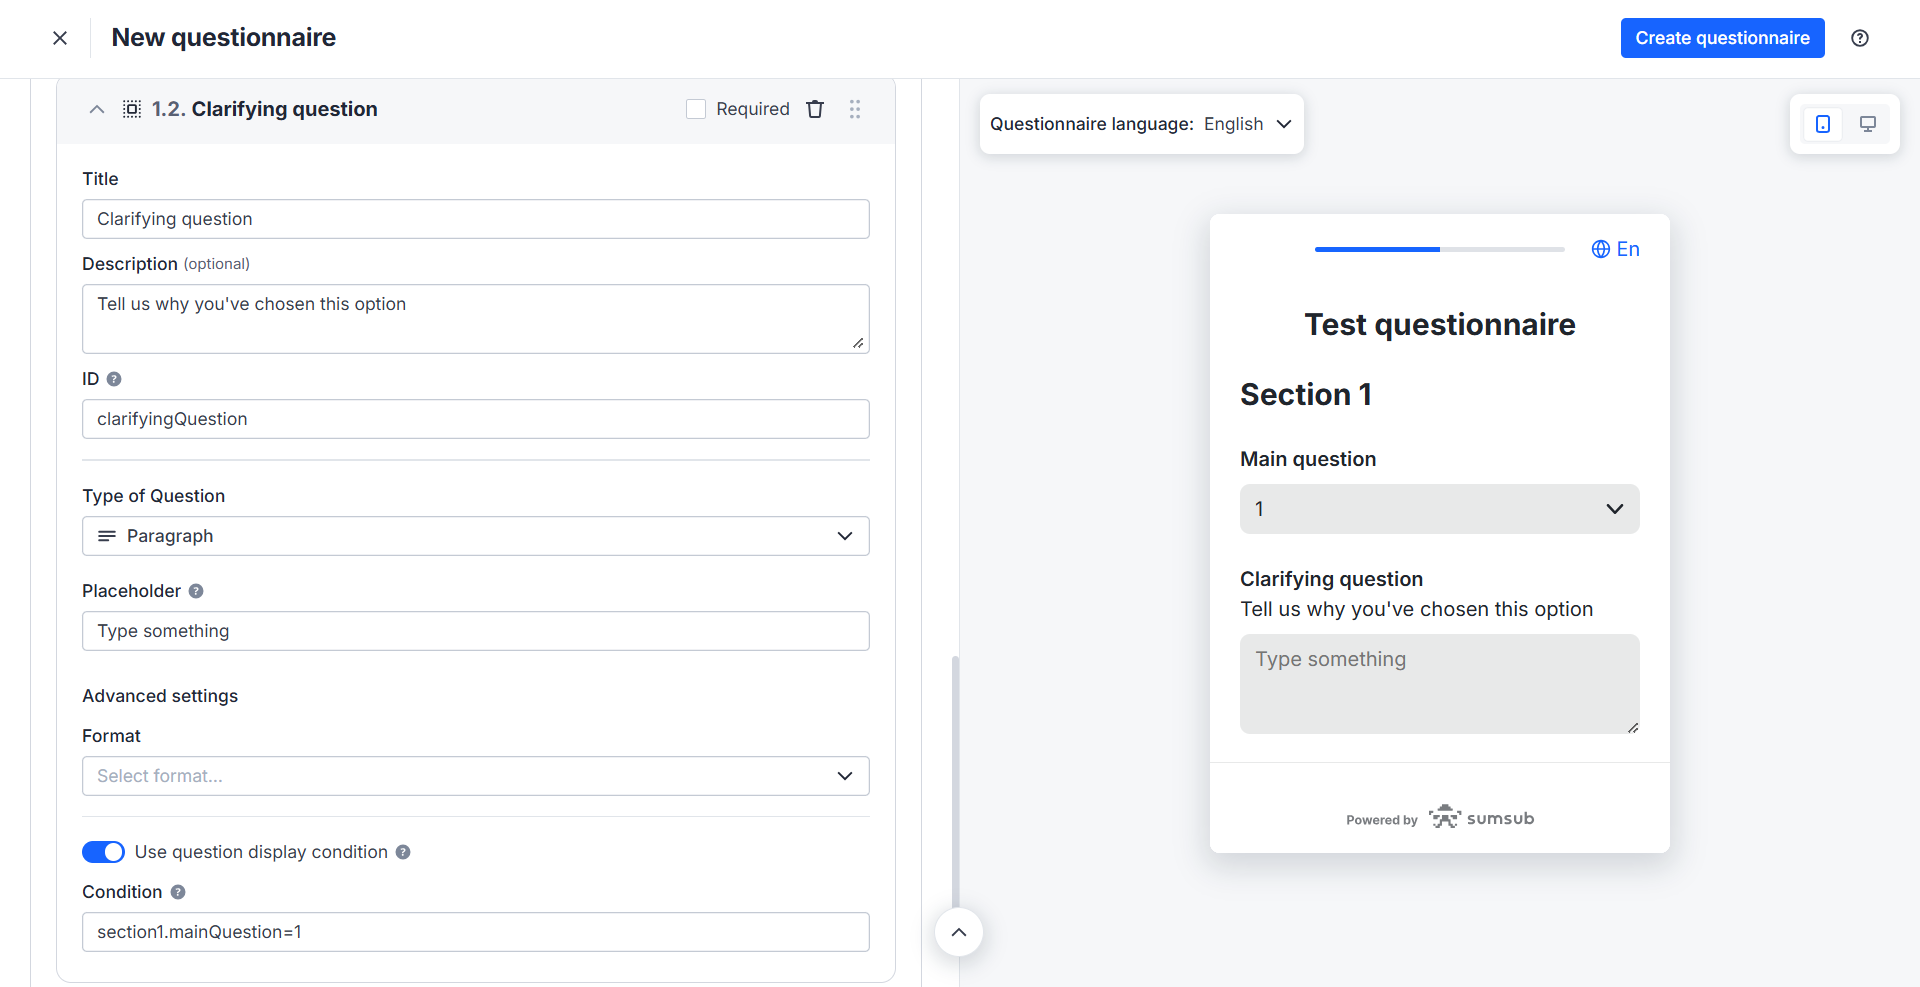
Add conditions for questions
Use the advanced questionnaire settings to configure conditions and display additional questions based on the previous answers.
For example, add a clarifying question if an applicant selects the first option:
- Create and set up a questionnaire.
- Add a main question and set up the answer options.
- Create a question below and enable the Use question display condition toggle.
- Configure a condition in the following format—enter
sectionID.itemID = 1, where the itemID is the id of the main question. Use the&&(AND) or||(OR) operators to make more complex conditions.
Updated 4 months ago