
Fraud Prevention Starter Kit
Combine onboarding signals into a single, ready-made fraud risk level without building custom rules from scratch.
Fraud Prevention Starter Kit acts as a predefined fraud risk package and helps you assess applicant risk during onboarding. This solution is applied through Workflow Builder, Case Management, the API and webhooks, and your monitoring rules.
It combines available signup, verification, device, network, identity, linkage, and feedback signals into a single actionable fraud risk level: low, medium, or high.
Use the resulting risk level to drive decisions such as:
- Additional checks.
- Manual review.
- Rejection.
- Dynamic limits and bonuses.
- Combined onboarding and transaction risk scoring.
If you already use Sumsub User Verification, most of the required signals — email, phone, IP, device, identity data, applicant linkages, and fraud network indicators — are already collected on the same platform. That means you can start detecting risky users without integrating a separate fraud tool or building custom rules from scratch.
The Starter Kit ships with a pre-built risk matrix based on Sumsub experience detecting identity fraud, forgeries, deepfakes, and coordinated abuse. You can adapt the logic as your fraud patterns evolve by creating custom rules, using AI-assisted rule generation, adjusting thresholds, and tuning rules that cause false-positive spikes.
Fraud Prevention Starter Kit and KYC
On its own, KYC already stops important fraud types, such as document forgery and attempts to bypass Liveness with deepfakes, which are built into Sumsub standard verification checks.
However, a verified identity is not the same as a legitimate one — KYC can pass while the account is still fraudulent. Many kinds of fraud happen before full verification takes place, or in cases where the user presents genuinely legitimate documents.
For example, if you run document checks without Liveness, a real but leaked document can pass: it is a genuine document, just not submitted by the person it belongs to. Document-only KYC does not stop that without additional controls. Even valid documents and a matching selfie do not reveal mule accounts, account handover, device reuse, account farms, coordinated abuse, or users who deliberately cover their tracks to stay anonymous.
Fraud Prevention Starter Kit adds a fraud risk layer around your KYC flow. It does not replace KYC or AML obligations. Instead, it supports risk-based onboarding by combining available verification and fraud signals into one risk level that your team can act on.
KYC is also not always run on every user. In many industries, signup only grants access to a base profile, and full KYC is triggered later — for specific actions or higher tiers — rather than for everyone at onboarding. That means at the moment you need to make a decision, the only signals you may have are the email, phone, and device a user registered with.
The Starter Kit covers this pre-KYC scenario: it turns those early signals into a risk level you can act on before full verification. Because the Fraud Prevention Starter Kit runs on the same platform, it sits in one flow alongside your KYC checks, Transaction Monitoring and Behavior Monitoring, not in a separate tool.
When to use Starter Kit
Fraud Prevention Starter Kit targets new account fraud — any fraud that needs new accounts to operate or scale. Common examples include mule and drop accounts, account handover and account farms, multi-accounting, bonus/affiliate/referral abuse, synthetic identities, and coordinated abuse.
Consider adding the Starter Kit if any of the following apply:
- You are entering new markets, adding payment providers, or accepting new payment methods.
- Growth campaigns (welcome bonuses, referrals, affiliates) are attracting abuse and inflating spend.
- Fraud is already visible, or expected, and existing KYC checks alone are not catching it.
- Manual-review load is growing and needs prioritization.
- Chargeback rates are rising.
Signals evaluated
The risk matrix draws on signals across several categories. Available signals depend on which Sumsub services you have enabled for your flow (for example, selfie signals require Liveness, and document cross-checks require ID document verification) and on whether the relevant data is passed to Sumsub. Each signal has a configurable default risk level.
Email signals
Email Risk Assessment evaluates whether an address looks real, established, and human-chosen:
- Disposable email — from a temporary, auto-expiring email provider.
- Email has no web registrations — no online footprint.
- Non-deliverable email — the mailbox does not actually exist (bounces on delivery).
- Email domain has no website — the domain hosts no working site (a throwaway domain).
- Gibberish email — the address looks auto-generated rather than human-chosen.
- Fresh email — first appeared anywhere on the public web less than three months ago.
Phone signals
Phone Risk Assessment evaluates whether a number is real, stable, and has a digital presence:
- Virtual/VoIP number — an anonymous number from a VoIP or virtual-number provider.
- Disposable phone number — a temporary SMS-receive or rented number used for one-off codes.
- Phone has no web registrations — no online footprint.
- Fresh phone — first appeared on online services less than three months ago.
Digital footprint and identity signals
These digital footprint signals evaluate how an applicant's contact details map to their real-world identity online:
- Name mismatch in web services — the declared name does not match any name linked to the email or phone online.
- No name link in web services — no name is tied to the email or phone anywhere online.
- Contact data linked to multiple different names — the email or phone is tied to several unrelated identities online (a multi-accounting or synthetic-identity indicator).
IP and network signals
Advanced IP check evaluates whether the network origin is consistent, trustworthy, or masked:
- VPN usage — a consumer VPN masking the true IP and location.
- Tor network usage — connection through the Tor anonymity network.
- Hosting/datacenter IP — connecting from a cloud or datacenter range (a sign of a self-hosted VPN or proxy).
- Open web proxy — a public, unauthenticated proxy.
- Privacy relay — Apple iCloud Private Relay or Cloudflare WARP (hides the IP but keeps the true region).
- Chance of residential proxy — the IP has a sustained history of being rented as a residential proxy exit node.
- Distant IP locations — impossible-travel IP shifts within a single session.
Device signals
Device Intelligence evaluates whether a device is genuine, unique, and untampered:
- Device identification and cross-applicant linking — new versus previously seen device.
- Velocity of applicants per device — many distinct applicants verified on one device in a short window.
- Multiple devices, or multiple mobile devices, within a single session.
- Rooted Android or jailbroken iOS.
- Device emulator or virtual machine.
- Cloned app.
- Anti-detect browser, browser/device tampering, or fingerprint spoofing.
- Privacy mode or incognito mode.
- Malicious bot or known-bot detection.
- Frida instrumentation, developer tools open, or a man-in-the-middle attack.
- GPS location spoofing.
- Session behavior: quick session, lengthy session, night-time activity, failed session continuation, and verification links opened inside a messenger or social app (third-party link access).
Selfie and liveness signals
These signals surface when Liveness is part of your flow:
- Third party involved in the selfie.
- Phone used during the selfie (a coaching or social-engineering indicator).
- Person asleep or unconscious in the selfie.
- Many selfie attempts.
- Estimated age mismatch between the selfie and the document.
- Virtual camera detected.
- Same biometrics across accounts registered with different document data.
Cross-consistency checks
Cross-consistency checks compare what an applicant declares against what their digital, device, and network footprint reveals:
- Country mismatches — address vs. IP, ID document vs. IP, photo EXIF vs. document/IP, and phone country vs. address/applicant/IP/email domain.
- Diverse countries in applicant data — more than one country across document, address, IP, phone, and EXIF.
- Browser language mismatch.
- IP location vs. device timezone mismatch.
Network and linkage signals
Fraud Network Detection and duplicate search evaluate relationships between applicants, devices, identifiers, and known fraud outcomes:
- Strong link to fraudulent applicants — a high-confidence connection (same face, document, or device) to applicants you have already rejected for fraud or blocklisted.
- Potential link to fraudulent applicants — a lower-confidence connection (shared IP or address, probabilistic device match, or shared document/selfie templates).
- Many account duplicates — the applicant matches several already-verified accounts, interpreted against your own duplicate policy.
NoteThe system detects linkage signals only within your own applicant base. Linkage signals never read or share data across Sumsub customers.
Default risk matrix
The Starter Kit ships with a pre-built risk matrix out of the box — a curated set of 50+ signals, each mapped to a configurable default risk level — so you get a working risk outcome without designing rules from scratch. You can customize the Starter Kit — adjust, disable, or extend any of the rules.
The Starter Kit also uses Applicant risk scoring and Risk Level Assignment, which let you combine the pre-built rules and risk matrix with your own rules and policies.
Prerequisites
Before connecting the Starter Kit, confirm the following:
- You already use WebSDK or MobileSDK, and you are familiar with how Device Intelligence integrates:
- With WebSDK, no action is usually required.
- With MobileSDK, you may need small changes on the mobile-app side.
- With the API, Device Intelligence integration is required — review how it works before you start.
- Each applicant has an email or a phone, or both. For the Starter Kit, email and phone are among the main sources of risk signals, so make sure they are passed at the integration stage.
TipPlan time for evaluation, not just integration. If you use WebSDK or MobileSDK, integration effort should be close to zero. Even so, set aside time for analytics: reviewing specific cases, understanding your traffic, and working out which applicants to auto-reject, monitor, or let through.
When you are ready to proceed, contact your Customer Success Manager at [email protected] to discuss rollout and support. Early on, monitor how everything works on both sides to make sure it behaves as expected.
Set up Starter Kit
You can activate the Starter Kit at the KYC stage or earlier, at signup. Existing WebSDK/MobileSDK flows are the fastest path when the required signals are already collected. API and pre-KYC use cases need additional integration to pass data and collect device signals.
| Entry point | What it requires |
|---|---|
| KYC stage via WebSDK | Required signals are already collected in your Sumsub verification flow. Ensure email and phone are passed with the applicant. |
| KYC stage via MobileSDK | Install a small mobile module and ensure email and phone are passed with the applicant. |
| KYC stage via API | Pass email, phone, and initial applicant data, and enable Device Intelligence collection on your front end or pass the IP address via API. |
| Pre-KYC/signup stage | Pass email and/or phone. Enable device collection if using Device Intelligence on your front end, or pass the IP address via API. |
The Starter Kit can be embedded at specific touchpoints across both the signup/pre-KYC stage and the KYC stage.
Contact your Customer Success Manager at [email protected] for support setting up the Starter Kit for your account.
Confirm setup
After integrating, confirm the following.
Checks
To enable all checks on a single verification level:
- In the Dashboard, go to the verification level of your interest.
- Navigate to Configurations → Fraud prevention.
- Make sure all available checkboxes are selected.
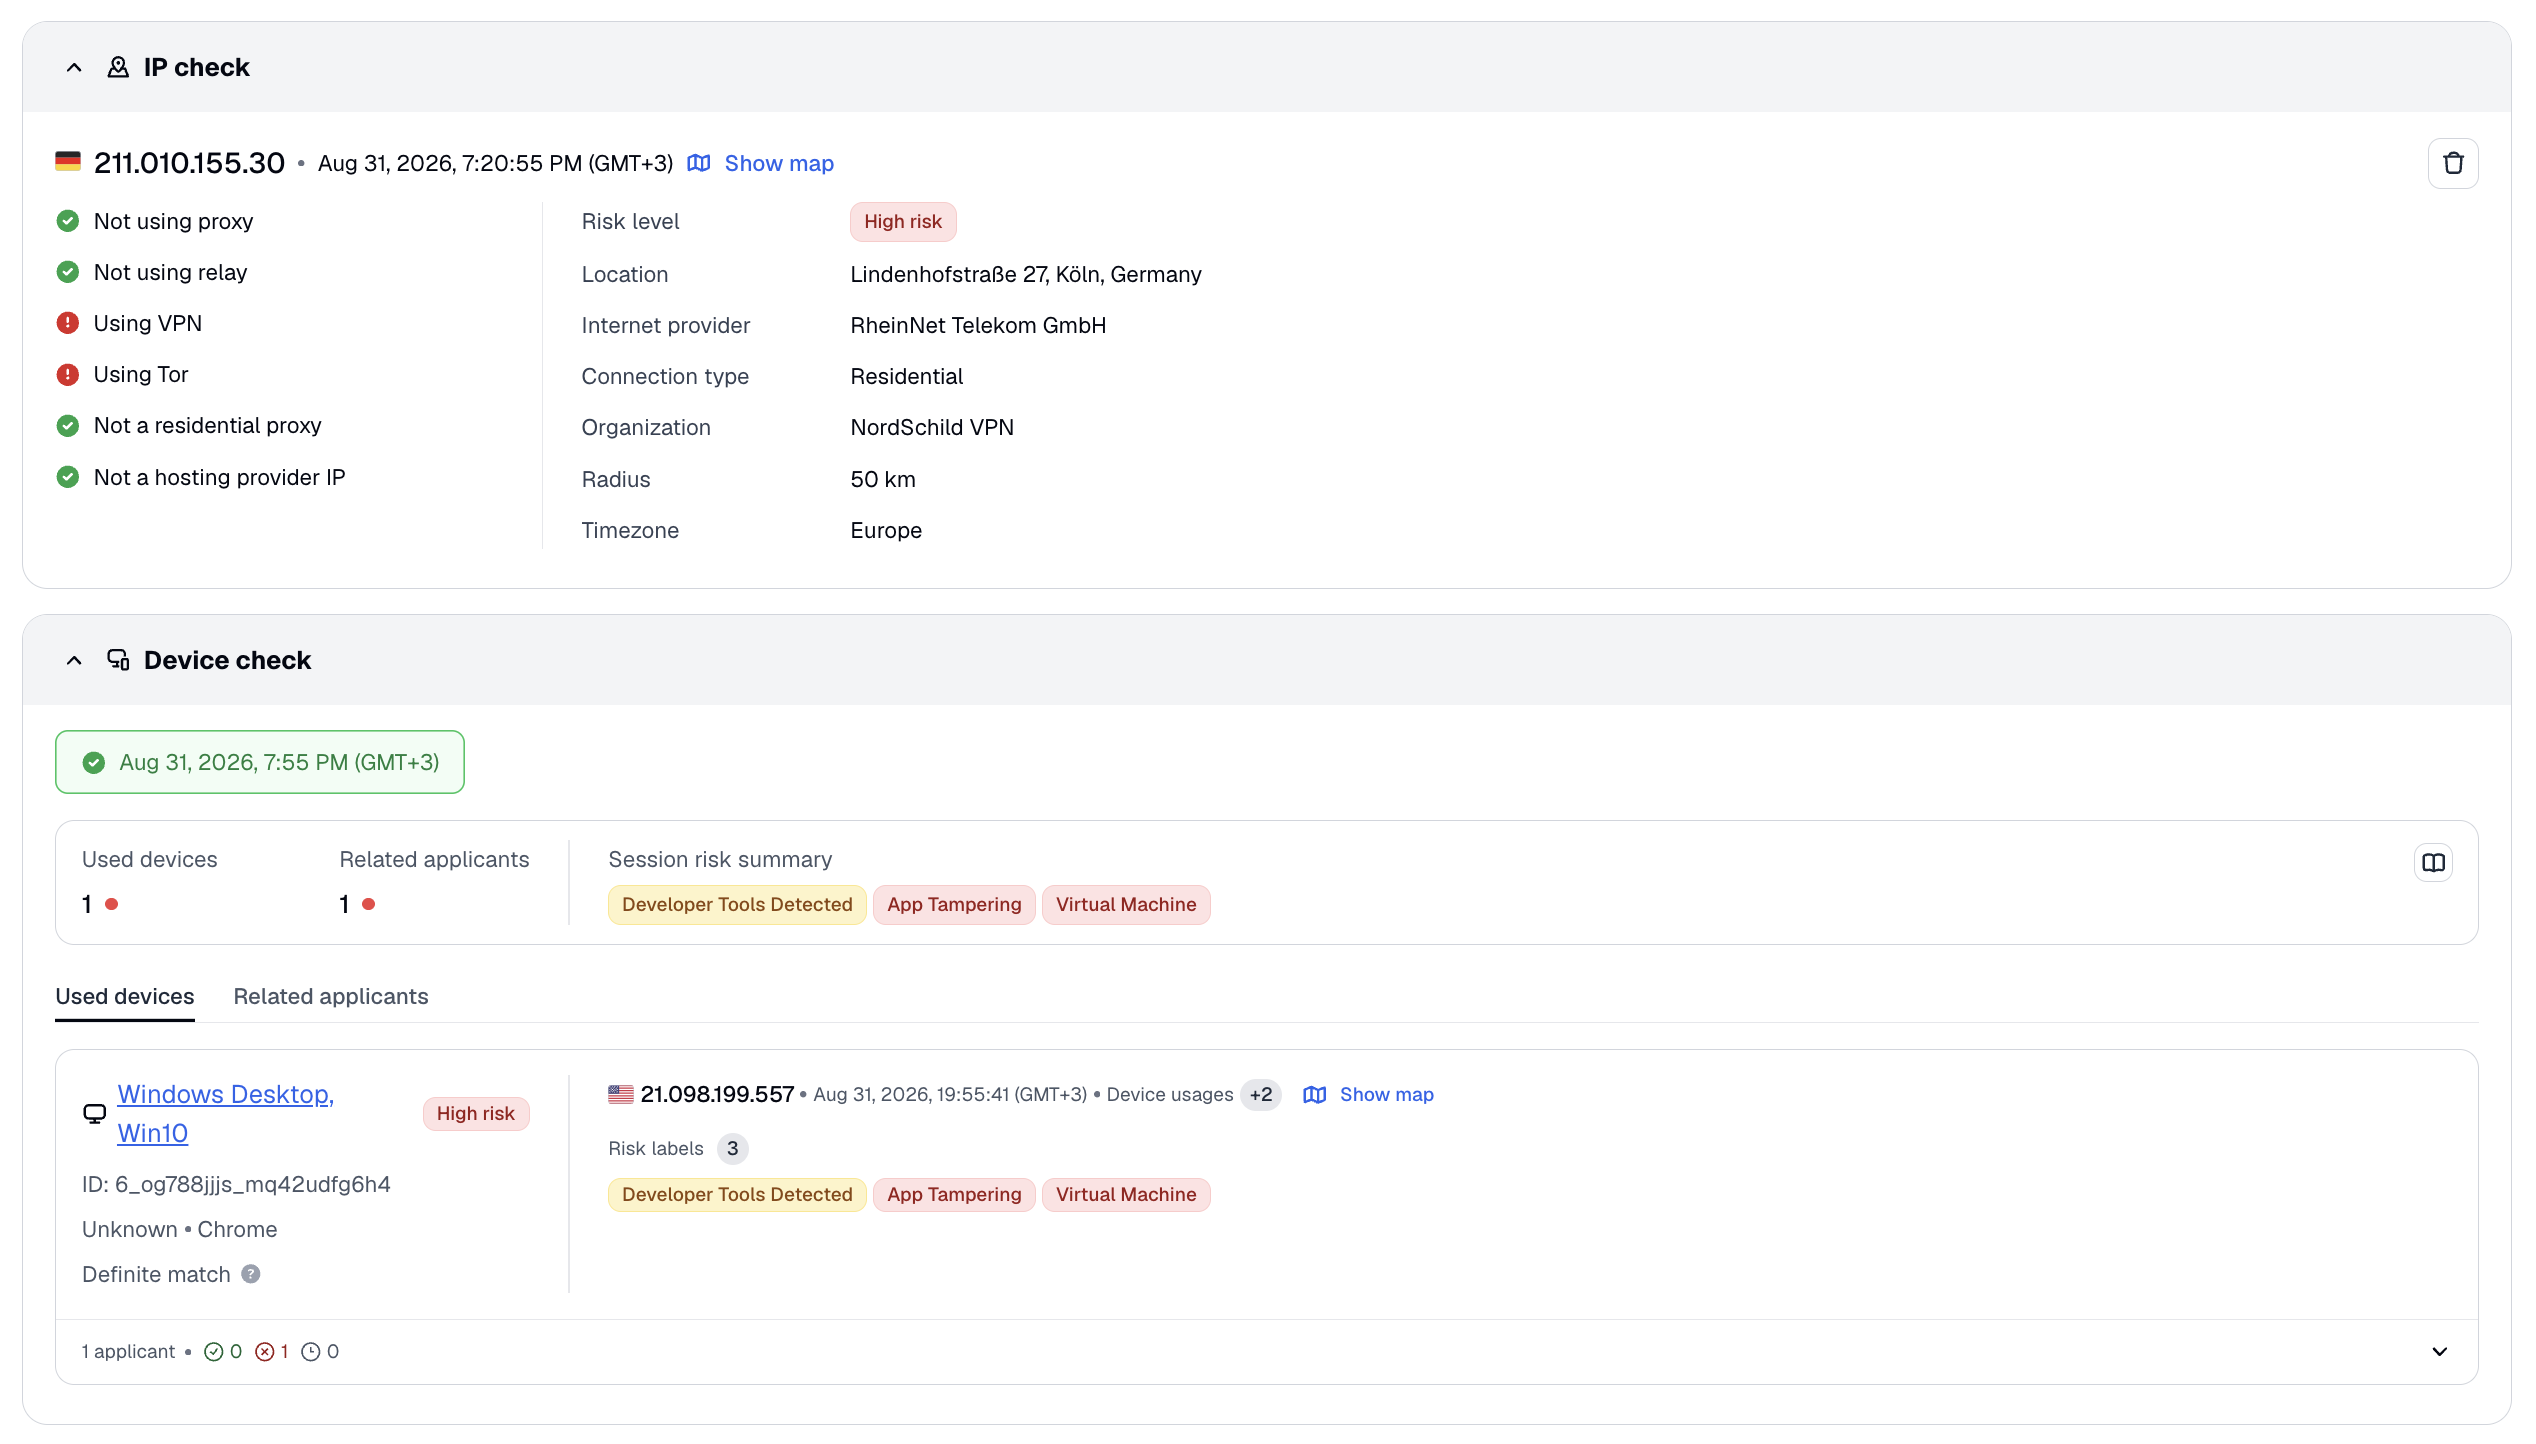
To confirm the fraud checks are working, open a couple of applicants and check for the following blocks on the Verification tab of the applicant page:
- Email confirmation check with risk assessment fields.
- Phone confirmation check with risk assessment fields.
- Device check.
- IP check.
Verification sessions
Applicant Risk Scoring works based on events, and each verification attempt is represented by a Verification Session event. To enable verification sessions during onboarding:
- In the Dashboard, go to the verification level of your interest and navigate to Configurations.
- Select Advanced settings.
- Check the Track verification sessions box.
- Click Save.
Risk levels
Risk levels are being assigned to new applicants.
- In the Dashboard, open Applicants → Individuals.
- Filter by Review status, it should be Check Completed.
- Add the Risk level column to see the full view.
Understand risk levels
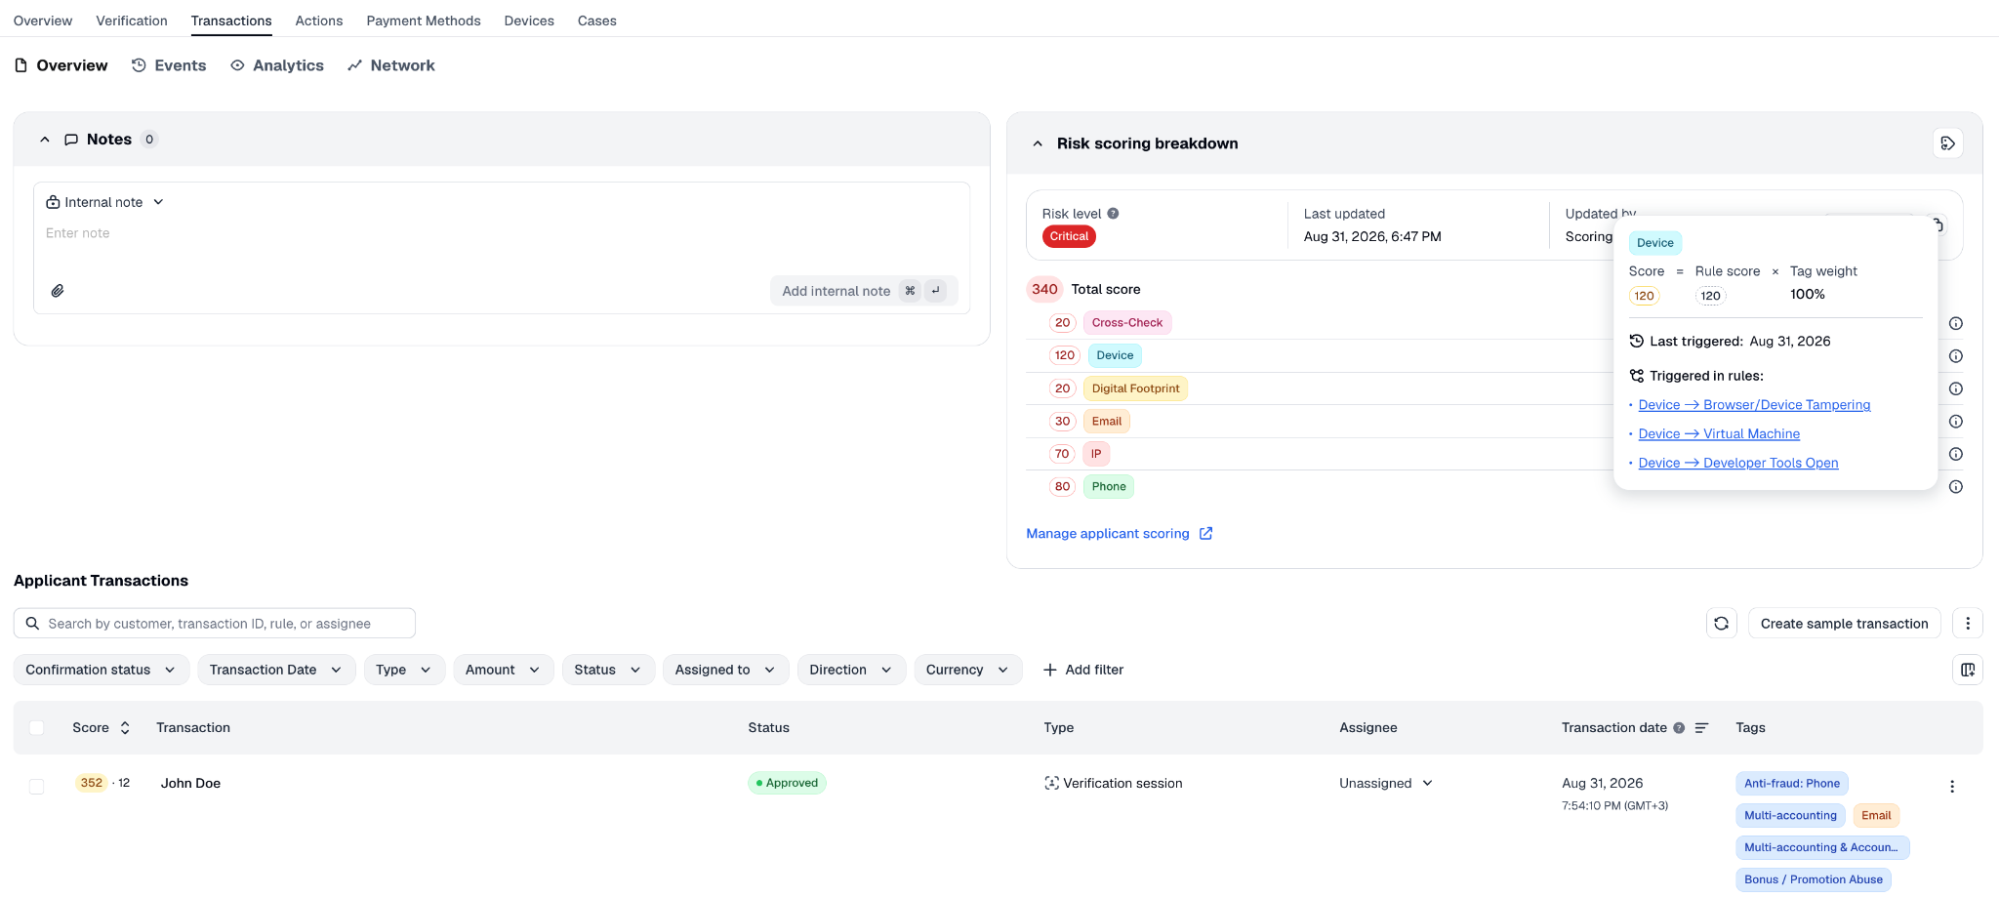
Each applicant receives a single fraud risk level. That level is not one check — it is built from a set of rules, where each rule evaluates a specific signal or condition by its own logic and contributes to the outcome. Those contributions are combined into one overall risk level, so you get a single, decision-ready result instead of dozens of separate signals to interpret.
In a typical setup, you can see levels such as low, medium, and high, telling you how risky an applicant is so you can decide what to do next.
To see why an applicant received a given level, open the applicant and select the Transactions tab to see the risk scoring breakdown, including which rules fired and how each contributed to the final level.
Use risk level to drive decisions across customer journey
Apply any of the actions below through Workflow Builder, Case Management, the API and webhooks, and rules in transaction and behavior monitoring, according to your risk appetite, automation capacity, and manual-review resources. Below you can find the five most common approaches.
-
Auto-reject the highest-risk applicants. Applicants with the highest risk scores can be rejected automatically at onboarding. We recommend this where the risk of onboarding a fraudulent user outweighs the risk of a false-positive rejection — for example, during an active fraud attack, or when exploring a high-risk market without enough resources to monitor onboarding risk.
In many cases, it is better to reject not at onboarding but at the first risky action (for example, a deposit), so you can observe what high-risk applicants do first. -
Manually review high-risk applicants. You can control the review process in Case Management. Beyond individual decisions, this helps you see what is happening across onboarding, spot false positives, learn what is new in your traffic, and react quickly to emerging problems.
-
Manage friction and additional verification steps. Apply fewer checks to low-risk applicants and more to high-risk ones.
For example, low-risk applicants might skip a step, while high-risk applicants are asked for Liveness up front, automated with no manual intervention needed.
-
Dynamically control limits and bonuses. Tie limits and incentives to the risk level. Welcome bonuses are a good example: none for high-risk, a small bonus for medium-risk, a larger one for low-risk. The same applies to transaction and deposit limits: lighter for low-risk users, tighter for higher-risk ones, letting users build reputation over time.
-
Combine onboarding risk with transaction and behavior risk. Use Applicant risk scoring to account for onboarding, transaction, and behavior risk in one place, and adapt your rules with onboarding risk taken into account.
Set conditions in Workflow Builder
Set up conditions on auto-rejections, additional verification steps, and manual review in Workflow Builder. To set up a condition based on the applicant risk level, create a condition based on the applicant.assessment.riskLevel property.
NoteTo start from a ready-made flow instead of building it from scratch, open the workflow examples gallery in Workflow Builder and copy the Fraud prevention example onto your canvas. It re-assesses applicant.assessment.riskLevel after each verification step:
- Applicants with a Critical risk level are rejected right after the entry-data check.
- The rest proceed to ID document and selfie verification.
- High-risk applicants get a transaction-monitoring case created and are sent to manual review.
- Medium-risk applicants are routed to an additional questionnaire.
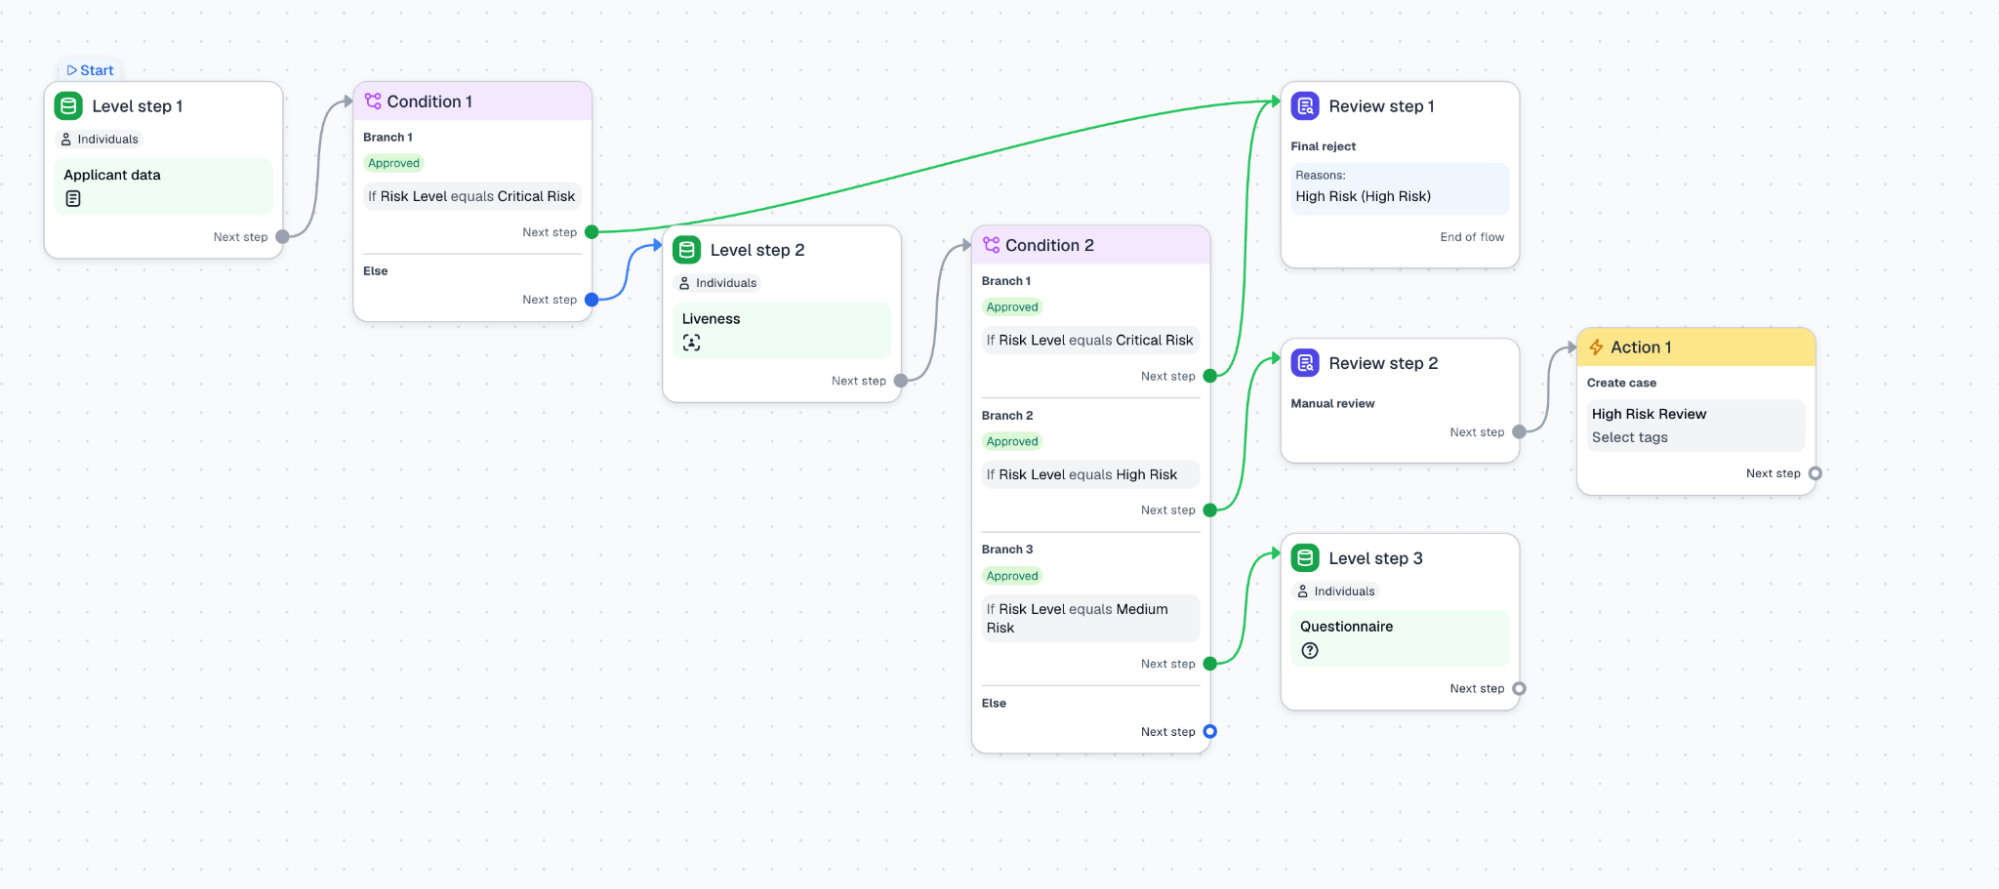
To set auto-rejections based on risk level, add a terminal review step with the type set to Final Reject and the reason set to High Risk. For more information on how to build conditions, refer to this article.
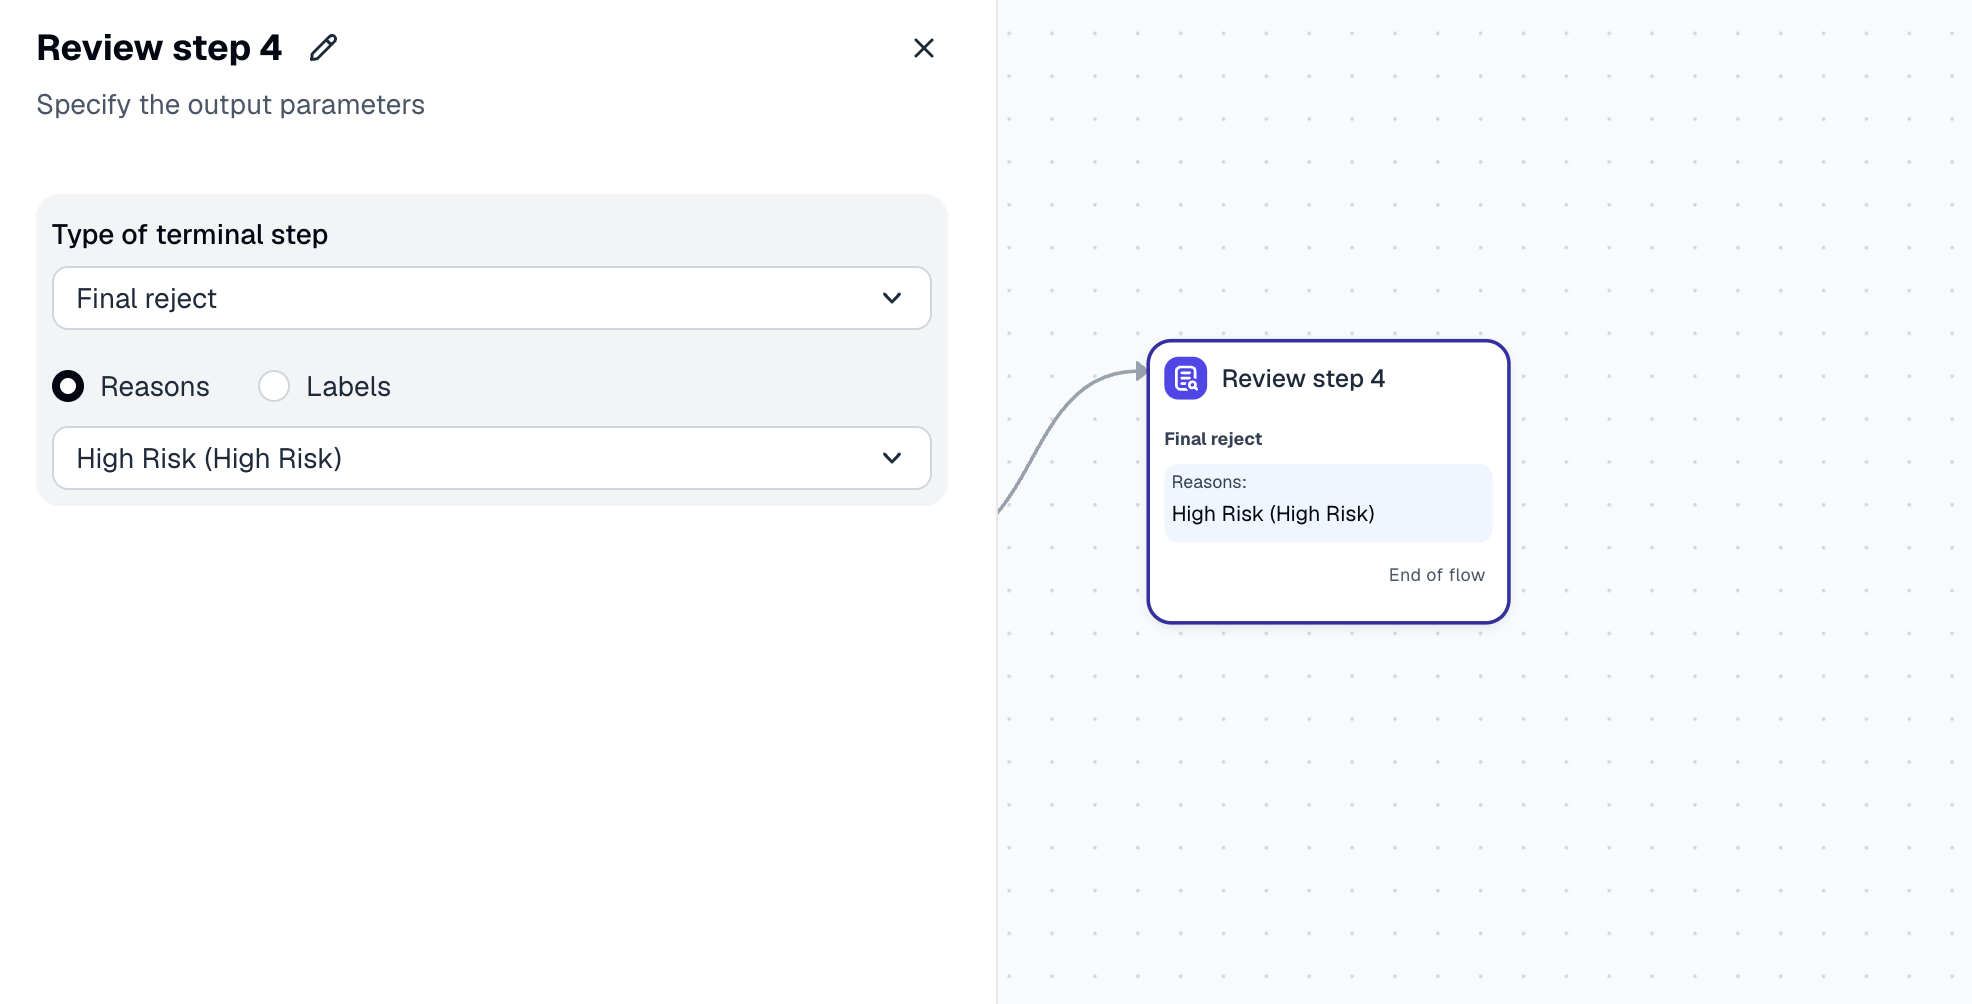
Use High Risk label
Use the High Risk label, not a fraud label, when rejecting risk-based cases. This keeps two groups separated:
- Confirmed fraud — applicants you have actually verified as fraudulent.
- High risk — applicants your risk policy did not allow to onboard, but that you have not confirmed as fraud.
Fraud labels feed back into the risk signals that link applicants to one another, so they carry a lot of weight. Reserve fraud labels for confirmed fraud only.
For applicants blocked purely by risk policy, use High Risk — you still stop them at onboarding, you can track and report the two groups separately, and you avoid distorting risk scoring for connected applicants.
Combine Starter Kit with monitoring rules
The easiest way to combine onboarding risk with transaction and behavior monitoring is to use the unified Applicant Risk Scoring matrix and risk level. Contact your Customer Success Manager at [email protected] to discuss combining the Starter Kit risk matrix with your existing risk matrix or additional rules.
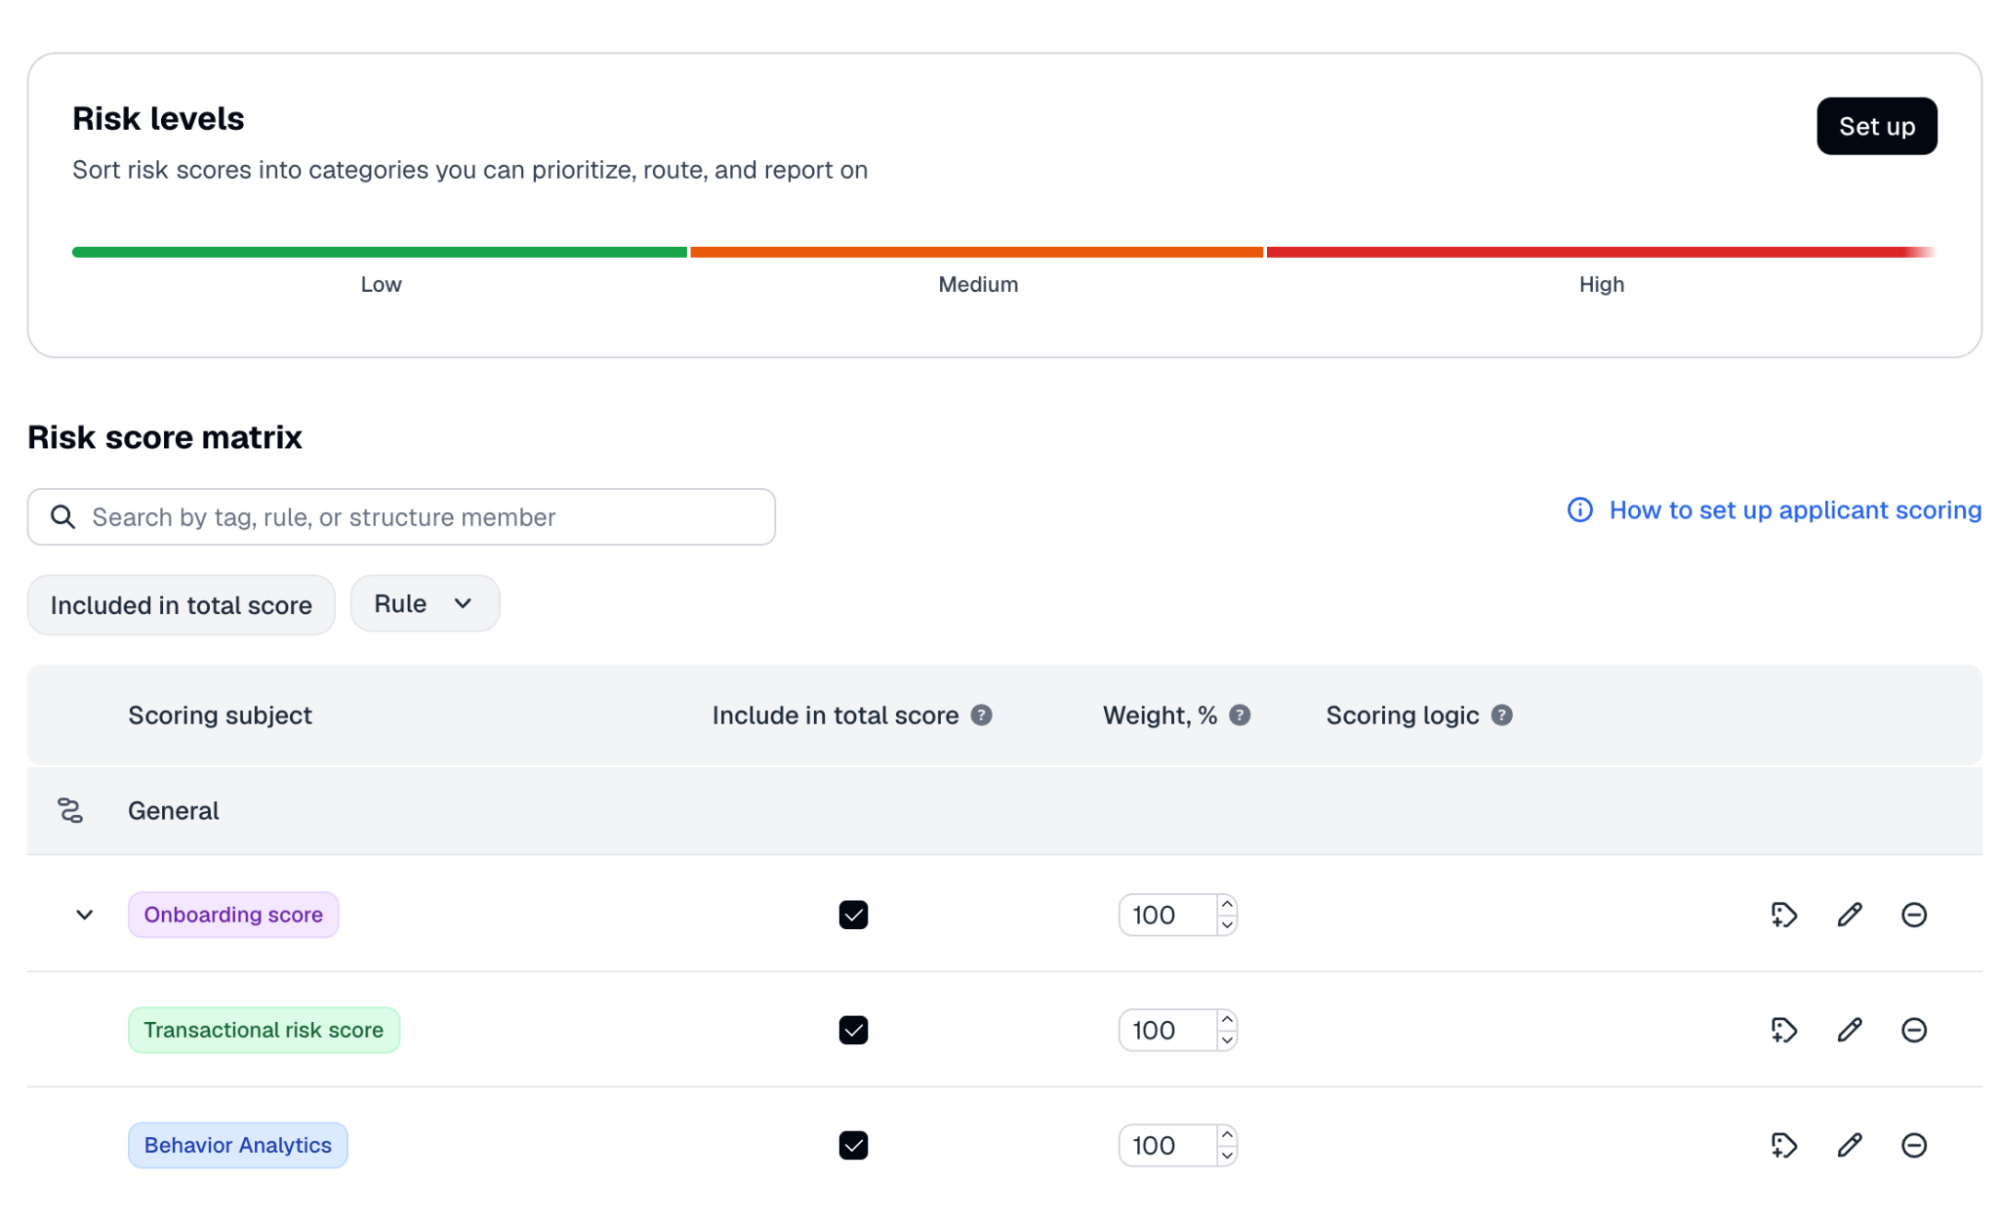
Alternatively, use the risk level directly during rule creation. For more information on how to build custom rules, refer to this article.
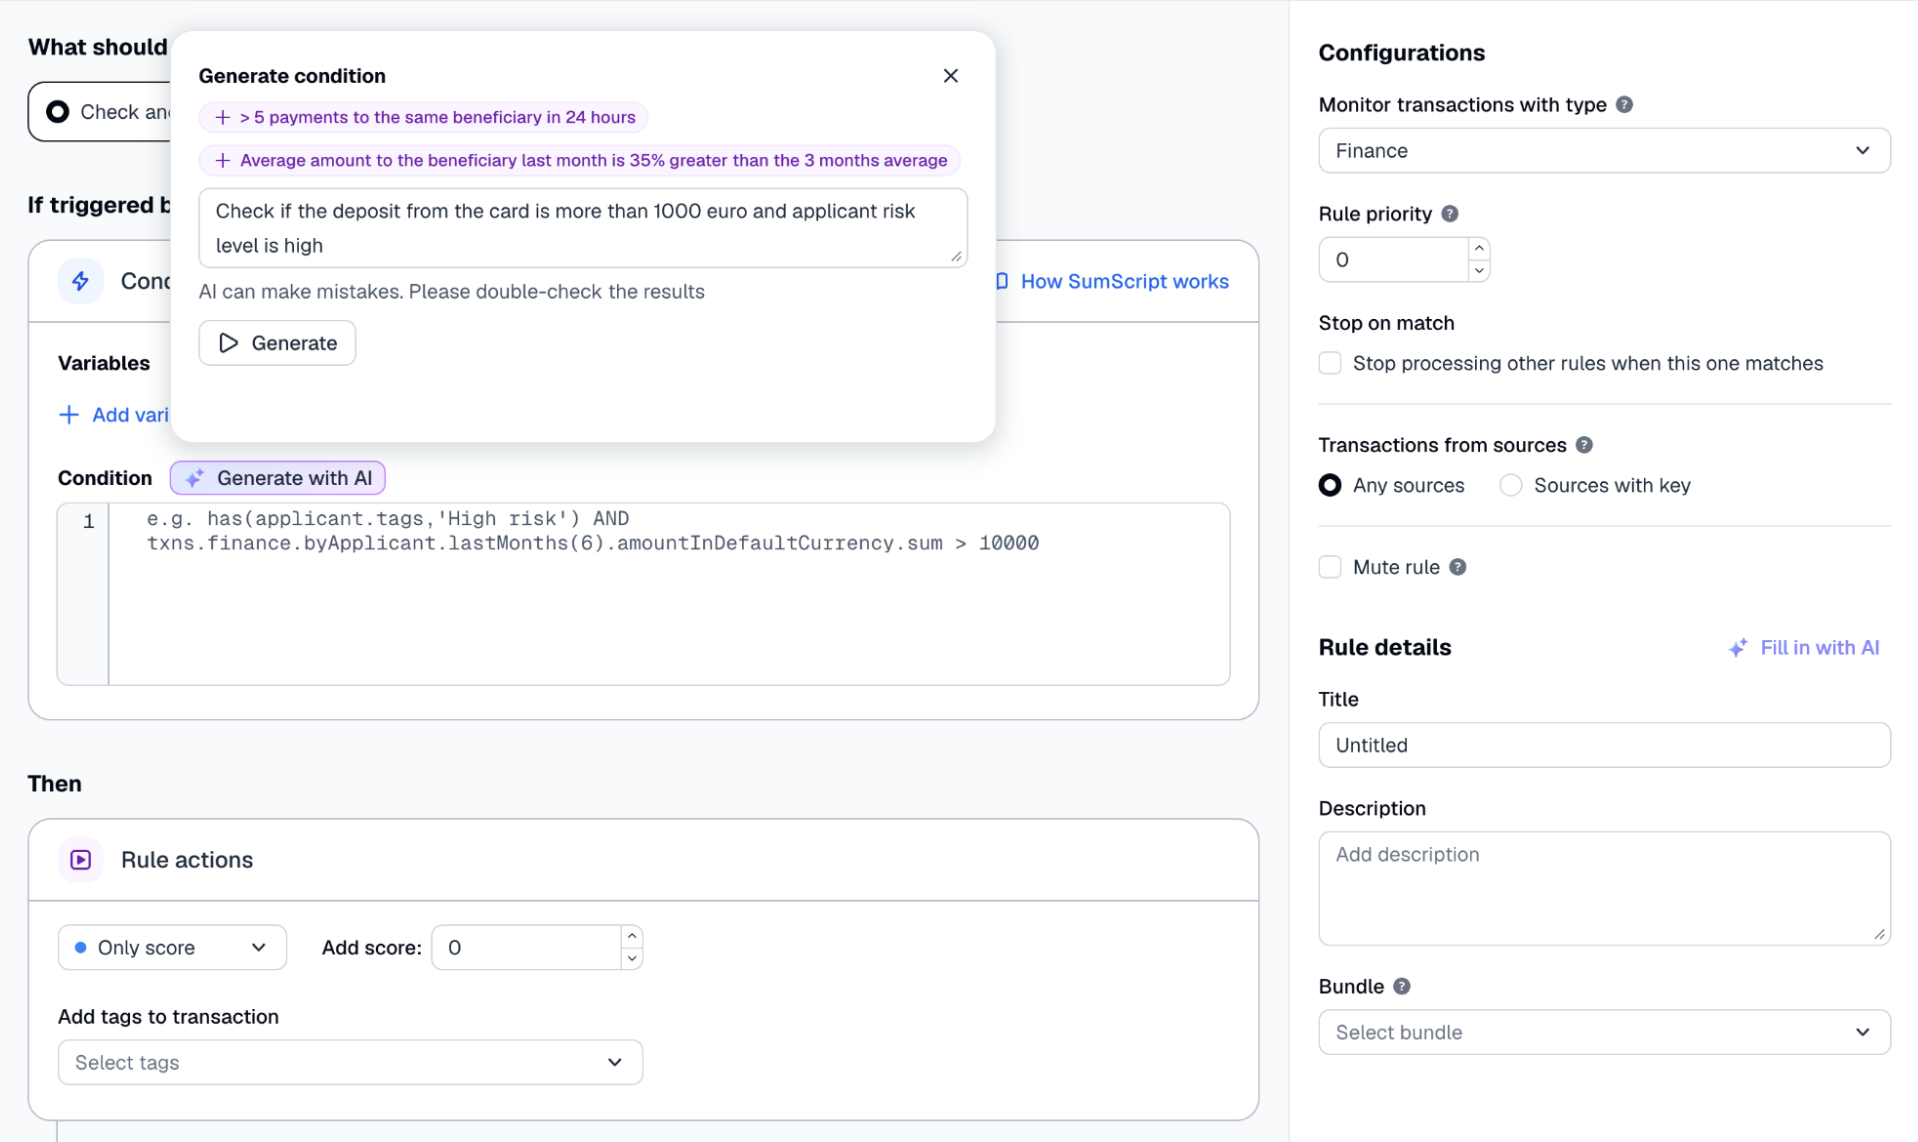
You can also use Summy AI Copilot for generating a rule that checks both risk level and transaction information.
Consume risk level via API
API integration lets you adjust end-user policies (for example, allowed limits or bonus programs) on your application side.
Use this API method and check the assessment object, which contains:
| Field | Description |
|---|---|
riskLevel | Label of the risk level (for example, Low, Medium, High) based on the total score. |
totalScore | Total calculated risk score. |
scores | Individual scoring tags and their scores. |
Request example:
curl -X GET \
     'https://api.sumsub.com/resources/applicants/5b594ade0a975a36c9349e66/one' \
     -H 'accept: application/json' \
     -H 'X-App-Token: <your-app-token>' \
     -H 'X-App-Access-Sig: <your-signature>' \
     -H 'X-App-Access-Ts: <unix-timestamp>'
To receive real-time updates about an applicant review status or risk level change:
- Receive the webhook (for example, applicantReviewed or applicantRiskLevelChanged).
- Use this API method and implement the
applicantIdfrom the webhook payload to fetch the fullassessmentobject.
Customize Starter Kit
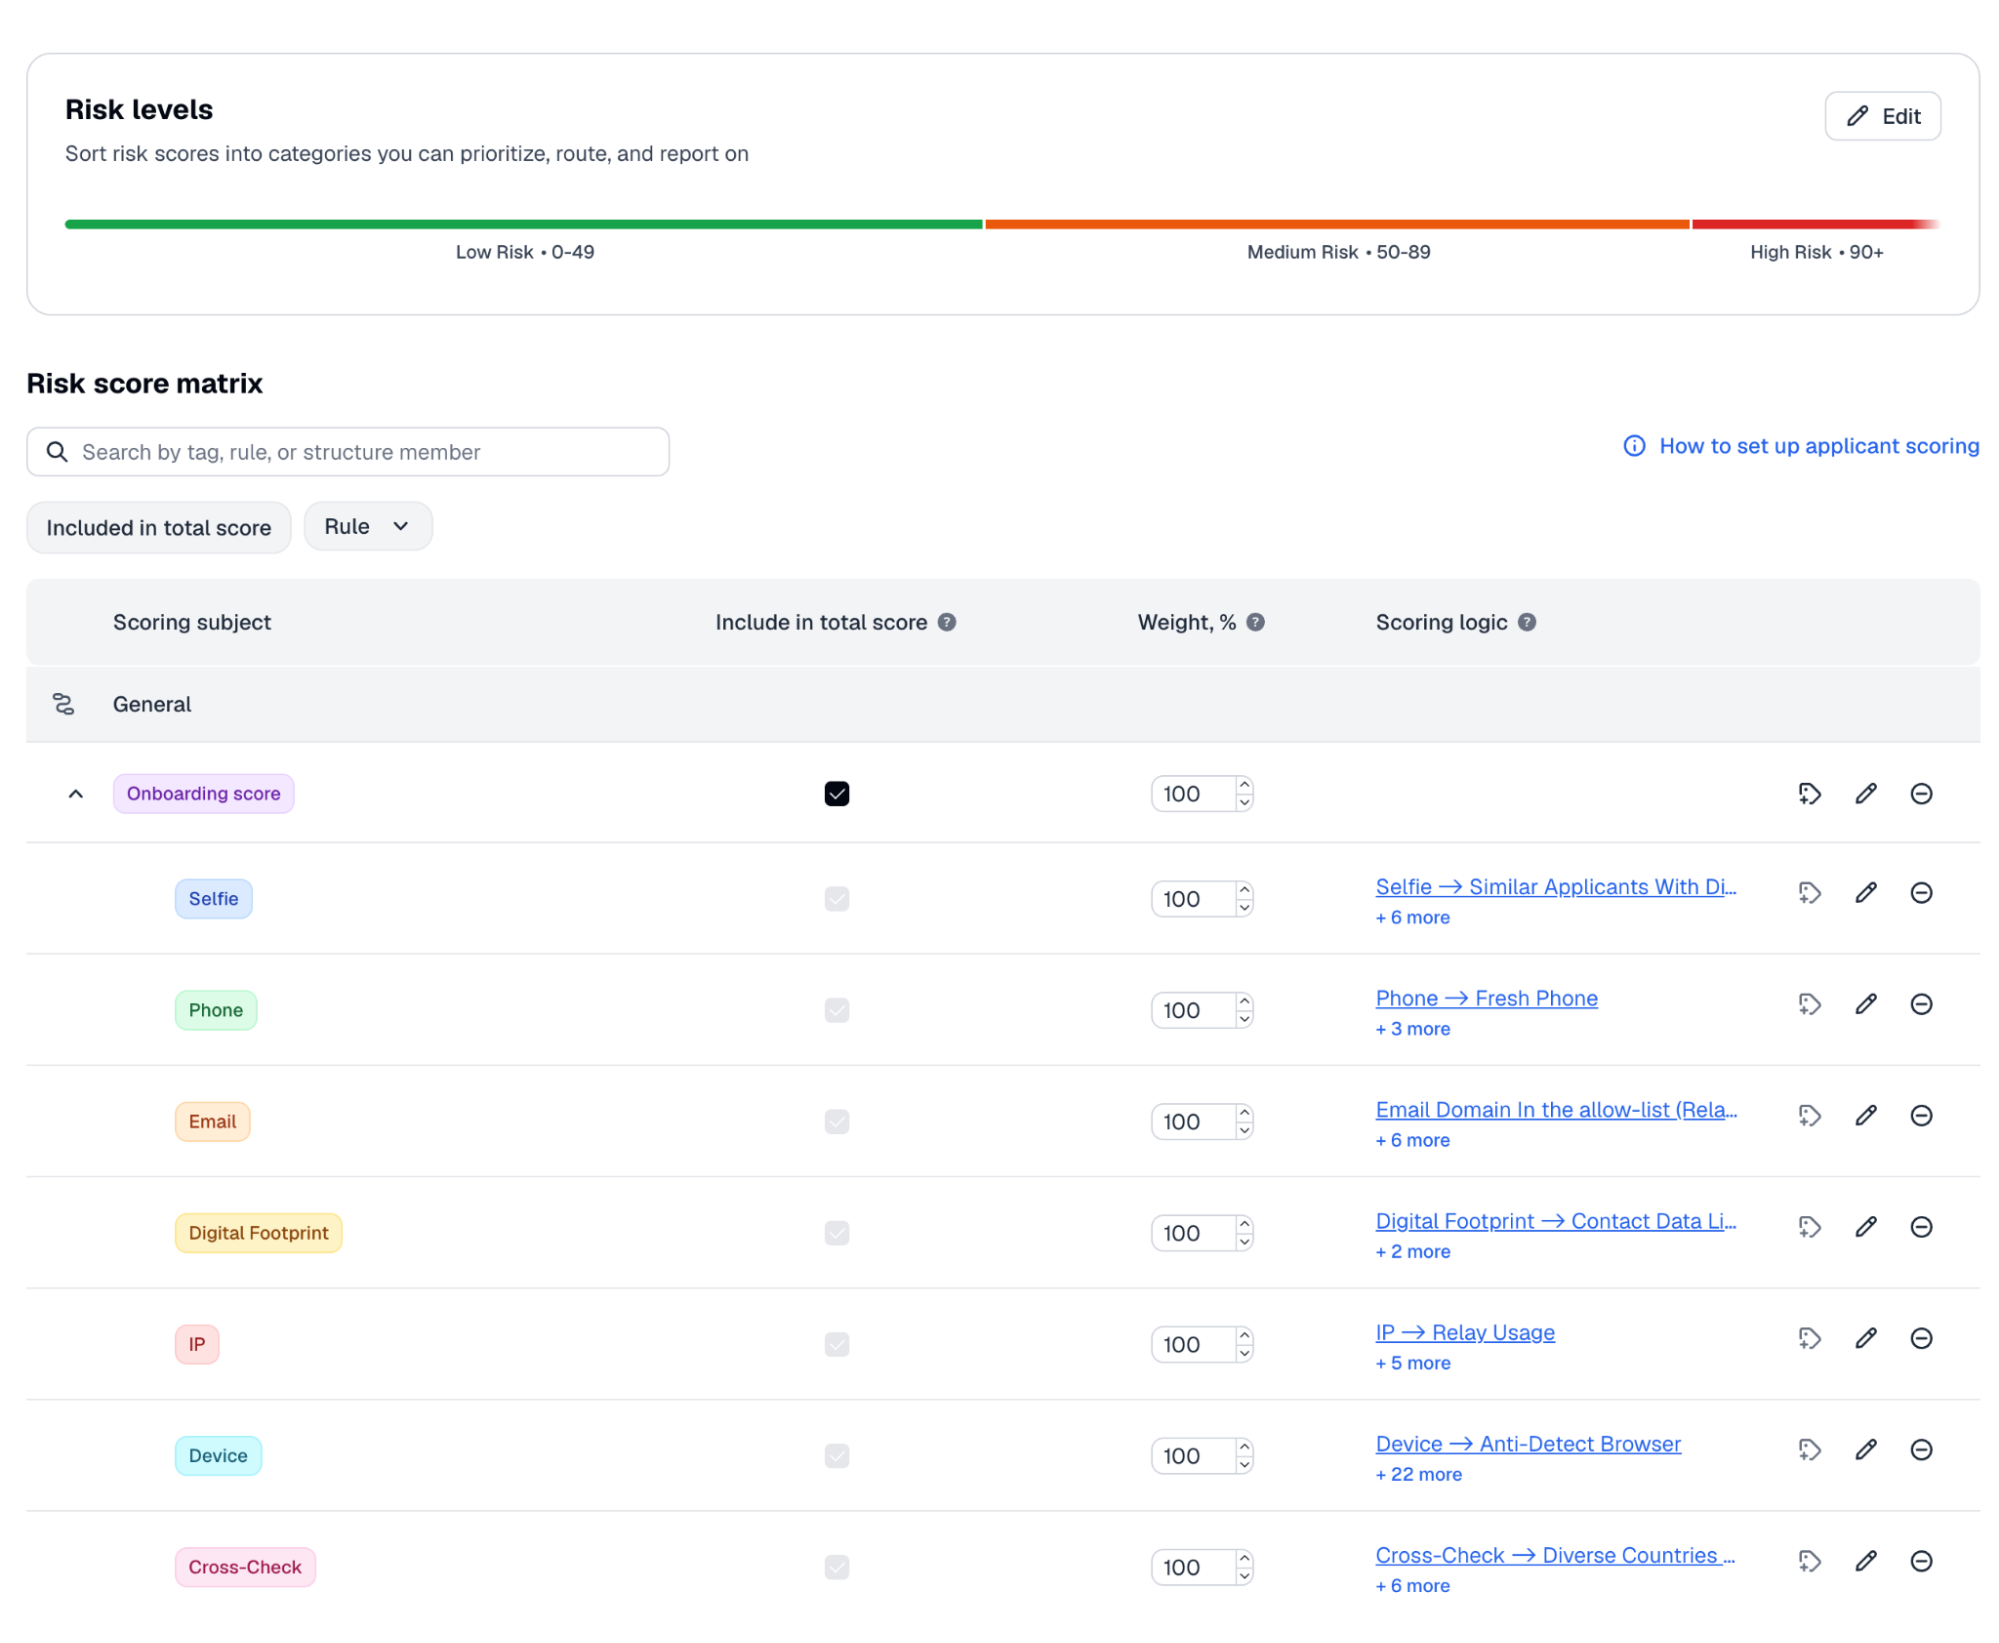
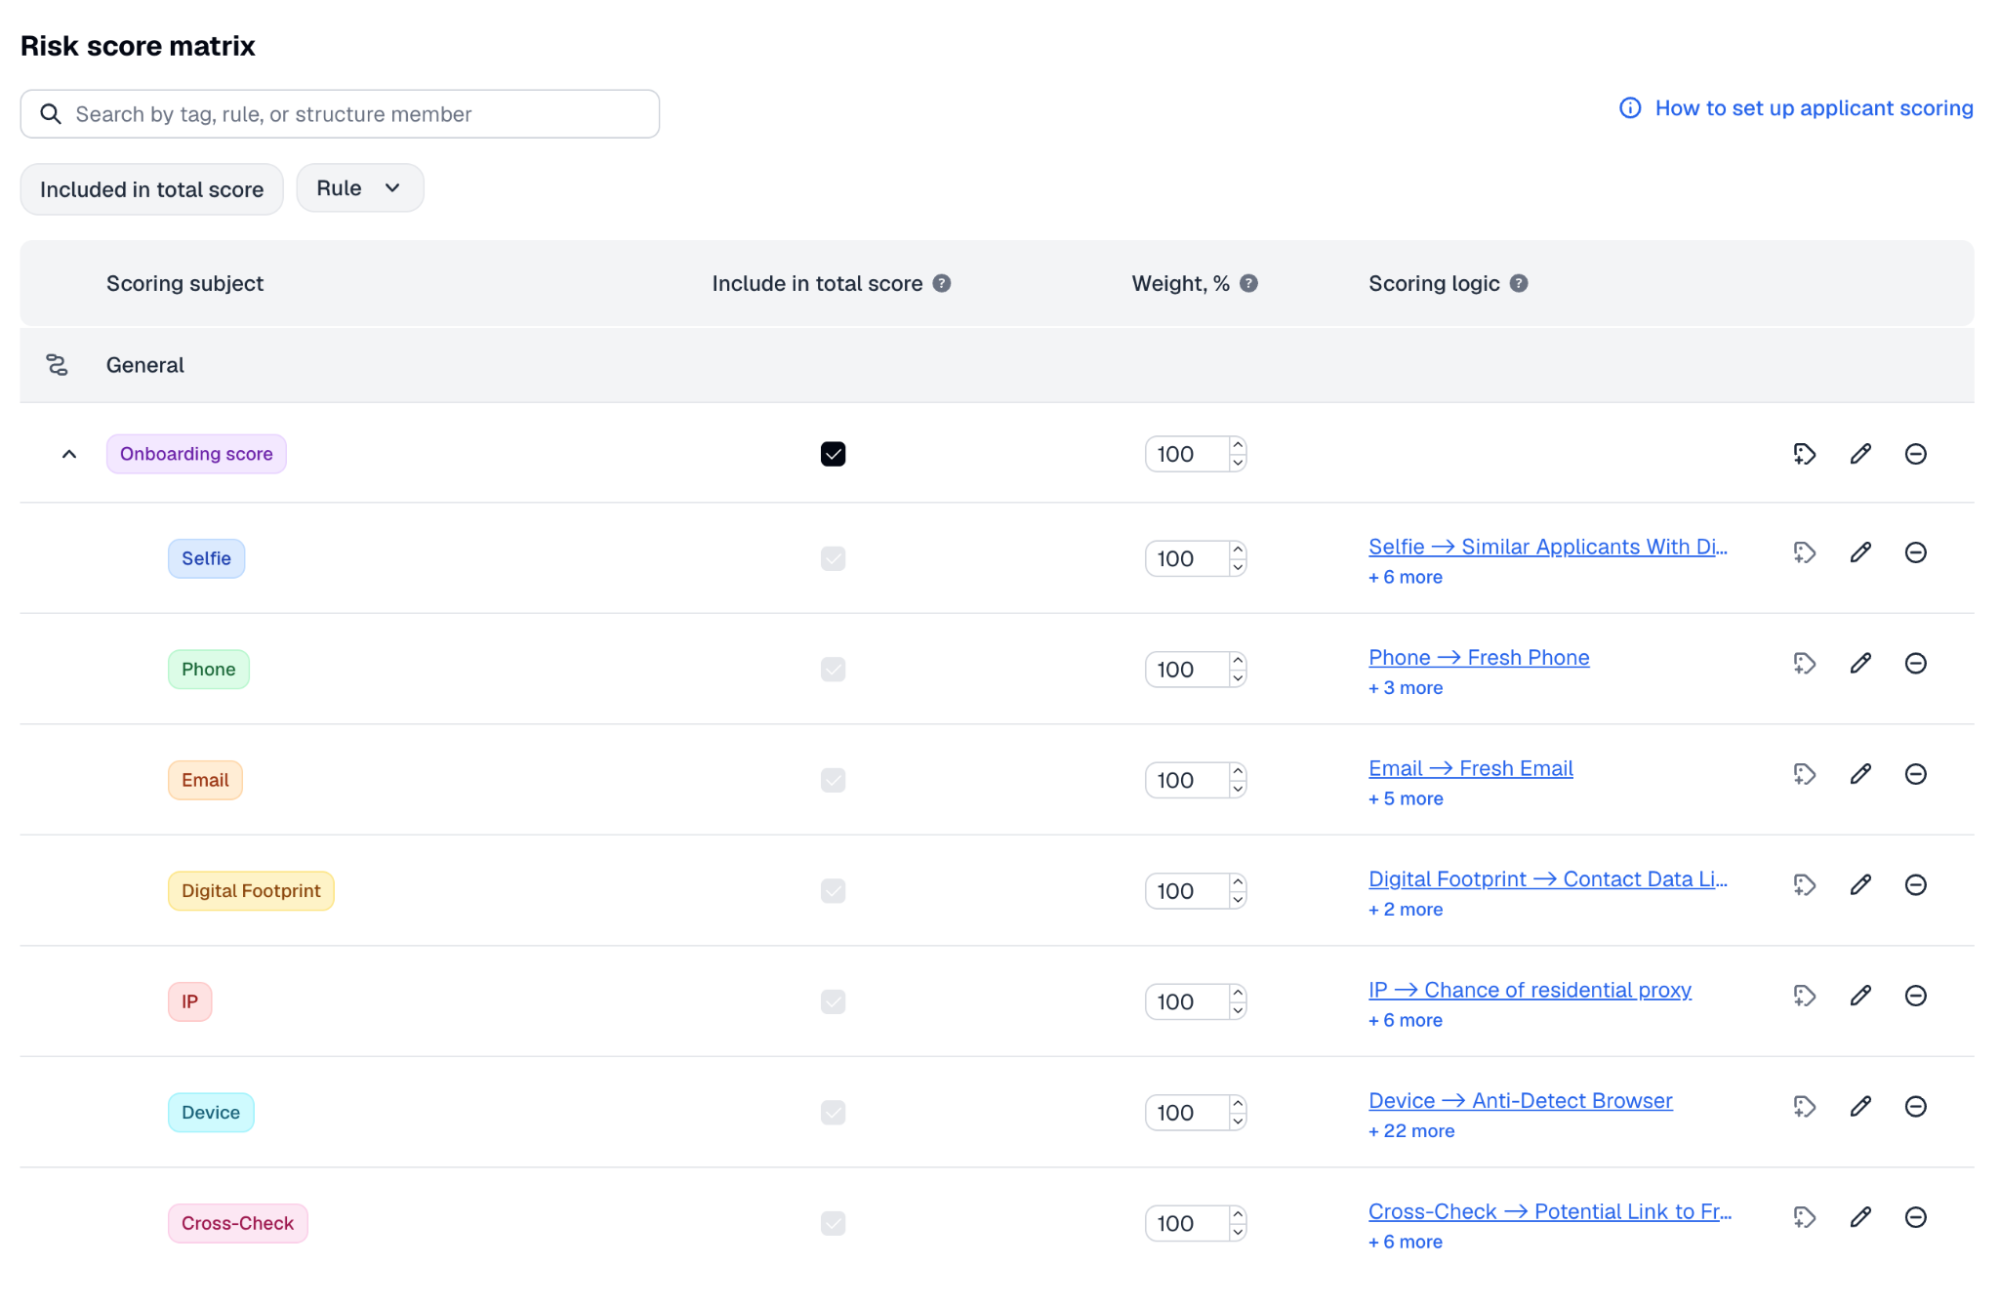
Start from the pre-built risk matrix and adjust it as your fraud patterns evolve. Change the risk matrix to adjust how signals combine into the risk level (weights and thresholds).
-
In the Dashboard, go to Transactions and travel rule → Settings and open Applicant risk scoring.
-
Select Risk levels → Edit to adjust thresholds or add new risk levels.
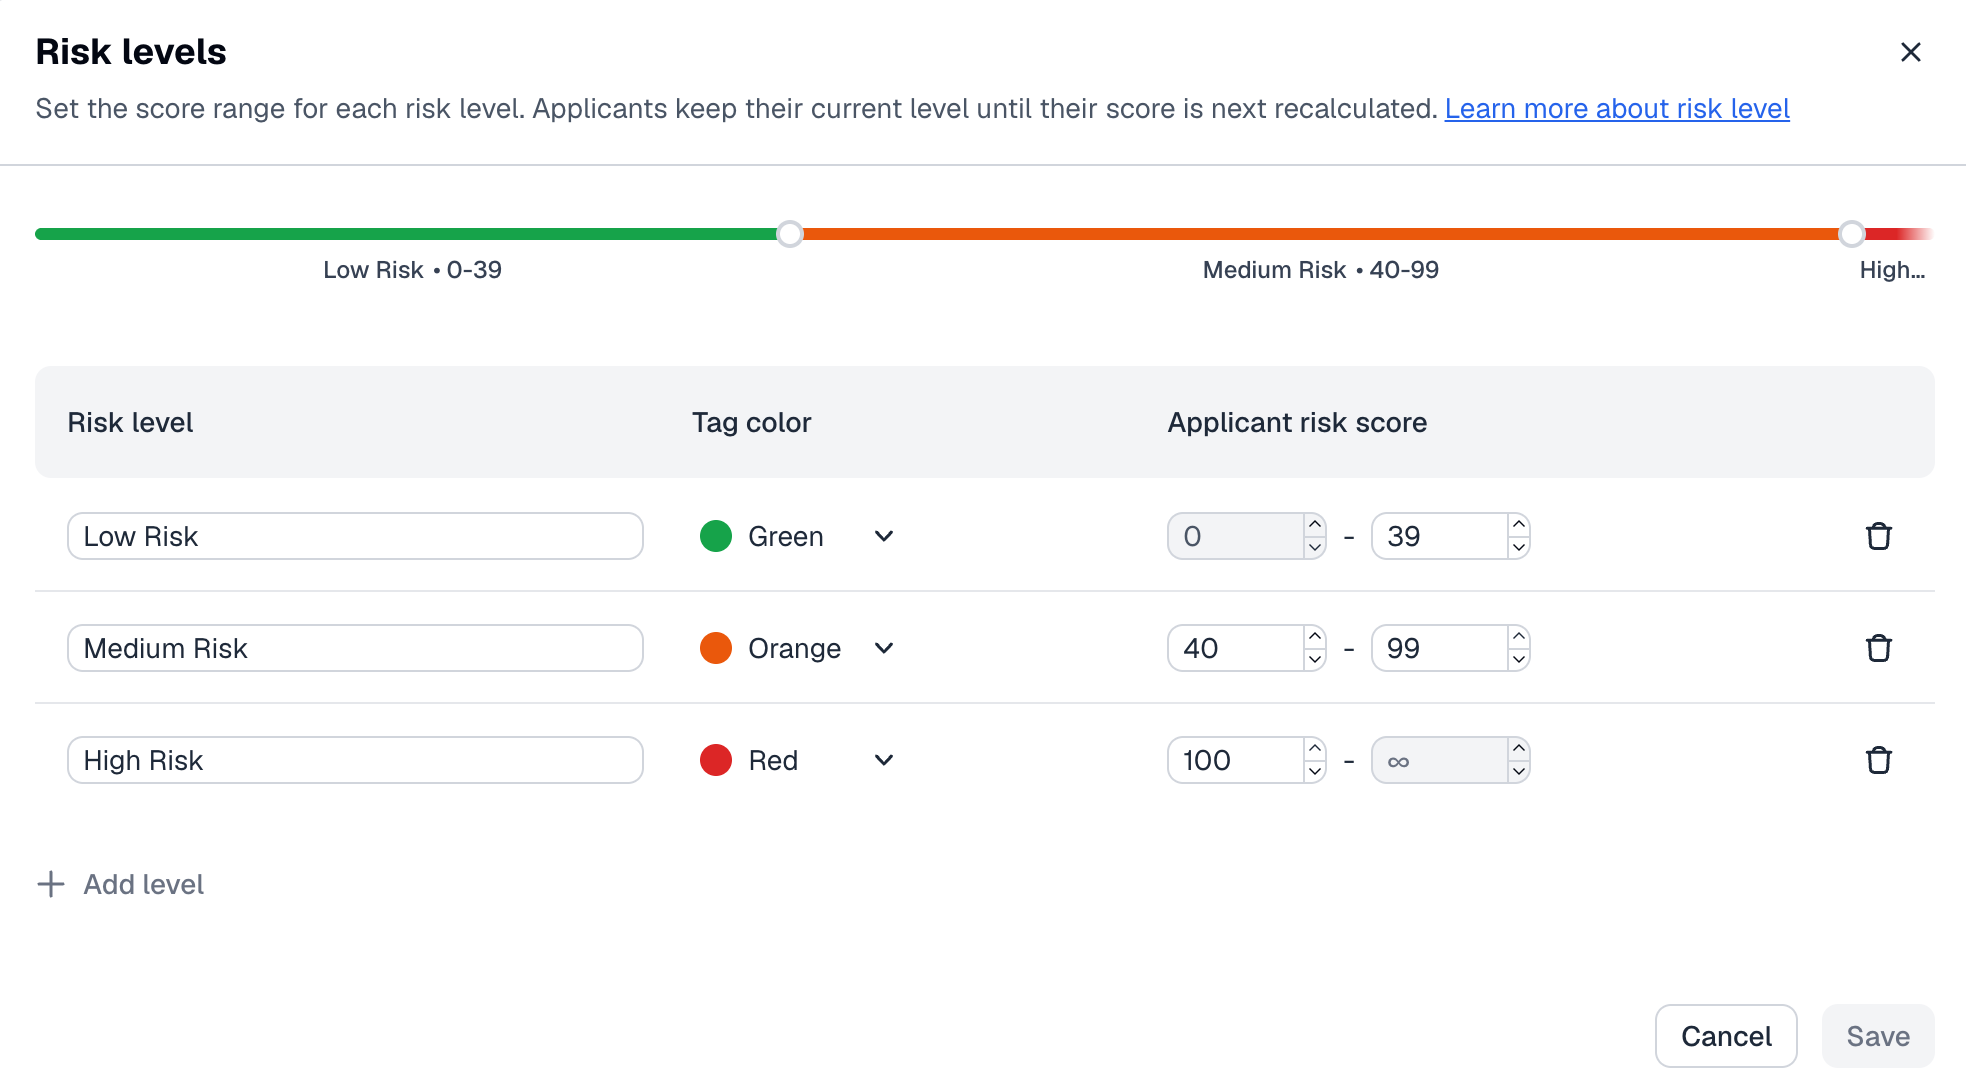
-
To adjust the weight for a specific category of signal, expand the risk matrix to see individual signal subcategories and select the category you want to adjust.
-
Edit existing rules — tune a rule, or disable one that is causing a false-positive spike.
-
Add new rules — create custom rules with SumScript, or generate them with Summy AI Copilot.
Improve protection
To strengthen your protection, set up the feedback loop. When you send confirmed fraudsters or blocklists back to Sumsub, that feedback strengthens future risk calculations through applicant linkages, repeated identifiers, statistical signals, and relationships with previously blocked or fraudulent applicants.
Use this API method to add known fraudsters to the blocklist.
Request example:
curl -X POST \
     'https://api.sumsub.com/resources/applicants/5c0e93c30a975a53a79aa54b/blacklist?note=A%20user%20provided%20a%20fake%20document' \
     -H 'X-App-Token: <your-app-token>' \
     -H 'X-App-Access-Sig: <your-signature>' \
     -H 'X-App-Access-Ts: <unix-timestamp>'
Important
- The Starter Kit is not designed for Account Takeover (ATO) prevention. For more information on account takeover prevention, refer to this article.
- Fraud Prevention Starter Kit is one layer of a broader risk strategy, not an end-to-end standalone fraud product. Understanding what a user will do next requires monitoring services such as Transaction Monitoring and Behavior Monitoring.
- Business verification (KYB) is not covered in this version.
Updated 6 days ago