
Video identification
Streamline customer onboarding and enhance security with seamless video identification solutions.
Video identification helps you confirm the identity of your applicants in a live video interview with an identification operator that will conduct all the necessary verification steps, including onboarding applicants and verifying submitted documents for authenticity.
With Video identification, you get all-in-one:
- Risk-based approach
- Due diligence guidelines
- Considerate interview scripts
- Skilled operators
- Automated reporting
NoteOnly English and German are supported for Video Identification by default.
Additional languages can be added upon request. Contact your Customer Success Manager or our support team for availability and pricing.
How Video identification works
Video identification consists of verification steps that may differ depending on your verification level configuration, but usually include a questionnaire, ID verification checks, and selfies.
The video identification procedure can be divided into the following stages:
Data Collection
Performing data collection and managing verification are the operators' responsibilities, including checking whether the provided documents are complete and readable.
Data collection consists of the following steps:
- Starting a call. An applicant and operator join the call; the identification steps are displayed for both parties.
- Getting ready for verification. The operator ensures that the applicant is a live person and receives their consent for verification and data processing.
- Applicant's face must be:
- Uncovered,
- Recognizable,
- Free from shadows,
- Distinguishable from the background and other objects.
- If required, the expert may also ask the applicant to change their position so that their head and shoulders are visible.
- Conducting verification. The operator asks questions and requests documents. The questions may differ depending on the client and the user involved, for example:
- What is your full name?
- What is your date of birth?
- What is your residential address?
- Each time a document is provided, the operator clicks "Make a Snapshot." Where permitted by local regulations, applicants can also upload documents directly from their device.
- Saving the results. The operator ensures the document image meets Sumsub's requirements; the operator can also assign the document type at this step, if possible.
- Taking a selfie. The operator asks the applicant to prepare to take a selfie and takes a photo of the user.
- Performing additional checks. For example, the operator may ask the applicant to pass TAN verification.
- Completing the call. The operator finalizes the call and submits the data for validation.
Data Validation
Data validation is performed by the operator who checks the submitted data and assigns the final status to the application.
Requirements
To get verified with video identification, applicants must have the following:
- An identity document, such as a passport, driving license, ID card, or residence permit, depending on the client requirements.
- Stable internet connection.
- Working webcam and microphone.
Unsuccessful video identification
The following scenarios are examples of unsuccessful video verification:
- Applicant has intentionally submitted data that does not correspond to the data in their identity document or does not coincide with the data obtained via other procedures.
- Video call session expires or is interrupted (the session expires when the applicant has not completed any activities in the Sumsub system in 15 minutes).
- Applicant refuses to comply with the expert instructions.
- Applicant employs the assistance of another person without the expert permission.
- Suspicion of money laundering or terrorist financing arises.
If any of the scenarios above occur during the verification process, Sumsub will reject the application.
TAN verification
Transaction Authentication Number (TAN) is a one-time code that provides an additional layer of security. TAN Verification is only required for Germany-based companies. For such cases, the video identification procedure can only be considered complete, once the applicant successfully passes TAN verification.
TAN verification consists of the following steps:
- Applicant's phone number is provided in one of the following ways:
- API — client supplies it before video identification starts.
- SDK — applicant enters it before or during the video identification call, depending on the SDK version.
- The operator initiates TAN verification.
- The system sends a TAN via SMS and prompts the applicant to enter it in a dedicated field.
- The applicant enters the code.
- The system checks the entered code, and the results appear on the screen.
Get started with Video identification
Use video identification to confirm your applicants’ identity and ensure security and compliance with the regulators' demands:
-
Configure the WebSDK and/or MobileSDK integration to perform video identification checks in a user-friendly environment that will handle all the stages, from uploading the data to processing it and coming up with the results.
-
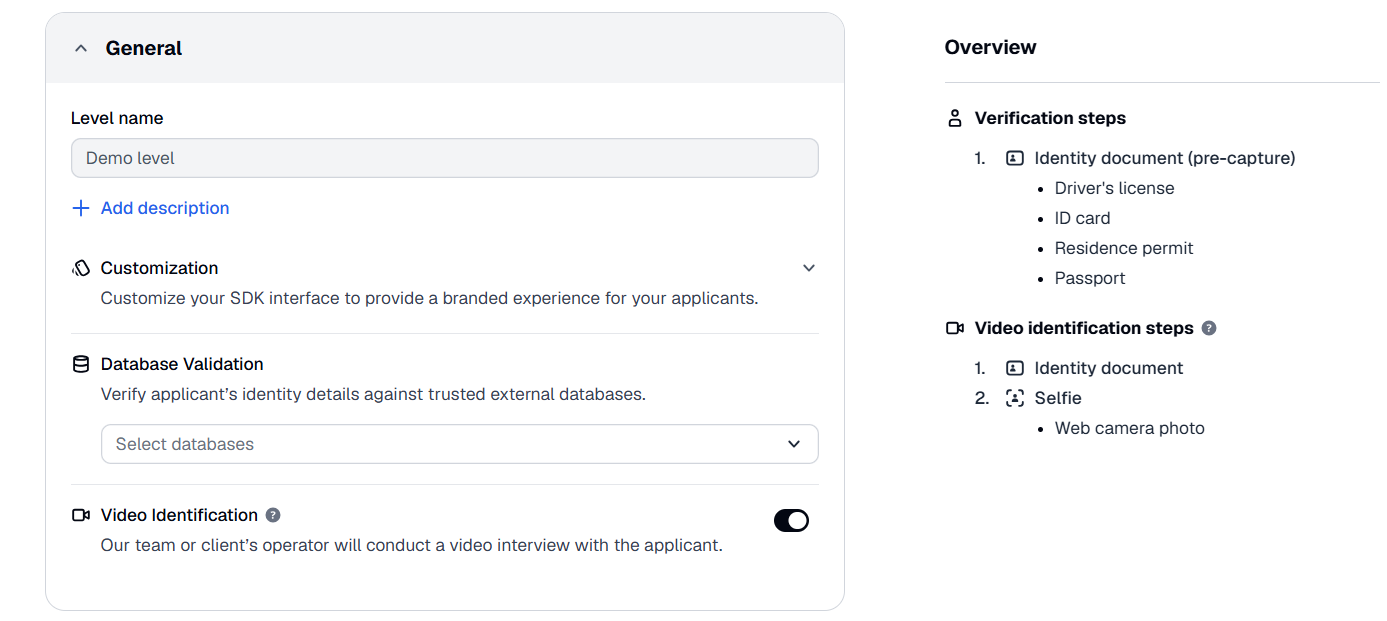
Create a verification level and select the Video Identification toggle. Contact your Customer Success Manager or Sumsub Support Team if you need any assistance or if the toggle is not available in your subscription.
-
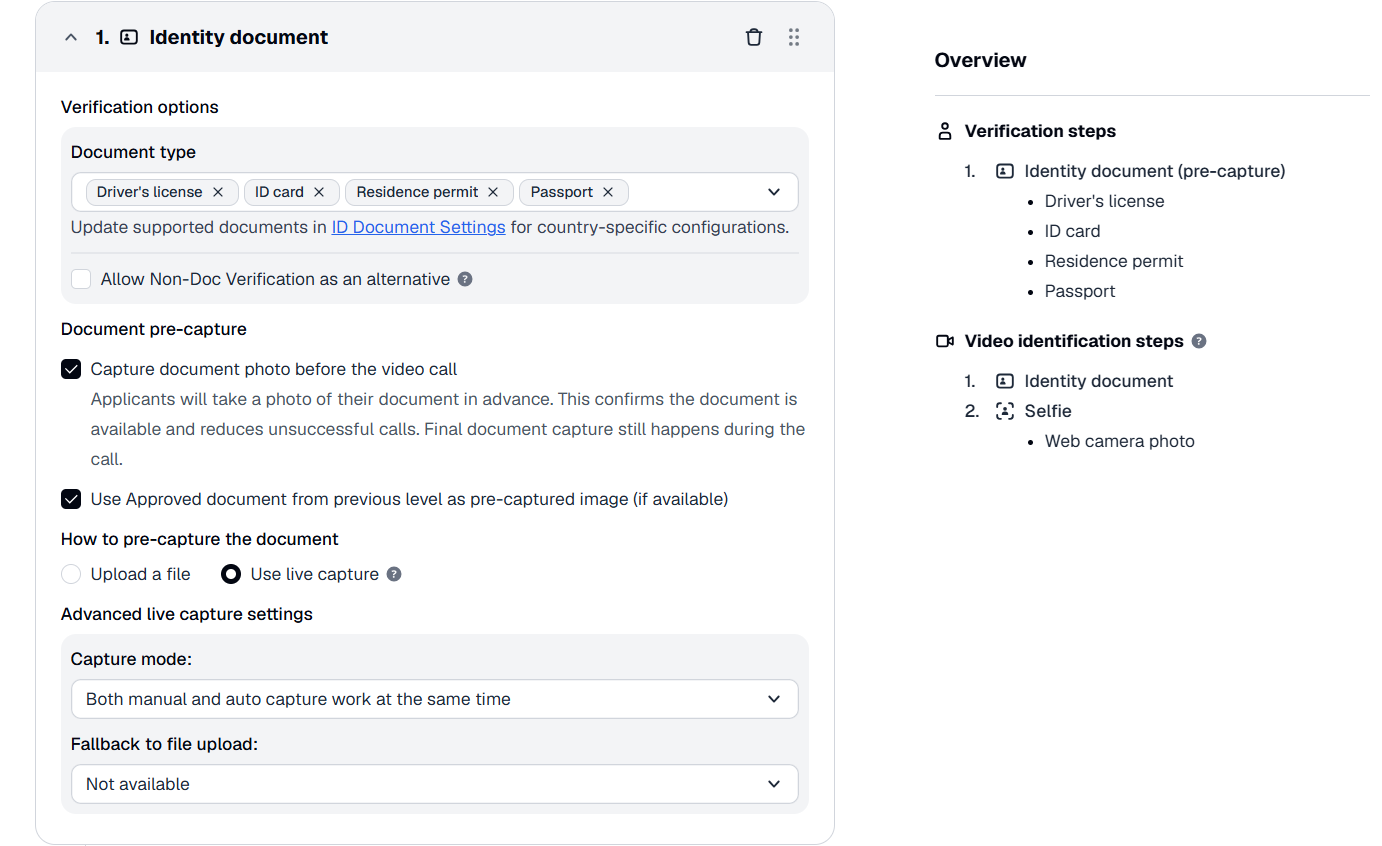
Configure the Video Identification level — add required verification steps and adjust how they will be processed during a video call:
- (If applicable) For the Identity document step, enable and set up Document pre-capture to reduce unsuccessful verification attempts:
- Select the Capture document photo before the video call checkbox so applicants are requested to take a photo of their document in advance.
- Select the Use Approved document from previous level as pre-captured image (if available) checkbox to reuse an approved document from previous applicant verifications, if any exist. If selected, the applicant will not need to capture their document manually.
- Choose the preferred pre-capture option: Upload a file or Use live capture.
- If you select Use live capture, adjust the Capture mode and Fallback to file upload settings.
- (If applicable) Set NFC verification to Disabled, Optional, or Required.
- For the remaining verification steps, select the Include this step during video identification checkbox if necessary, so applicants pass these steps during the video call. If disabled for specific steps, applicants will be requested to complete these checks prior to the video call.
- (If applicable) For the Identity document step, enable and set up Document pre-capture to reduce unsuccessful verification attempts:
LimitationWe do not support Proof of Address checks in levels with Video Identification. If you need to have Proof of Address checks after Video Identification checks, create a separate level for Proof of Address and use Workflow Builder to change the level once Video Identification is approved.
Note
- If there is an Identity document step in your verification level, you cannot exclude it from the video call.
- When Document pre-capture is enabled, there must be at least one additional verification step in the verification level. For example, Selfie or Phone verification.
- Regardless of whether Document pre-capture is enabled, the final capture still takes place during the video call.
- If Include this step during video identification is checked for the Selfie step, only the Web camera photo option will be available.
Review Video identification results
To review the verification results:
- In the Dashboard, open the Applicants page and select the applicant who passed video identification.
- In the profile, scroll down to the Video Ident Control Panel section and review the results.
Alternatively, use the following API methods:
Updated 27 days ago