QES integration guide
Start using QES Verification and seamlessly onboard customers in Europe with a single solution.
This article provides a complete guide on how to integrate QES Verification into your verification flows.
Step 1: Set up implementation
To get started with Qualified Electronic Signature (QES) Verification:
- Generate an app token to start using the Sumsub API.
- Set up webhooks to get verification results. To manage QES verification results, you will need to configure and use the applicantReviewed webhook.
- Get started with the SDK implementation, as described in the web SDK integration article and the mobile SDK integration article.
NoteTo view and manage your available and active QES Verification products, refer to this article.
Step 2: Adjust the user flow
On your new Sumsub Client Dashboard account, you will have access to a pre-configured level that includes both identity verification and document signing. These processes run in sequence, with document signing starting right after identity verification.
Upload documents for applicant signing
You can upload documents for signing and configure the visibility of signatures in two ways:
- Via the Sumsub client Dashboard. With this method, the documents uploaded on the level will be displayed to all applicants for signing.
- Via the Sumsub API Endpoint. This method allows you to upload unique documents for each applicant to be signed.
Upload documents using the client Dashboard
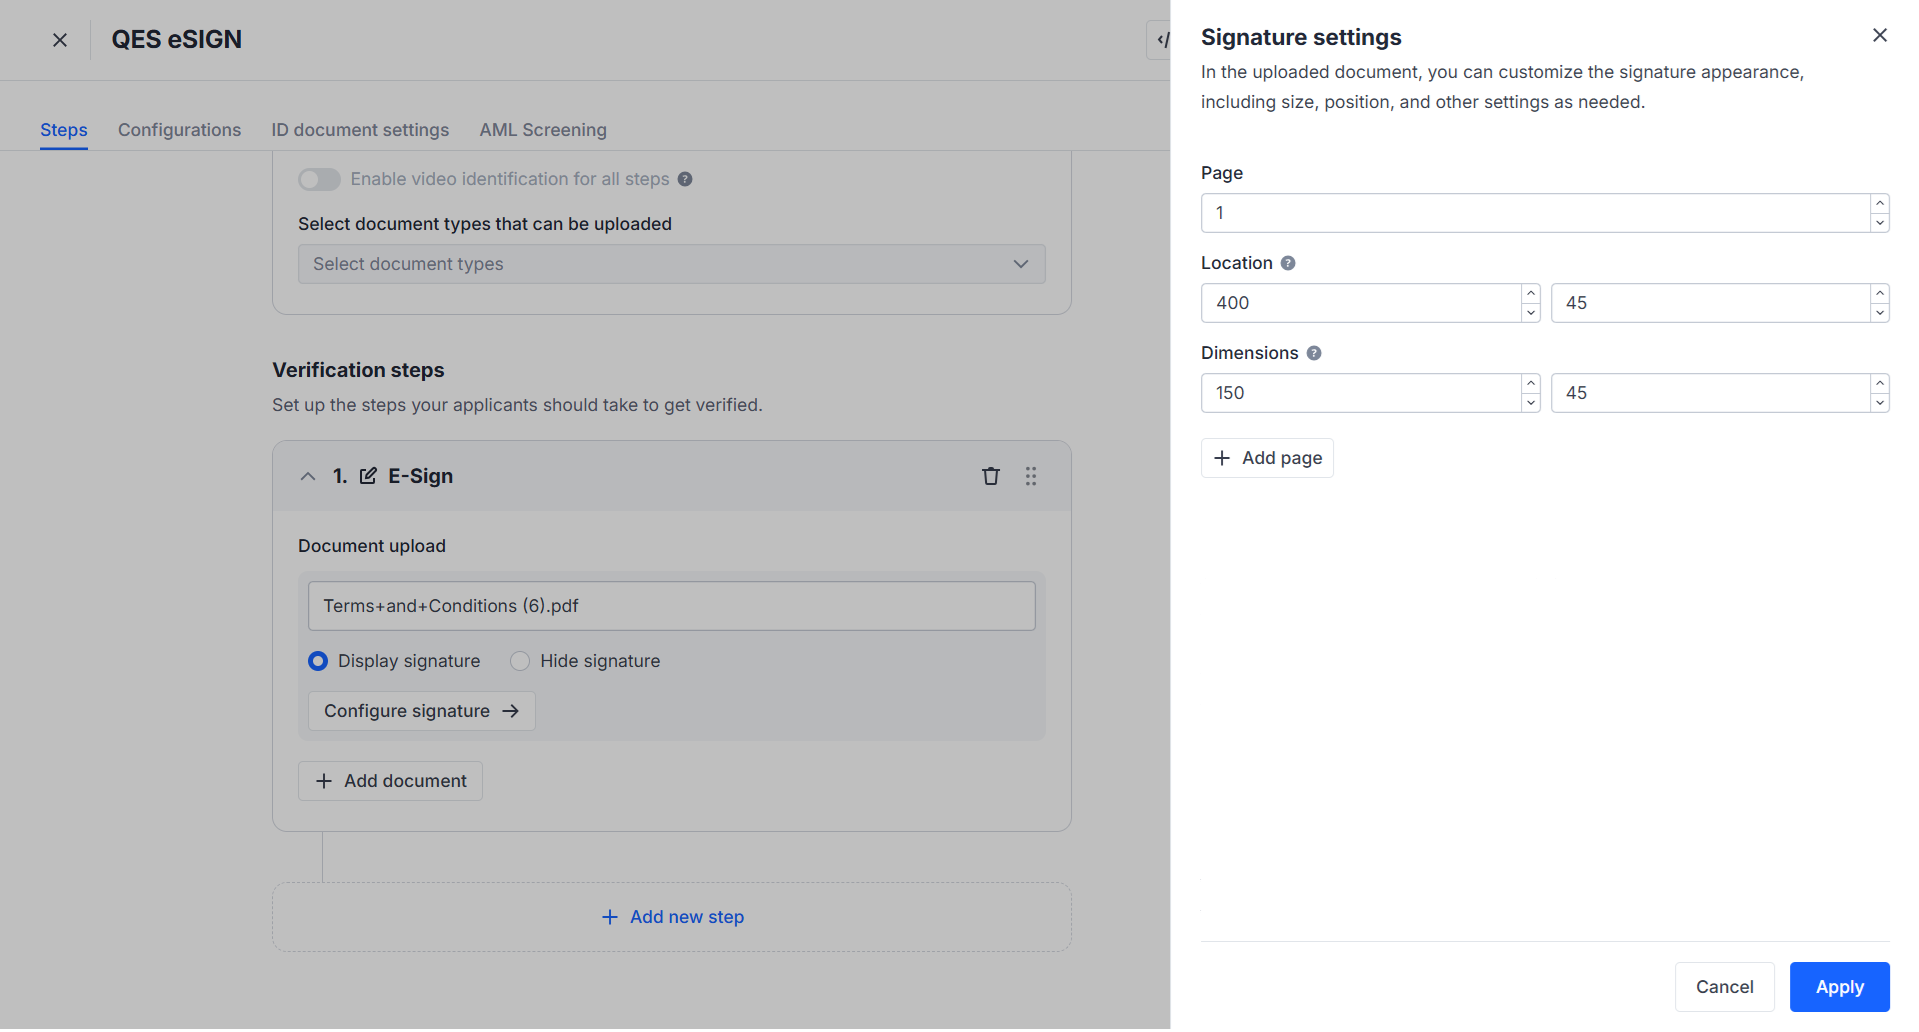
In the Client Dashboard, open the dedicated verification level with the E-sign step and upload the documents for signing. Specify the following parameters during the process:
- The number of documents that should be signed.
- Whether the signature should be visually displayed in the document.
- The document page(s) where the signature(s) should be placed.
- The exact position of the signature within the page.
- The size of the displayed signature.
| Level setting | Description |
|---|---|
| Document upload | Enables the client to upload a PDF file for user signing. |
| Document name | Name of the document that will be displayed in the user interface. |
| Signature appearance | Whether to display the signature on the document. If not set, the signature is not displayed. |
| Page number | The page of the signed document on which the signature should be displayed. |
| Signature position | The X & Y axes of the signature position on the selected document page (in PDF units). |
| Signature width | The width of the signature on the selected document page (in PDF units). |
| Signature height | The height of the signature on the selected document page (in PDF units). |
By default, each signature displayed within the client document(s) will contain the following information:
- Name of the signer.
- Legal basis for Qualified Signature creation.
- Date of the Qualified Signature creation.
NoteBoth the signature size and positions are specified in PDF units. For example, the A4 page size of 210mm x 297mm = 595 x 842 PDF units.
Upload documents using the Sumsub API
To upload unique documents for each of your applicants to sign, firstly follow the instructions for creating an applicant. Below is an example of an applicant creation API request:
curl -X POST \
  'https://api.sumsub.com/resources/applicants?levelName=QES+Verification+(Seamless+ID+Capture)' \
  -H 'Content-Type: application/json' \
  -d '{
          "externalUserId": "someUniqueUserId"
      }'
Once the applicant has been created, follow the document uploading and signature placement instructions. Below is an example of a document upload API request:
curl -X POST \
  "https://api.sumsub.com/resources/applicants/68516cc16724f8f19c7d935f/esign/resources/uploadDoc"  \
  -H 'Content-Type: multipart/form-data' \
  -F 'content=@/path/to/your/file.pdf'  \
  -F 'metadata={
        "imageFileName": "Displayed File Name",
        "signatures": [{
          "pages": [
            {
              "page": 1,
              "x": 400,
              "y": 45,
              "width": 150,
              "height": 45
            },
            {
              "page": 2,
              "x": 400,
              "y": 45,
              "width": 150,
              "height": 45
            }
          ]}
        ]}'
Note
- You can upload only one document per API request. To upload multiple documents for signing, conduct several API requests.
- If you do not want the signature to appear in the document, you should not provide
signaturesin the request.
Configure Email and Phone Verification
Email and Phone verification is required both for regulatory compliance and document signing purposes.
There are two primary options for how this can be completed:
- Clients may choose to verify their users' email and phone number at the initial registration steps and pass this information over to Sumsub via the API. To do so, create an applicant in advance and share the email and phone attributes in the request body.
curl -X POST \ 'https://api.sumsub.com/resources/applicants?levelName=QES-IDV' \ -H 'Content-Type: application/json' \ -d '{ "externalUserId": "someUniqueUserId", "email": "[email protected]", "phone": "+4912389032156" }' - Alternatively, Sumsub can handle these steps for you. To do so, include Email and Phone verification steps in your flow.
Enable AML Screening and Monitoring
AML Screening and Monitoring helps you check your customers against the following watchlists during the onboarding:
- Sanctions
- PEPs
- Adverse Media
- Regulatory Exposure
- Law Enforcement Actions
- State-owned Enterprises
Document exchange and signature placement
- Signature placement configuration:
- Define the position on the document where the Qualified Signature should appear (for example, the bottom-right corner of the final page).
- You can configure this via the Sumsub Dashboard.
- Document types and multi-document signing:
- Sumsub supports signing multiple documents in a single session. Signed documents are returned to the client through both:
- Results Panel on the Sumsub Client Dashboard.
- Dedicated API endpoint for signed document downloads.
- Sumsub supports signing multiple documents in a single session. Signed documents are returned to the client through both:
Step 3: Verify identity via Web and Mobile SDKs
Use our Web and Mobile SDK frameworks to conduct QES Verification code-free:
- Generate an access token associated with the userId (
externalUserId) andlevelNameused for identity verification. - Launch the SDK and conduct identity verification.
- Receive and handle verification results.
ImportantQES verification is supported only in the WebSDK 2.0 and MobileSDK versions starting from 1.39 or higher.
Step 4: Listen to webhooks
Once verification is complete, the results are automatically delivered with the applicantReviewed webhook.
This webhook contains the reviewResult object that includes the reviewAnswer field, indicating the verification status. If it is GREEN, it means QES Verification successfully completed, and you can get QES Verification results. If it is RED, the applicant has not passed verification; the reviewRejectType is set to RETRY or FINAL:
- FINAL — indicates a final applicant rejection.
- RETRY — applicants are allowed to resubmit their documents and repeat verification.
Step 5: Get verification results
You can get QES Verification results in either of the following ways:
Get verification results in Dashboard
To view the results of QES Verification in the Dashboard:
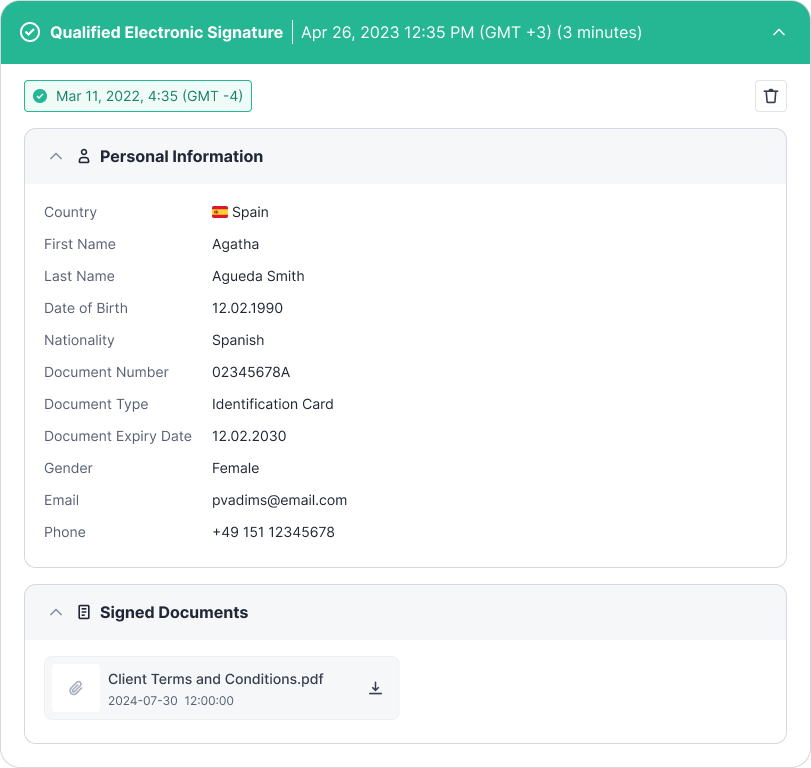
- Navigate to the Applicants page and open the profile that you need.
- Scroll down to the Qualified Electronic Signature section and review the results.
Get verification results via API
To retrieve the results via the Sumsub API, use the Get E-Sign method according to the request example provided below.
Request
curl -X GET \
  'https://api.sumsub.com/resources/checks/latest?type=E_SIGN&applicantId={applicantId}'
Response
The response will include detailed personal information that was verified to issue a Qualified Signature and basic details about the signed documents.
{
  "checks": [
    {
      "answer": "GREEN",
      "checkType": "E_SIGN",
      "createdAt": "2024-11-12 10:28:06",
      "id": "1cdf9711-4d50-4659-b82a-a12c330dc797",
      "inputDoc": {
        "idDocType": "PASSPORT",
        "country": "DEU",
        "firstName": "MUSTERMANN",
        "lastName": "ERIKA",
        "validUntil": "2027-02-28",
        "number": "C01XYCCG9",
        "dob": "1964-08-12",
        "email": "[email protected]",
        "phone": "+4912389032156"
      },
      "esignCheckInfo": {
        "unsignedDocuments": [
          {
            "id": "1672018978",
            "imageId": 1672018978,
            "name": "Terms And Conditions.pdf"
          }
        ],
        "signedDocuments": [
          {
            "id": "1672018978",
            "imageId": 1919960264,  // Use this ID to receive signed document
            "name": "Terms And Conditions.pdf",
            "signedAt": "2024-11-12 10:28:37"
          }
        ]
      }
    }
  ]
}
The complete scope of possible applicant output data as a result of successful verification includes:
- Signed client document(s)
- First name
- Date of birth
- Last name
- Nationality (if available)
- Gender (if available)
- Place of birth
- Document type
- Document number
- Document issue date
- Document expiration date
- Phone number
- Email attributes
Step 6: Receive signed documents
After receiving the QES Verification results, you can obtain the signed documents.
The signedDocuments array from the response will include the following information:
id— unique identifier of the signed document in the Sumsub system.imageId— unique identifier that is used to obtain the signed document.name— document title that was specified during the document upload in the level settings.signedAt— date and time when the document was signed.
Note that there can be several objects in the
signedDocumentsarray.
Each signed document will be issued an imageId. Submit the ID to the Get signed documents API method in order to retrieve the document.
The response will contain a binary content representing the signed document. The Content-Type response header precisely describes the response mime-type:
HTTP/1.1 200 OK
Date: Wed, 13 Nov 2024 10:44:38 GMT
Content-Type: application/pdf
Content-Length: 239371
Connection: keep-alive
x-correlation-id: 85e3033ee12d196b8400322e03e47b36
Content-Encoding: identity
content-disposition: attachment; filename=Terms+And+Conditions.pdf

<Binary content representing the signed document>
Updated 3 months ago