Reusable KYC via SDK
Improve verification conversion using our SDK.
Once clients agree to share verification data, they become the donor and recipient. You can have an unlimited number of sharing partners, and Sumsub also supports bidirectional sharing.
How Reusable KYC via SDK works
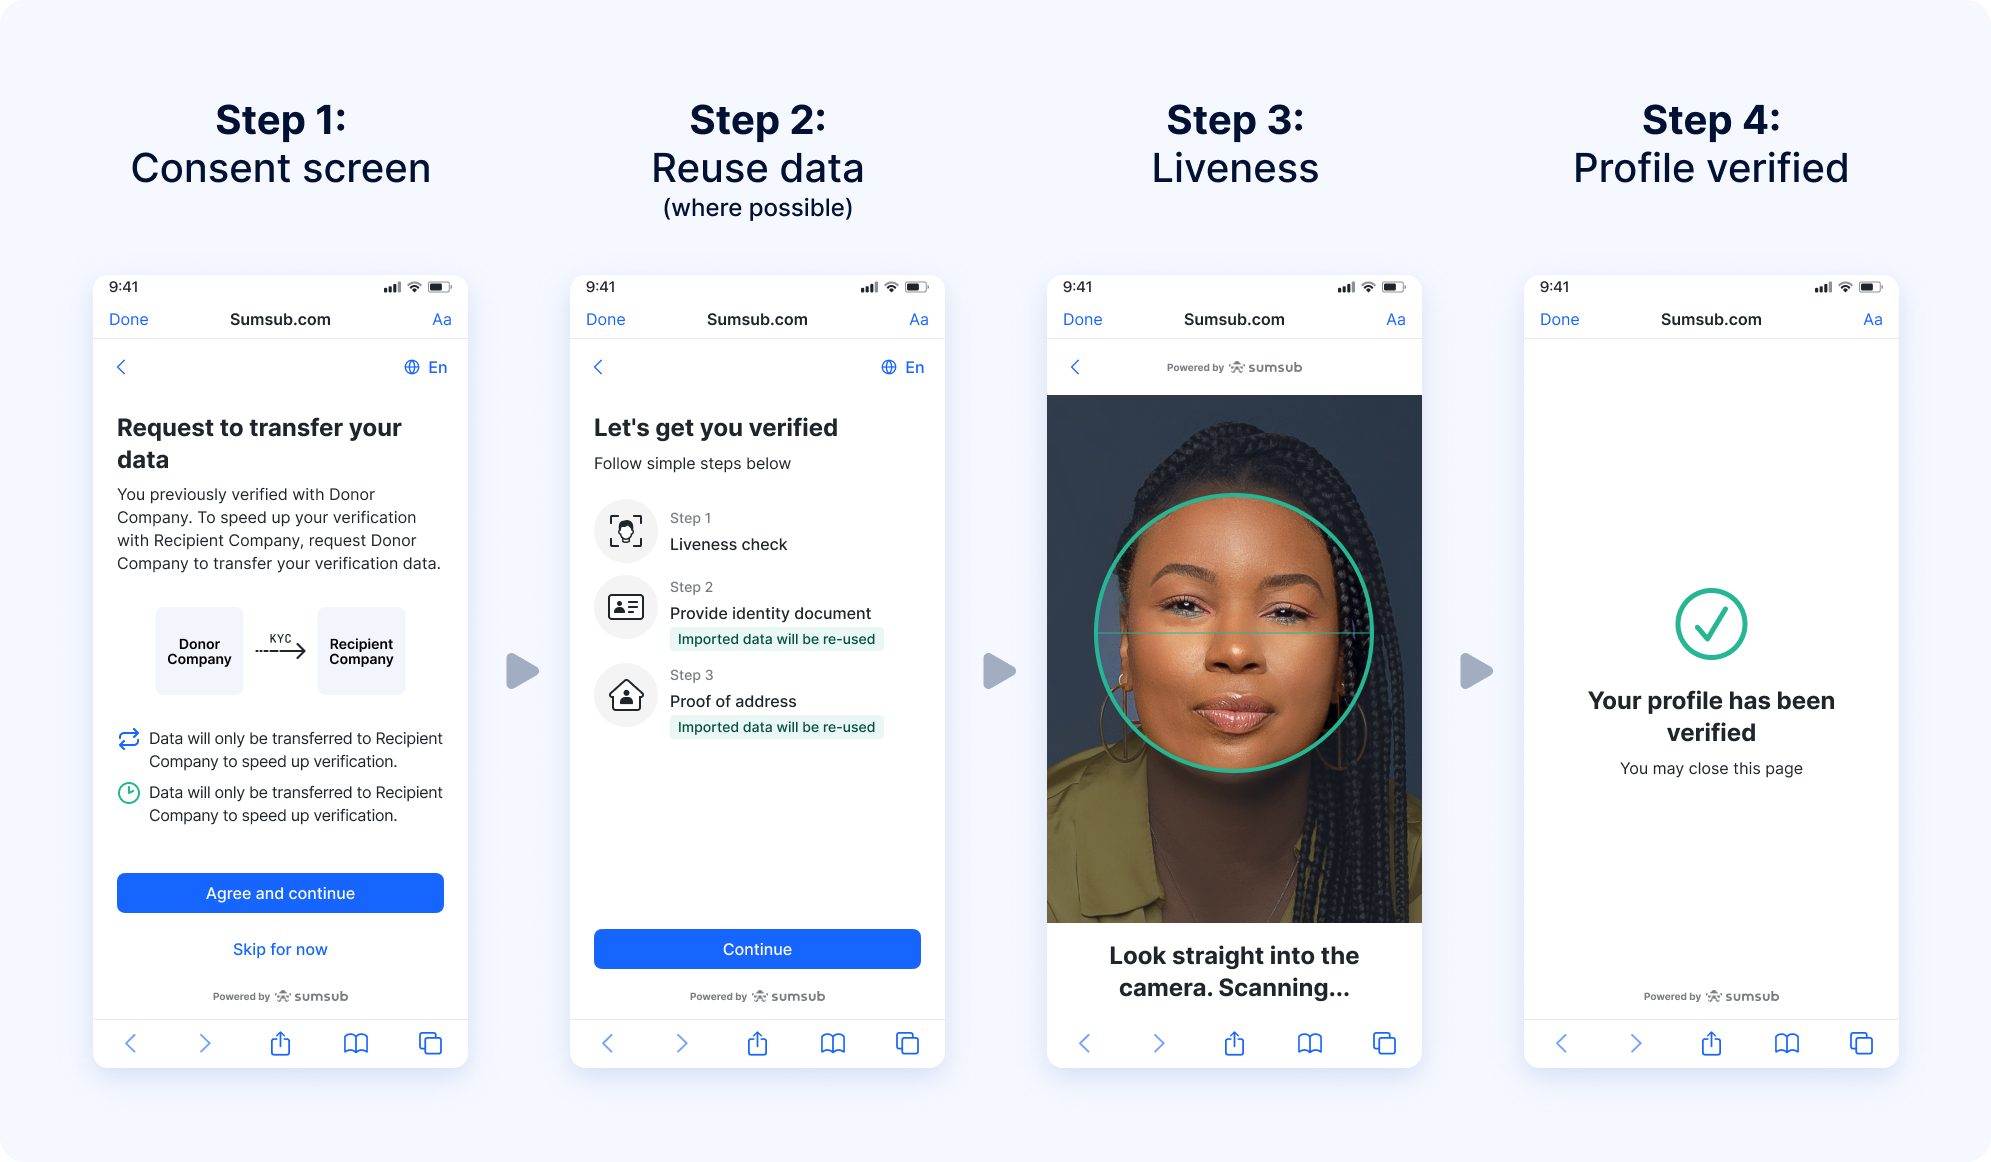
The applicant experience contains the following steps:
- If the applicant has been verified previously, Sumsub will check that the verification data with the donor will be reusable in the recipient's specific level configuration.
- If the data is reusable, the applicant will see a consent screen to collect explicit permission from them to transfer and reuse the verification data with the recipient.
- To confirm the document data ownership, the applicant must pass a Liveness check.
- Sumsub reuses transferred data to complete recipient verification checks wherever it is possible, for example, ID verification or PoA.
NoteIf any remaining checks require more or updated documents, we will directly ask the applicant to provide the requested data.
This approach is designed with data privacy in mind. We are collecting explicit consent for data transfers on behalf of our clients to strengthen the legality of data transfers and provide transparency to their applicants.
Personal identifier based implementation
Reusable KYC setup for both the donor and recipient involves enabling automatic matching of applicants across sharing partners. To do so, Sumsub uses applicant personal identifiers (phone or email). You will need to perform the setup only once, and after that, you will not have to perform any additional actions:
- Donor enriches all their applicant records with personal identifiers and ensures they will be added to all new applicants verifying with them.
- Recipient ensures the applicant personal identifier is passed through to Sumsub when SDK is initialised.
Enrich applicant records with personal identifiers
Donor can enrich all their applicant records with personal identifiers either by providing Sumsub a CSV file with the required data or directly using this API method.
curl -X PATCH \
    'https://api.sumsub.com/resources/applicants' \
    -H 'Content-Type: application/json' \
    -d '{
          "id": "5e9ad53d0a975a656d67e4d0",
          "externalUserId": "userIdOnYourSide",
          "email": "[email protected]",
          "phone": "+49 123456789",
          "sourceKey": "newSourceKey",
          "metadata": [
            {
              "key": "keyFromClient",
              "value": "valueFromClient"
            }
          ],
          "lang": "en"
        }'
Donor also needs to enrich any new applicant profiles with personal identifiers moving forward, while the recipient needs to make sure applicant personal identifiers are passed through to Sumsub when SDK is initialised.
Both donor and recipient can do this by simply passing through a personal identifier when the SDK is initialised. To do so, they can generate an access token with the personal identifier.
Example of such a request:
curl --request POST \
     --url https://api.sumsub.com/resources/accessTokens/sdk \
     --header 'content-type: application/json' \
     --data '
            {
              "applicantIdentifiers": {
                "email": "[email protected]",
                "phone": "555-1111"
              },
              "ttlInSecs": 600,
              "userId": "johndoeID",
              "levelName": "basic-kyc-level"
            }
      '
You can also do this by pre-creating an applicant with the personal identifiers, and then initialising SDK for them.
Once this is complete, whenever an applicant needs to verify with the recipient company, Sumsub will automatically identify if an applicant has verified previously with any data-sharing partners by matching the personal identifier.
NoteWe support reuse of identity documents, PoA documents, liveness data, questionnaires, applicant data, and email and phone confirmation steps.
Enable Reusable KYC for SDK
Reusable KYC via SDK only works on WebSDK 2.0. To migrate from WebSDK 1.0 to WebSDK 2.0, follow the instructions given in this article.
The following is a sequence of steps to be taken to turn on the data-sharing functionality.
Step 1: Sign contract
Contact our support team at [email protected] so that the donor and recipient can sign a one-time contract to use the service. You will not have to sign any additional documents.
NoteSelf-service clients do not need to sign any contracts or additional agreements. To start using Reusable KYC, self-service clients only need to connect as partners, either as a donor or a recipient.
Step 2: Add sharing partners
Once the service is enabled, you can add sharing partners directly in the Dashboard. For more instructions, see this article.
Step 3: Use personal identifier
Implement a personal identifier based implementation as described above.
How to test Reusable KYC via SDK in Sandbox
You can test Reusable KYC via SDK in Sandbox mode without the need to create a new level. Switch to the Sandbox as described here and use your existing level.
Before sharing agreements are set up, you can test sharing using Reusable KYC within the same key, which means your client key is both the donor and recipient.
Step 1: Create applicant
Create an applicant in Sandbox in your chosen level. Make sure the applicant is approved, has reusable documents, and meets the requirements of level you want to test with.
Add a personal identifiers to the applicant. This can be done directly in the applicant profile.
Step 2: Add Reusable KYC preset
Add Sandbox testing preset with Reusable KYC option:
- Switch to Sandbox mode and go to a level.
- Go to Sandbox mode for verification testing.
- Select preset. You can either modify an existing preset or create a new one by clicking Edit.
- Tick the checkbox Enable Reusable KYC. Make sure this preset is applied to the level you want to test.
Step 3: Initiate SDK
Initiate the SDK with the applicant personal identifier added in Step 1 using one of the following methods.
- Initialise the SDK by including the personal identifier as part of the access token as described here.
- In the Dashboard, open Integrations and select the level of interest. In the top menu, click Verification links, go to the Permalinks, and select Additional link options. In the Email or Phone field, enter the personal identifier from Step 1.
You should now see the Reusable KYC flow.
AttentionThe flow will still only start if the applicant matching the personal identifiers is approved, has enough documents to meet the requirements for the level, and the level has Liveness in it.
Reuse of applicant data
Sumsub supports reuse of applicant data. When reuse is applied, we copy and reuse any applicant fields that match between the donor applicant and the recipient’s provided level.
Note
- Only fields supported by the provided level are reused.
- Custom fields are not copied or reused.
Reuse of email and phone confirmation steps
If the donor applicant has already confirmed an email address and/or phone number during a level (via level steps), and the recipient’s provided level includes the same email/phone confirmation steps, we reuse the donor’s confirmation results.
Recipient applicant will appear with confirmed email and/or phone without requiring the end user to complete OTP verification again. It works as follows:
- The system pre-fills the email/phone value from the donor applicant.
- The OTP step is skipped as we reuse the confirmation from the donor.
Note that applicants cannot edit the email or phone value once it has been copied.
AttentionThe email/phone value is copied from the donor applicant to the recipient applicant even if the recipient level does not include email and phone confirmation steps.
Reuse of questionnaires
Reusable KYC via API supports reuse of questionnaires. The system reuses individual question responses when the donor and recipient questionnaires match on structure and answer options.
To reuse a question response, all of the following must match:
- Question and section IDs. The question ID and section ID on the donor questionnaire must exactly match the question ID and section ID on the recipient questionnaire.
- Response value. The response value from the donor applicant must exactly match one of the response options configured for the same question ID on the recipient side.
When these conditions are met, the system copies the donor’s response to the corresponding question in the recipient questionnaire. If the system can copy responses for all required questions in a questionnaire, it treats that questionnaire as completed.
NoteThe questionnaire step only gets the Approved status when the applicant itself reaches the approved state.
To make sure the donor and recipient questionnaires match, we recommend using the Export and Import questionnaire functionality available in the Dashboard.
The following steps describe how to align the questionnaires on the donor side:
- In the Dashboard, open Integrations and go to the Questionnaires section.
- Find the questionnaire that you want to reuse.
- Open the actions menu on the right and click Export.
- Save the exported questionnaire data by clicking the Copy to clipboard button in the pop-up window.
- Send the export to the recipient.
The following steps describe how to align the questionnaires on the recipient side:
- In the Dashboard open Integrations and go to the Questionnaires section.
- Click Import questionnaire.
- Paste the questionnaire data you received previously and click the Create questionnaire button.
- Add the imported questionnaire to the relevant verification level. For more instructions, see this article.
Once these steps are completed, the donor and recipient questionnaires will contain the same data.
Reusable KYC via SDK with Workflow Builder
Reusable KYC via SDK supports document and data reuse across all verification levels of a Workflow Builder flow, not just the initial level. This includes documents such as proof of identity, proof of address, and liveness checks, as well as applicant data, email, phone number, and questionnaire data.
As an applicant moves through the workflow, the system re-runs the reuse logic at each level and reuses all relevant documents and data for the specific stage.
NoteThe donor selected for the first workflow level remains the same throughout the entire workflow. The system does not switch to a different donor in the middle of the workflow. Donor selection prioritizes applicants with the most documents over the most recently verified applicants.
The applicant can proceed to the next workflow level only after they successfully pass the current level and all required data matches correctly.
Automated reuse processing expires 60 minutes after applicant creation. If the applicant does not move through all workflow levels within this period, the system stops applying reuse logic automatically to the remaining levels. The applicant can then continue with the general KYC flow.
ImportantFor Reusable KYC via SDK, if the initial workflow level does not require the generic agreement but a later level does:
- Reusable KYC will be disabled.
- The applicant will have to accept the generic agreement manually.
Trigger Reusable KYC in Workflow Builder
To activate reuse in a Workflow Builder:
- Set up a verification level.
- Build a workflow using these levels in Workflow Builder.
- Generate a permalink for the first workflow level.
- Include a personal identifier (phone or email) in the permalink.
- Send the permalink to the applicant.
- Ask the applicant to start verification through this permalink.
- Once the applicant is approved at the first level, the workflow automatically moves them to the next level and attempts to run Reusable KYC again. This repeats for each subsequent level in the workflow
The system activates reuse only when the applicant starts the first workflow level through a permalink with a personal identifier. If you launch the workflow directly from the Dashboard, the system does not activate reuse.
Updated 23 days ago