
Protect e-commerce and loyalty program sign-ups from fraud
Implement a verification flow to defend your platform against bots and fake accounts.
As digital technology grows rapidly, it sometimes becomes a real weapon in the hands of dishonest users or entire organized illegal schemes. Many online e-commerce platforms are now a perfect target for various fraudster attacks:
- Bot sign-ups.
- Fake accounts created for coupon or loyalty fraud.
- Promo abuse via disposable identities.
- Account farming using emulators, cloned apps, and anti-detect browsers.
At Sumsub, we care about safety and transparency within the digital business environment and suggest implementing a powerful adaptive flow that will eliminate fraud at an early stage, while staying effortless for genuine users. Combine our solutions via Workflow Builder to create the sign-up flow:
- Fraud prevention. Include various checks to collect and verify essential data at sign up:
- Digital footprint checks for contact data (email and phone) validation and online presence assessment.
- Device intelligence for device behavior analysis.
- Advanced IP check for estimating all risks and patterns associated with the user IP address.
- Identity verification. Add documentary checks and include Liveness to resolve risky corner cases that require complete user verification.
Create sign-up verification flow
Combine the checks into the sign-up scenario built around safety: to catch bots and fake accounts early, without adding friction for legitimate users.
Step. 1 Create verification levels
The current scenario requires two separate verification levels, each covering a specific stage of the journey:
- Initial sign-up verification level for collecting and validating contact data, and running the Fraud prevention checks listed above.
- Identity verification level for performing user verification with an identity document and selfie when suspicious patterns are detected.
Add the initial sign-up verification level:
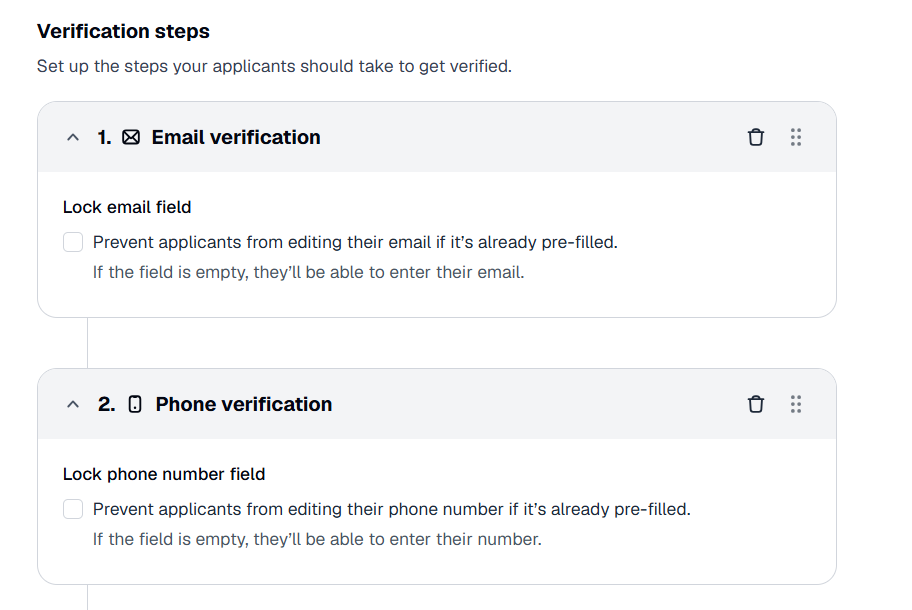
- Create the verification level that includes both the Email verification and Phone verification steps.
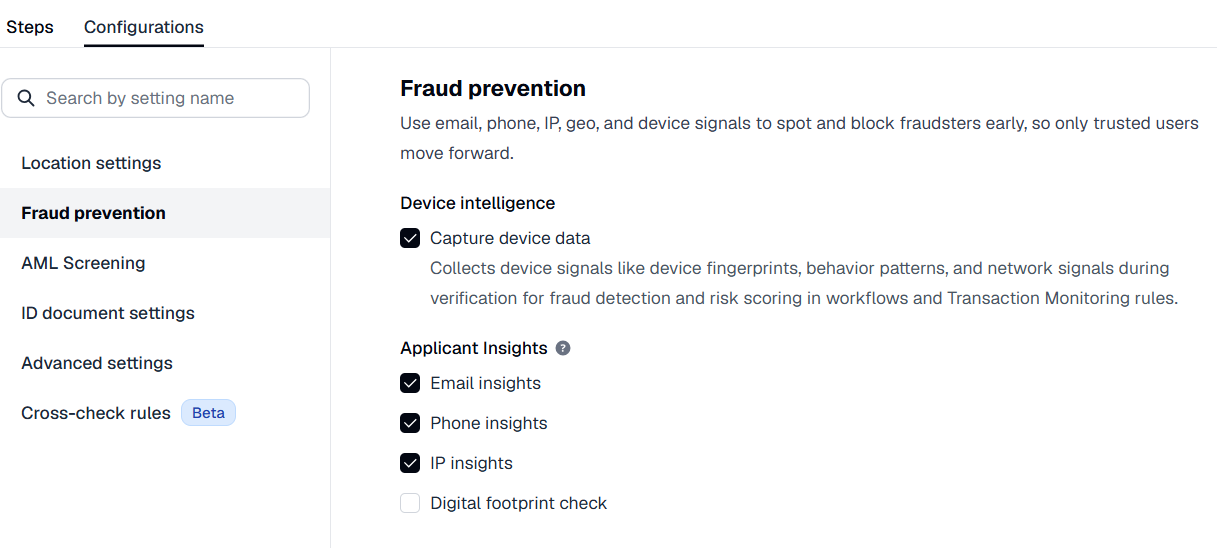
- Configure the Fraud prevention checks in the level:
- Go to the Configurations tab.
- Enable the following checkboxes: Email insights, Phone insights, IP insights, and Capture device data.
- Set up the rest of the level settings as required.
NoteThe verification steps should be placed in the exact order described above. Otherwise, level creation is blocked.
Add the identity verification level:
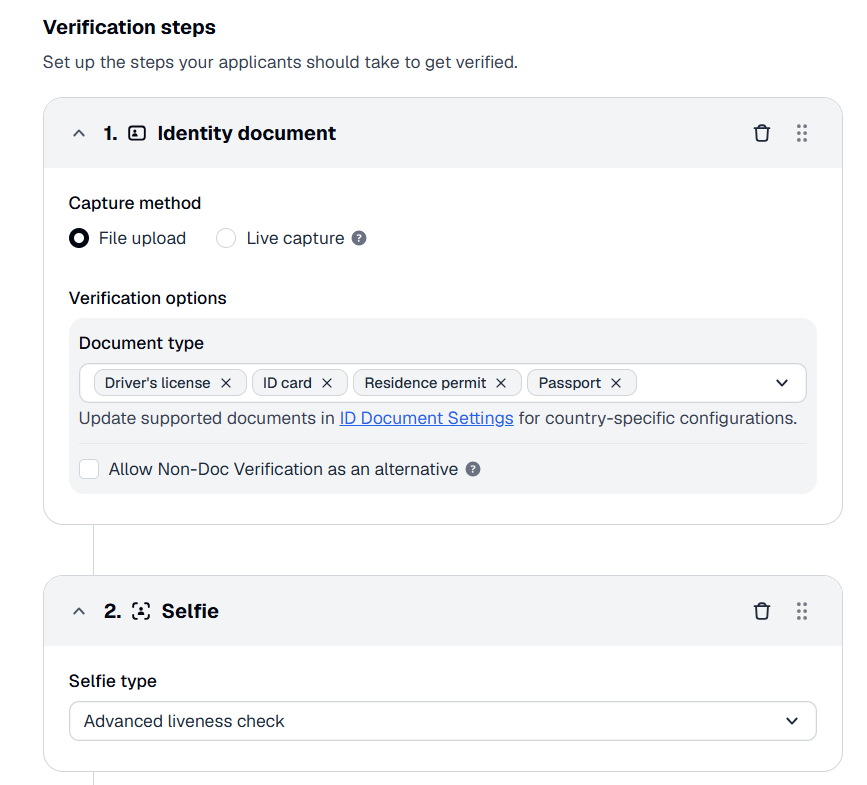
- Create the verification level that includes both the Identity document and Selfie steps.
- In the Identity document step, set any suitable document types.
- In the Selfie step, select the Advanced liveness check option.
- Configure the rest of the level settings as required.
Step 2. Add initial node to collect and assess contact data
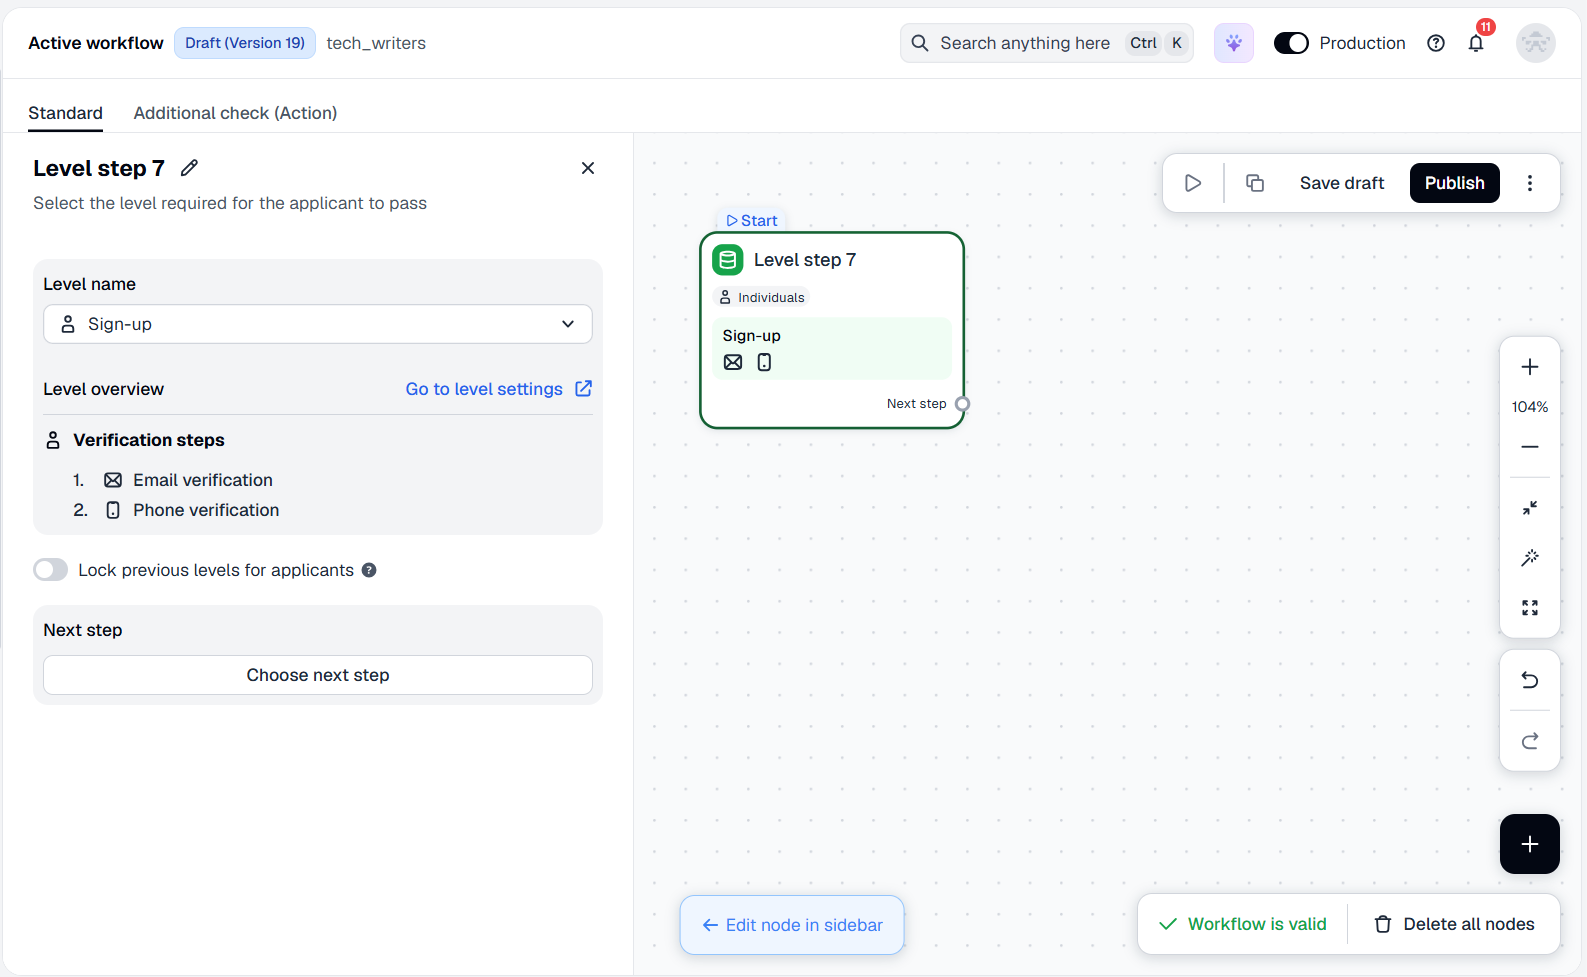
Go to Workflow Builder to place the level node, which launches the verification flow. To add the Level step node:
- In the Dashboard, go to Workflow builder and select Active workflow.
- Navigate to the Standard tab and go to the Draft view.
- Add Level step to the canvas and attach the initial sign-up verification level by selecting it from the list.
Step 3. Send suspicious users for identity verification
Adjust the verification flow so applicants showing some questionable signs are required to pass identity verification.
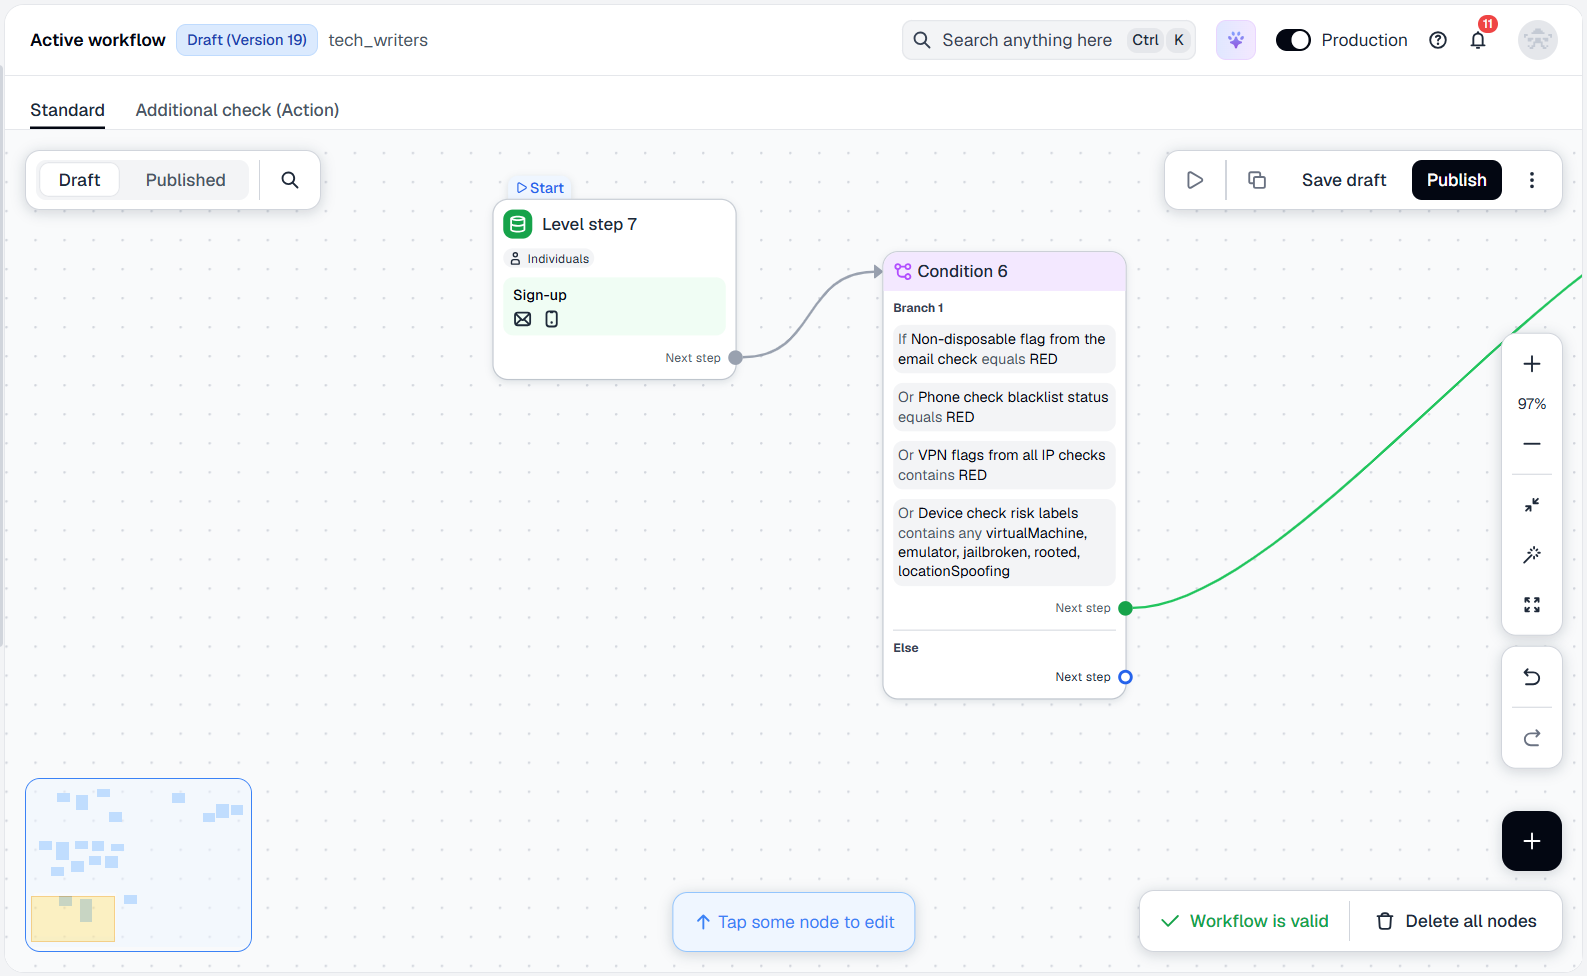
Set up the conditions:
- Click on the initial node created earlier and select Condition as the next step.
- Select the If logical operator.
- From the Field drop-down list, select the
checks.email.nonDisposableparameter. - Set the logical condition to equals and specify
REDas the value below. - Within the same branch, add more conditions for other checks and their fields:
- Click Or group and configure the conditions:
- From the Field drop-down list, select the
checks.phone.blacklistedparameter. - Set the logical condition to equals and specify
REDas the value below.
- From the Field drop-down list, select the
- Click Or group and configure the conditions:
- From the Field drop-down list, select the
checks.all.ip.vpnsparameter. - Set the logical condition to contains and specify
REDas the value below.
- From the Field drop-down list, select the
- Click Or group and configure the conditions:
- From the Field drop-down list, select the
applicant.riskLabels.deviceCheckparameter. - Set the logical condition to contains any and select the following values:
virtualMachine,emulator,jailbroken,rooted, andlocationSpoofing.
- From the Field drop-down list, select the
- Click Or group and configure the conditions:
NoteIf you plan different outcomes for some conditions, add another branch instead of using Or groups.
Configure the identity verification path:
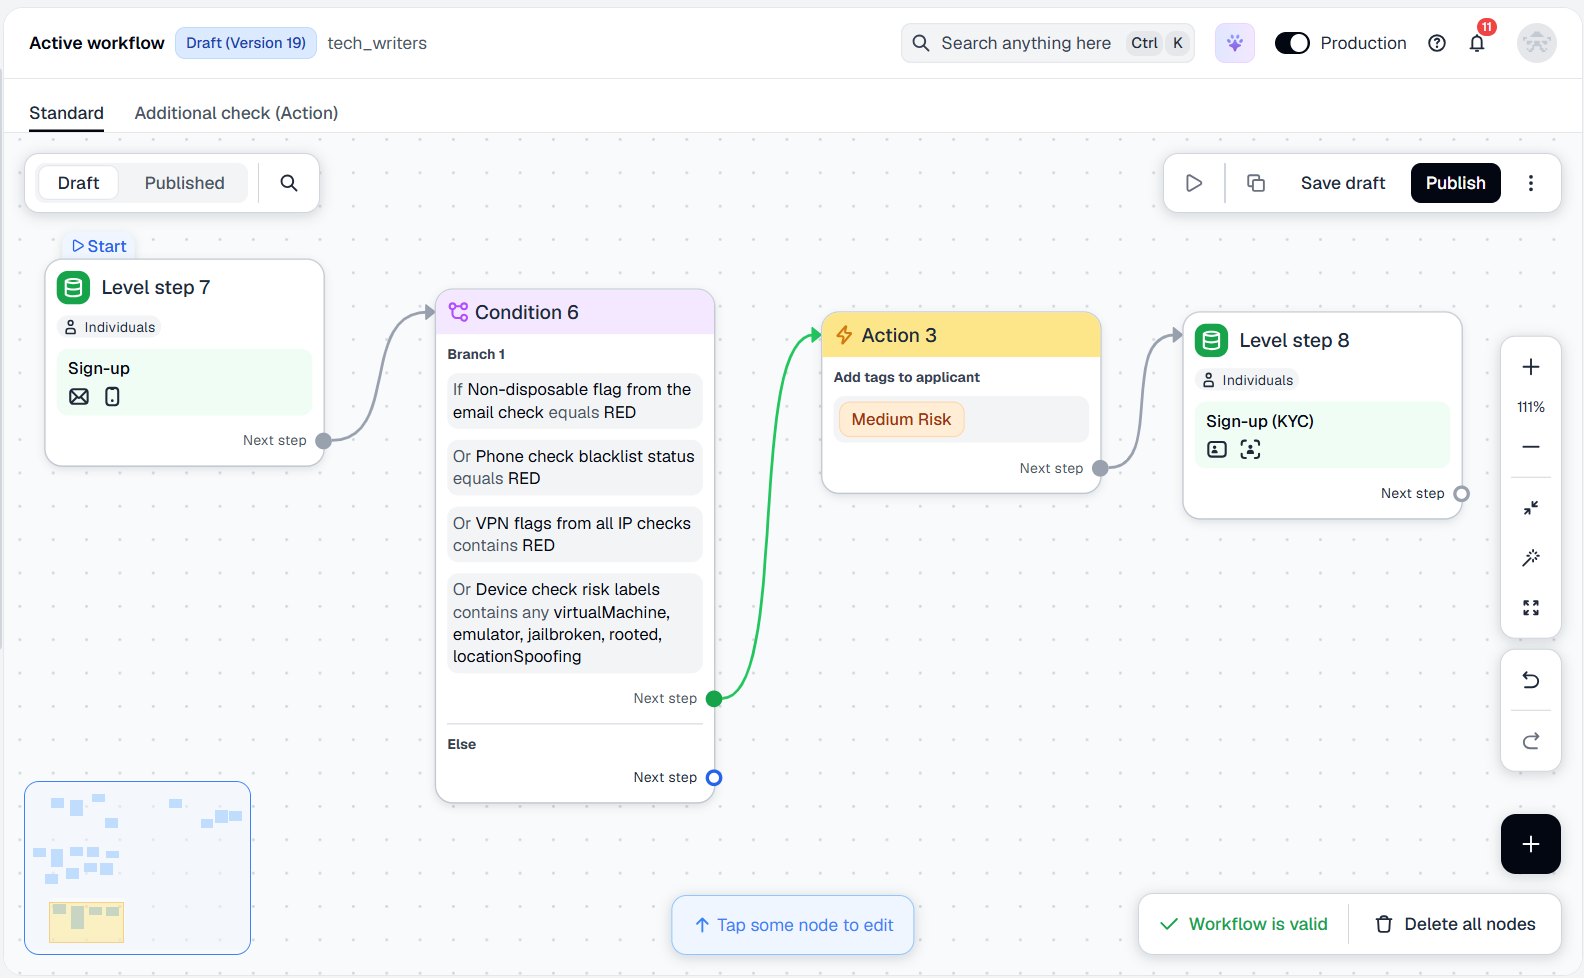
- Within the added Condition node, select Action as the next step.
- Select the type of action: Manage tags.
- Select the Add tags checkbox.
- From the drop-down list below, choose the required tags to assign.
- Click Choose next step and add the Level step node.
- Within the added Level step node, select the identity verification level.
Step 4. Set up fraudster rejection
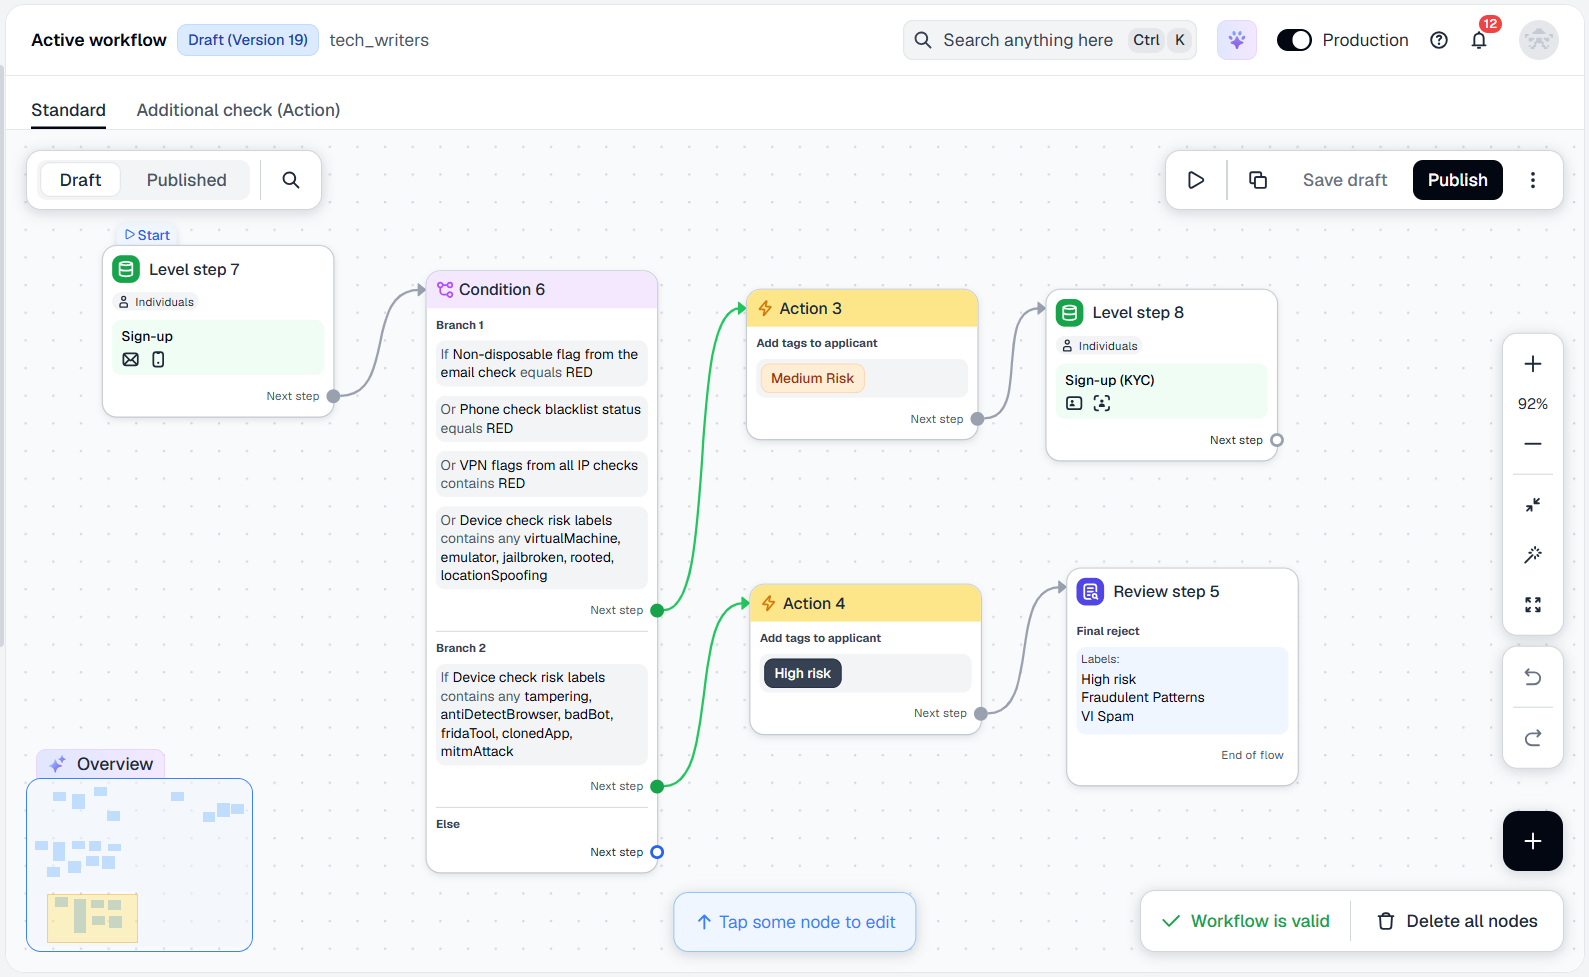
Add nodes to reject applicants whose device behavior genuinely indicates a high-risk user. Configure the rejection path:
- Within the Condition node, add and adjust another condition branch:
- Click Add new branch and select the If logical operator.
- From the Field drop-down list, select the
applicant.riskLabels.deviceCheckparameter. - Set the logical condition to contains any and select the following values:
tampering,antiDetectBrowser,badBot,fridaTool,clonedApp, andmitmAttack.
- Click Choose next step and select Action.
- Configure the Action node:
- Select the type of action: Manage tags.
- Select the Add tags checkbox.
- From the drop-down list below, choose the required tags to assign.
- Within the Action node, click Choose next step and select Review step.
- In the Review step configuration, identify the type of terminal step: select Final reject.
- Specify reasons or add labels to explain the decision.
Step 5. Start using flow
Once the flow is created and configured, you can save the draft, perform test verification, and publish the flow to run the checks:
- Save the draft and experiment with your flow — create copies and conduct tests.
- Publish the flow to go live once the flow configuration is tested.
Step 6. Receive verification results
Get verification results via the webhooks or view them in applicant profiles.
The configured flow kicks in only when the findings signal danger and takes the appropriate action, while genuine sign-ups remain completely unnoticed.
Looking to explore fraud prevention solutions beyond this workflow? Get in touch with our team to discuss your platform's needs.
Updated 27 days ago