Respond to incoming transfer requests
Learn how to review, confirm, or reject a Travel Rule request before the originating VASP submits the blockchain transaction.
Use this flow when another VASP initiates a Travel Rule data exchange for a wallet controlled by your user and the following is true:
- Blockchain transaction has not been submitted yet.
- You need to confirm wallet ownership and provide beneficiary data for Travel Rule validation.
In this scenario, your organization acts as the beneficiary VASP.
Depending on the type of the originating VASP, you could receive an outgoing transfer request from different protocols:
- Sumsub protocol — our own Travel Rule protocol that allows us to process data and confirm data exchange when the originating VASP also belongs to the Sumsub Travel Rule ecosystem.
- External protocols — Sumsub uses an external protocol when you receive a transfer request from the VASP that is not part of the Sumsub Travel Rule ecosystem.
Tip
- If your VASP is initiating the transfer, use Before withdrawal: Initiate outbound data exchange flow.
- If the blockchain deposit has already been received and no Travel Rule data exchange exists, use After deposit: Create incoming data exchange flow.
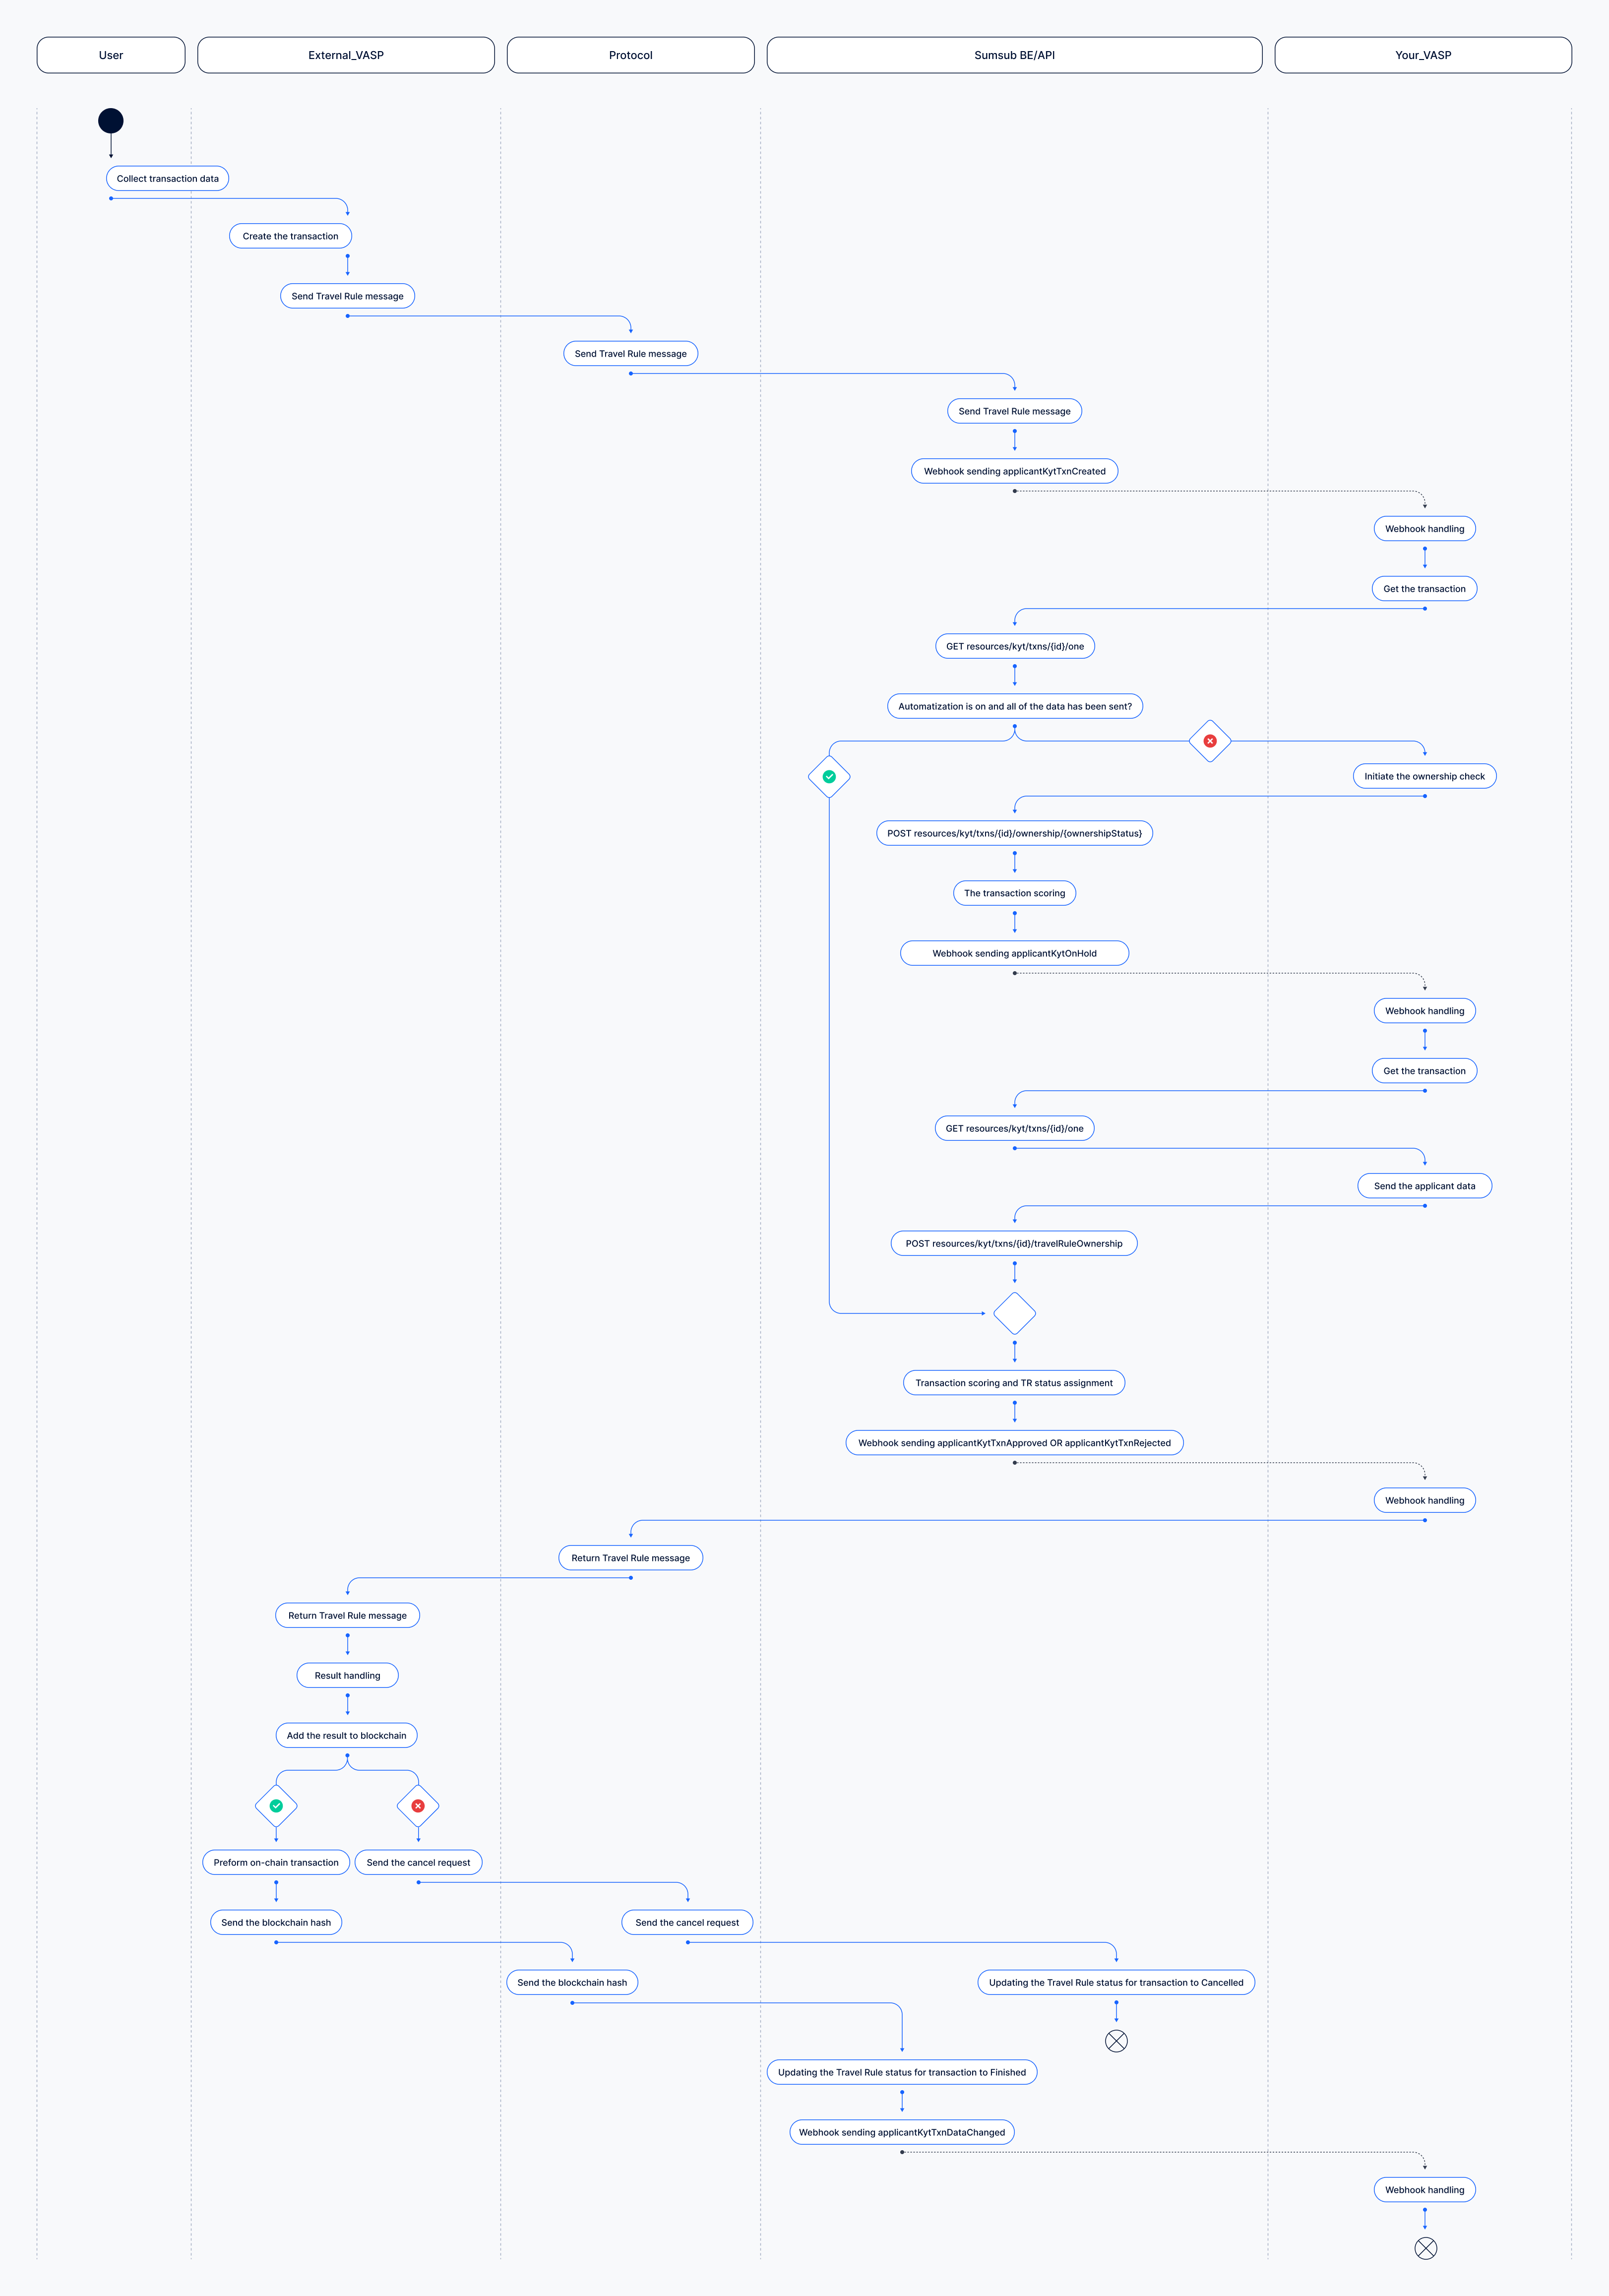
How processing of incoming transfer request works
The process of managing incoming transfer requests includes the following steps:
- Once you receive an outgoing transfer request on behalf of the user, it will appear in the Transactions and Travel rule -> Transactions. Here you can also track the data transfer status.
- At this stage, your data exchange transaction will get the
notScoredstatus. - Sumsub asks you for confirmation of the data exchange transaction details. As a beneficiary VASP, you need to confirm that the wallet address to which the Travel Rule data exchange transaction is addressed belongs to you.
- Once you confirm the ownership of the wallet address and view the data exchange transaction details, you have to review or provide the beneficiary data stored by your organization.
- After you have provided the beneficiary data, Sumsub conducts data cross-validation required by the Travel Rule regulations to ensure that the assets are being sent to the intended beneficiary. You can choose fields for this check in Travel Rule settings.
- Request can be approved, rejected, or declined.
- If your VASP has confirmed the provided beneficiary data, the originator VASP can now proceed and send the transaction to the blockchain.
- Once the transaction is sent, the originating VASP needs to update the blockchain ID to finish the Travel Rule process. After that Travel Rule status will be changed to
finished.
AttentionIn case of external protocols, in Step 3: Confirm wallet address ownership and Step 4: Enrich inbound data exchange transaction, you will only need to perform the instructions given in the Automation tips to proceed with the data transfer.
These settings are optional for the Sumsub protocol, but required for the external protocols.
Confirm incoming transfer request
The following is a sequence of steps to be taken to manage an incoming transfer request.
Step 1: Set up webhooks
Configure the webhooks used to process inbound Travel Rule requests. The main events in this flow are:
- applicantKytTxnCreated
- applicantKytTxnApproved
- applicantKytTxnRejected
- applicantKytOnHold
- applicantKytTxnDataChanged
To receive webhooks to your backend, you have to configure it in the Dashboard. For more instructions, see this article.
Step 2: Generate app token
You need to generate an app token to sign your API calls. For more information on how to generate a token, refer to this article.
Step 3: Confirm wallet address ownership
When you receive an outgoing transfer request, you may need to confirm wallet ownership before accessing the PII fields.
To do this, subscribe to the applicantKytTxnCreated webhook event.
After receiving the event, retrieve the transaction via this API method and check the needMasking field:
- If its value is
true, you must confirm or reject wallet ownership before you can access the data in the request. - If its value is
false, continue to beneficiary data confirmation.
If the destination wallet belongs to your organization, confirm ownership.
If the wallet does not belong to your organization:
- Reject ownership.
- Do not proceed with beneficiary data confirmation.
- Treat the request as declined.
To confirm or reject the wallet address ownership, use this API method.
Request example:
curl -X POST \
  'https://api.sumsub.com/resources/kyt/txns/66cd891eefa135789ce5264f/ownership/confirmed'
curl -X POST \
'https://api.sumsub.com/resources/kyt/txns/66cd891eefa135789ce5264f/ownership/unconfirmed'Even after you confirm ownership,
travelRuleInfo.statuscan still remainonHold. To complete the confirmation flow, you may still need to enrich the transaction with the required Travel Rule data.
AutomationTo enable automated wallet-ownership confirmation:
- Import your wallet addresses into the Wallet Address Book.
- In the Dashboard, navigate to the Transactions and travel rule section and open Travel Rule settings.
- In the Automated Wallet Ownership and Applicant Data Confirmation field, select either Automated validation or Simplified validation.
This setting is optional for the Sumsub protocol, but required for the external protocols.
If automation is enabled and all required ownership and applicant data is already available, the flow may skip the manual confirmation steps and proceed directly to scoring and outcome assignment.
Step 4: Provide beneficiary data
After wallet ownership is confirmed, check whether beneficiary data confirmation is required. Retrieve the transaction and inspect travelRuleInfo.needApplicantOwnershipConfirmation field:
- If its value is
true, you must confirm or provide beneficiary data. - If its value is
false, the transaction can continue without manual enrichment at this step.
You can complete this step in one of the following ways.
Existing applicant profile
If the beneficiary already has an existing applicant profile, you can assign the data exchange transaction to the applicant. All required data will be automatically extracted from the applicant profile. To do so, use this API method:
curl -X POST \
     'https://api.sumsub.com/resources/kyt/txns/test_txn_id/travelRuleOwnership' \
     -H 'content-type: application/json' \
     -d '{ "applicantId": "67a0ec0b9aa095000000000f" }'
NoteYou may also encounter a case where an applicant has already been found based on the data provided in the transaction, and you simply need to confirm this applicant in the same way.
Non-existent applicant profile
If the beneficiary does not have an applicant profile, you must enrich the Travel Rule data exchange transaction using this API method as the following example demonstrates:
curl -X POST \
     'https://api.sumsub.com/resources/kyt/txns/test_txn_id/travelRuleOwnership' \
     -H 'content-type: application/json' \
     -d '{
            "applicantParticipant": {
              "fullName": "John Doe",
              "externalUserId": "external_user_id",
              "type": "individual"
            }
         }'
AutomationTo automate data enrichment for deposit transactions:
- Import payment methods to applicants using this API method.
Request example:curl -X POST 'https://api.sumsub.com/resources/applicants/6756c06e40c2f83feed050ef/payments' -H 'content-type: application/json' -d '{ "externalId": "id_from_your_system", "data": { "type": "cryptoWallet", "cryptoChain": "XRP", "currencyCode": "USDT", "accountIdentifier": "rHb9CJAWyB4rj91VRWn96DkukG4bwdtyTh", "memo": "12345678" }, "institutionInfo": { "issuer": { "type": "license" } } }'- In the Dashboard, navigate to the Transactions and travel rule section and open Travel Rule settings.
- In the Automated Wallet Ownership and Applicant Data Confirmation field, select Automated validation.
This setting is optional for the Sumsub protocol, but required for the external protocols.
Step 5: Data exchange status update
If the request is approved, the Travel Rule data exchange gets the completed status and the originating VASP can submit the blockchain transaction.
Once the blockchain transaction ID is added to the Travel Rule record, the transaction moves to finished.
Your VASP will be notified about the closing update with applicantKytTxnDataChanged webhook:
{
  "applicantId": "6447b564728bf40939a7664f",
  "applicantType": "individual",
  "correlationId": "fb36d7a2f2e1ac15773ec9a56f999dde",
  "sandboxMode": false,
  "externalUserId": "customExternalUserId",
  "type": "applicantKytTxnDataChanged",
  "reviewResult": {
    "reviewAnswer": "GREEN"
  },
  "reviewStatus": "completed",
  "createdAt": "2024-01-24 07:38:34+0000",
  "createdAtMs": "2024-01-24 07:38:34.994",
  "clientId": "coolClientId",
  "kytTxnId": "6576e772b2f80732714d1de0",
  "kytDataTxnId": "m26m980m9jd7pozq72se4",
  "kytTxnType": "travelRule"
}
If the originating VASP decides not to continue after receiving the Travel Rule result, they may send a cancel request instead of broadcasting the blockchain transaction. In that case, the Travel Rule transaction is closed as
cancelled.
Updated 2 months ago